CLASSIC CARS
A lot of folks, of all ages, admire classic cars, whether they are shown as originals or as customs. It's much more than just taking pictures of cars--that can be boring. For me it's about capturing the car's essence, its character, it's uniqueness; its "trademark." style.
Lens choice and perspective are two key factors I use for this type of subject. Exposure is also critical, as many of the cars are in broad daylight and are extremely reflective. So, be careful with that challenge. You might have to over-expose a lot of your images in camera.
So let's take a look at some of these works of art, starting with this beauty.
I took a totally unconventional angle of this 1957 Buick in order to emphasize the design of the curves and circles. The focus is on the vehicle's design rather than the car itself.

In order to isolate this 1953 Chevy from its busy surroundings, I got in close with a 17 mm lens and shot it vertically to further isolate it. I overexposed it by a +1 stop to keep it from going too dark.

For this 1951 Pontiac, I closed in on nothing but its hood ornament. Although I liked the original image, I found the ornament's design (shapes and curves) so interesting that I converted it to an art piece by using a photo editing application called "Glowing Edges." I used a close-focusing zoom lens set at 250 mm in order to extract the hood ornament from the confusing and distracting space around it.

When I photograph the whole car I like to take a unique perspective. For this beautiful '57 Chevy Bel Air I got close to the fin, got a corner perspective and, with a 10 mm lens, was able to emphasize it's trademark fin. In order to keep the black dark I under-exposed it by a -2/3 of a stop.

Another way to isolate a classic vehicle from its environs is to convert everything but the car to B&W. That is what I did with my nephew's awesome customized 1939 Ford. It really made his car "pop." In case you're new to this, it's a simple photo editing process. First, you "select" the car carefully. What I do after I select it, I enlarge the image really huge so I can double check my selection, making sure I didn't cut off parts of the car and that I covered all of the background carefully. When I'm satisfied with my Selection, I then convert the background to B&w and make adjustments to it until I am pleased with the blacks, grays, and whites. The result is something like this.

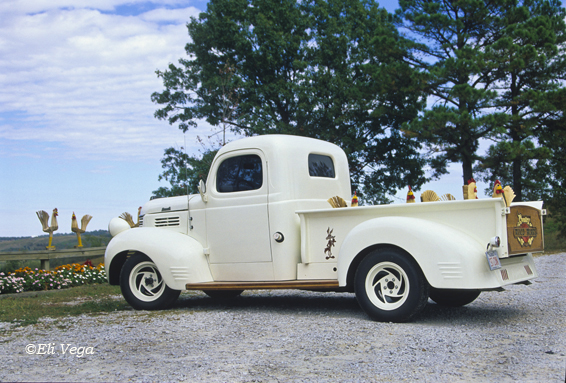
Sometimes it's just the color of the car that will make it "jump out" from the others. A good example is this white Ford pickup. I over-exposed this scene by 1-stop to keep it from going gray.

I found this beauty as I drove by Pindall, Arkansas. My composition was there for the taking. The owner ran a nearby woodworking shop and gift shop and had some of his carved chickens and roosters in the pickup bed, I guess ready for delivery. Whatever the reason, they added to my composition!
I saved this last example for those of you who like to have fun with photo editing software. I photographed this elongated Caddy, then converted the background using an application called "Glowing Edges," like one of the images above, except on this one I just applied it to the background.

In summary, for me it's much more than just taking pictures of cool cars. I consider the colors, shapes, the surroundings, any issues I might have with exposure, the backgrounds, and any unique characteristics of the car before I go "click." After the fact, I might decide to do something a little extra, to take it beyond a photograph--just for fun.
Nicely written & very informative, we provide best Brentwood limousines in USA
ReplyDelete