Tuesday, December 19, 2017

SILHOUETTES

I have always enjoyed silhouettes in photography. The greatest challenge is knowing how to spell the word!!

Composition is the first key component for good silhouettes, as with any photograph. In addition to composition, there are three ingredients for successful silhouettes.

1) The subject--it has to describe itself, even with missing details.
2) Lighting--It has to be dynamic, to compensate for the lack of details throughout the 
    image. I prefer early morning or late afternoon/evening.
3) Exposure--usually, depending on the time of day and where I aim my camera, the built-in 
    light meter usually gives me what I want. I take advantage of what it was designed to do. 
    However, there are times when I need to tell it what I want it to do, usually underexposing 
    the scene from a -1 to a -2, or more!

With that short introduction, let me now share some examples. 


I'll start with the great American Indian Exposition held every August in Anadarko, Oklahoma. I've always had a lot of fun at that event. One particular year, I photographed several colorful tepees during the day. Applying the concept of un-labeling, which I talk about in my new book RIGHT BRAIN PHOTOGRAPHY, I noticed the shapes and designs of the tepees and thought they might look good at sunset.


I was at the east Texas lake of Lake O' The Pines. I went there right before sunset, hoping to see a good subject to photograph at sunset. I had nothing in mind. I went there with an open mind and ready for anything. Lucky me. 

This guy was not going to stop fishing until there was no daylight left.After he was done and the sun had gone completely behind the horizon, he drove his pick-up truck up to where I was and asked me, "Did you get some good pictures?"


I got up extremely early one morning and headed down two-lane county roads, surrounded by farms and ranches southeast of the big city of Dallas, Texas. I love the photographic surprises I often get at that time of day. This particular morning, I stopped to check out an old barn. As I walked toward the barn, I saw another surprise! It wasn't the kind of subject I like in real life, but, photographically, I liked all the shapes, designs, geometry and play on light. I got as close as I comfortably wanted to on the spider and chose a very shallow depth of field, like maybe f/4, which turned the background into a world of surrealism.   


In many respects, Dallas and Fort Worth, though hardly distinguishable nowadays as two separate cities, are miles apart. One early morning, I walked along a dry river bed, hoping to get a good early morning glimpse of the Fort Worth skyline. I turned back to see if there was anything behind me that might be interesting. This turned out to be my "keeper" for the day!
I knew that by aiming my camera toward the sun, the trees would lose all detail. I used an FLD filter and overexposed slightly to keep the scene from going too dark. 


Okay, so we're still in Fort Worth, Texas. For weeks, I saw a freeway expansion project underway. The more I looked at it, I started seeing it through my imagination, and not just what my eyes could see. My imagination saw early morning vibrant colors, silhouettes, shapes, form, etc. With that in my mind, I got up early one morning to replicate what my imagination saw. All the elements came together for me that morning. All I had to do was wait until the workers arrived. They climbed up the scaffolding, then started walking on top of all the construction. When one of the guys got down to inspect something, "click." 


I was at this river, which separates Texas and Oklahoma, just before sunrise. Before the sun broke the horizon, I saw this scene unfolding. I had to work fast to get what I wanted, before the sun came up. I underexposed the scene. As a result, the remains of an old fishing pier created a surreal yet spiritual feel. The reflection of one particular piece of the fishing pier skeleton looks like a cross in the water, surrounded by other mysterious floating shapes.


If you haven't already done silhouettes, I hope I have given you enough examples for you to get an idea of the variations you can create. If you don't like getting up early in the morning, then go out right before sunset, at sunset, and just after sunset. Scout around your area during the day and ask yourself, "Hmmm? I wonder what that might look like at sunset?"

Have fun with it! Contact me if you would like a 1-on-1 or small group lesson some early morning.....or late evening.     


Tuesday, November 14, 2017

ENVIRONMENTAL PORTRAITS

My tip for this month has to do with what you do, or can do, with environmental portraits without the use of off-camera flash, umbrellas, and reflectors. Obviously, there are times when you need to use those portraiture tools. I'm not saying don't use them; I'm just saying that you can also do a good job without them.

It begins with my choice of setting. I like to photograph people in the outdoors, thus the term "environmental portraits." Since I don't have the degree of controls that are more readily available in a studio setting, I set strict requirements for myself. 

The most important requirement is lighting. If I am going to do a photo session, I will choose either an overcast day, if possible, or do the session in late afternoon when the natural lighting is less harsh and doesn't create unwanted shadows on faces, chins, necks, etc. Additionally, colors "pop" under those conditions, while keeping flesh tones acceptably natural. Getting correct exposures is virtually effortless!

I also like to vary my model's poses. I don't want them all to look, well, posed in the traditional, "Look at the camera and say cheese." Related to this, I don't like for my models to look overly staged. I want them to look like themselves, comfortable, casual, relaxed. I let them decide what they want to wear. The end result should be about them, not about how well I can photograph them--although that is my job. I want it to be about them. 

Composition also becomes a key consideration for me. Yes, I will get those subject-in-center shots, but, again, I like to vary my shots and sometimes include the model as part of the environment he/she is in.  

Now, how about the left brain technical stuff? First, I don't want to do a lot of color retouching on possibly 30-50 images of the same person! This is one reason I prefer to shoot in TIFF mode. I don't follow the on-line pros & cons; I follow the end results. F/stops are important too. I don't ask which f/stop I should use; I ask, "What do I want it to look like?" I always let my purpose, goal, and intent to determine my f/stop. The shutter speed's primary role is to minimize hand movement when shooting without a tripod. In most cases, the model will not be moving, but my hand might. So I need to keep my eye on that shutter speed. My "rule of thumb," to minimize hand movement is: My shutter speed should be equal to or greater than the focal length I have my lens set on. For example, with a focal length of 70mm, my shutter speed should be close to 70, preferably faster. A VR lens  (Vibration Reduction) can also help in those situations.

Exposure. Ah yes, exposure. If my composition is good, my depth of field is good, but my exposure is off, it's going to be a bad shot! I want good color, lighting, and tones throughout the image, without it looking flat. That is why I prefer to shoot under overcast skies--they serve as a natural giant diffuser and reflector. The quality of my images is such that it requires minimal fine tuning in my photo editing software, mostly light touches like some vibrance, burning, minimizing hot spots, and a little dodging on the eyes in some images to bring out more "whiteness," without overdoing it. 

I like to use my 24mm-70mm lens for those full-body, half-body, and close-ups. That range gives me that.       

So, now that I have explained what I do and why I do it this way, let's see some examples.  A couple of weeks ago a local high school senior asked me to take her senior pictures. Her name is Rebekah, and she gave me permission to showcase her. The first thing I told Rebekah was that I wanted to photograph her "out and about," on either an overcast day or late in the afternoon.

I chose an upcoming Saturday. I told her we would meet at a designated location around 3:30 pm, If it was overcast, we could meet anytime. As it turned out, when I got up that morning, it was obviously heavily overcast. I quickly contacted Rebekah and asked her if we could meet earlier. She agreed and we met at 11:00, yes, midday--horror of all horrors. Who wants to photograph people in the middle of the day, right? It's a photographic no-no to do so, unless.....it's an overcast day. 

Let's look at just a few of the 30+ images I created that day with the help of Rebekah. By the way, when she saw the results, she used the word "amazing." If the customer is happy, you've done your job! 


Let's start with a typical full-body posed image. The original old metal gate near the historic Crescent Hotel in Eureka Springs, Arkansas was a nice setting for this shot. The background, slightly blurred with an f/2.8, served as a good backdrop. Since all my focusing was going to be on Rebekah, I set my camera on Auto Focus for the entire session, to allow me to quickly assess my compositions and backgrounds without having to worry about focusing. 


Before we started the photo session, I told Rebekah that I might use some backgrounds, but that I wanted her to be the main focus. She wanted some photos around this next area, near a gazebo where her parents got married! The gazebo overlooks the Crescent Hotel.

In this case, since it was a special spot for her, I introduced the hotel as a backdrop, blurred in the background with an f/5.6. Compared to the previous image, I was close enough to her, and the background was so far away from her, I knew that f/5.6 would work.  


For this shot, I wanted to engulf Rebekah with these deep red colors. We were actually walking from one location to another when I spotted this background. The background was closer to her than the background in the image above, so I used an f/4, which softly blurred the late fall red leaves on the tree. If I had used f/11-f/16, the leaves would have "competed" with Rebekah for attention. The blurred background also gives the image a more three dimensional feel.

With careful and intentional usage of f/stops, we can convert backgrounds into backdrops. 


I added a vignette to this next image after the fact. The vignette increased the attention on Rebekah. If this had been a bright sunny day, this shot would have been extremely difficult to pull off. There would have been a lot of bright, burned-out sky in the background. 

When I do this to an image, I make sure the client also gets the original. I want them to decide which one they like best. The vignette becomes, not the final image, but an option.  


After I had spent a good 30-45 minutes with Rebekah and felt like she was getting a little more comfortable with me aiming my camera at her, I decided it was okay to try a little fun.
Before this shot, I asked, "OK. Now let's celebrate. What can we do to celebrate?" She took it from there, let her guard down and just started being herself. Click! I loved her spontaneity--I hardly finished my sentence before she started celebrating!


This was another one of her spontaneous celebratory poses. It was fun to see her loosen up and just be herself. They turned out to be some of the best shots. 

Notice the blurred background? F/2.8. 


Now, this might surprise you, but of all 30+ images I created that day, this final example is my favorite. Everything came together for this shot. The bridge served as a perfect "stage" for her. She looked so relaxed when she stood like that. The overall surroundings, perfectly exposed because of the overcast day, gave the "environmental" to an environmental portrait, not to mention the great late autumn colors throughout. It looks like a movie set.

I did not want a blurred background like in some of my other images, so for this one,
with my lens set at around 24mm, and with me several feet away, an f/6.3 did the trick. 

Did you catch those left-brain variables? 1) 24mm (more inherent depth of field),                
2) The distance of the subject from me to my subject--several feet).          


So now you know. First and foremost, pick an overcast day or shoot in late afternoon for those great effortless exposures. Vary your compositions and formats (landscape & portrait modes; verticals and horizontals). Small/wide f/stops like f/2.8-f/5.6 to convert backgrounds into backdrops. And, just be yourself. Don't be so much into yourself as a photographer. The more comfortable the rapport is between you and your subject/model, the better photos you will be able to get. Have fun!   

Thursday, October 19, 2017

SEE WITH YOUR IMAGINATION
(Not your eyes)


I talk about this in my new book, RIGHT BRAIN PHOTOGRAPHY. It is one of the hardest concepts for many photographers to grasp. There are several reasons as to why that is, but I won't get into that in this post. I will, however, talk about what that means to me and how I apply it to my photography.

I recently had a 4-hour 1-on-1 photo lesson in The Ozarks near Eureka Springs. My student was one of my most devout students from Colorado. I will use our 4-hour photo shoot as my tip this month. 

Selma and I spent our time around Lake Leatherwood, a city lake near downtown Eureka Springs, Arkansas, and nearby Blue Spring Heritage Center.

We did not have much to play with that day. The autumn colors were not to be, it was a warm bright sunny day, and just not much that jumped out at us. Herein is my tip for this month: 1) We should not limit ourselves to photographing only that which hits us between the eyes; 2) We should see with our imaginations, not our eyes. If we only see with our eyes, we will often be disappointed with what we see.

My three years as an art major taught me to create something that wasn't there. I apply that same concept to my photography, but in a different way, since I'm working with a different medium. I ask myself, not how can I photograph what my eyes see in the best way possible, but also, what can I make that look like, other than what I see with my eyes. When I "see" that in my imagination, my right brain shakes hands with my left brain and says, "I've got an idea, and this is what I need from you."

I kept telling Selma, "See with your imagination," as I pointed out certain photo opps to her. As a result, we were able to see what we didn't see. 


I'll start with a couple of images I created while walking around Lake Leatherwood. As we stood on top of the old CCC stone dam, I pointed out some reflections in the water to Selma. I told her I was going to focus on the reflections, with just a sliver of land, but I was going to show it "upside down," with the blue sky reflections as the top of the image. Here is the result of that imagination. 

If you look closely, there are two abstract water horses, and even a strange brown-looking face in the lower middle part of the image. From a left brain perspective, I underexposed the scene by a -1 2/3 to bring out the colors, which also gave me a faster shutter speed (1/640), to freeze the rippling in the water. A unique abstract just waiting for me to "see" it. 


I underexposed this scene also by -1 2/3, again, to bring out the colors in the leaves.
The water was reflecting the dark autumn-brown leaves from above, therefore making the scene dark, except for the bright green and yellow leaves. By underexposing, it keeps the darks dark, while accentuating the variance between darks and lights,

Can you see the strange face above the yellow leaf?   


Now we move on to the Blue Spring Heritage Center. We came upon this scene and I told Selma that I thought this would make a good double exposure. She asked, "What is it about any scene that makes you think it would be a good double exposure?" Good question. My answer was this: It has all the elements of a good painting--the trees on the left facing in, the gazebo, the trees on the right facing in, the reflections. You almost see a complete circle, if you follow the direction of the trees, and the reflection.

I spend an entire chapter in my book on composition. This scene, without much effort on my part, had several elements of good composition.


Let me pause here to remind us of one fact we can easily forget. Without getting too technical about it, our eyes have the incredible ability to adjust quickly between detecting detail in very dark areas and very bright areas in any scene. In fact, they do such a good job that high-contrast scenes can often look "flat," not appearing to have much contrast at all. It has to do with the eyes' rods and cones. We can look at the darkest part of a scene and our eyes quickly adjust to that; we can then look at the lightest part of that same scene and our eyes quickly adjust to that too. Our camera sensors, and film, do not have that talent--and I take advantage of that.

The above fact can fool us, which can lead us to move on, as we look for something more interesting. However, I have trained my mind (my imagination) to see what my eyes might have missed. If I see part of a scene that is receiving light and another part that isn't, I stop and let my imagination take over. What can I make this look like?

When I saw these flowers being hit by sunlight, against dark foliage in the background, I knew I could create something my eyes didn't see. The scene actually looked rather flat to my eyes, not much contrast. What I do with a scene like this is either use spot metering (meter on the brightest part of the flower, in this case), or do some extreme underexposure. I went with the latter on this one, which, in essence, can achieve the same results as spot metering, but it's quicker. I underexposed this scene by a - 2 2\3 stops to get this effect. Yes 2 and 2/3 stops--almost 300% less light than the built-in light meter thought I needed for a "correct" exposure. 

Selma kept saying throughout the day that she felt very uncomfortable going down that far on the underexposure. I kept reminding her why I ignore my histogram, and that there is no such thing as a "correct" exposure; there is only the right exposure, and we define that.

(250mm; f/9)


More reflections. We came upon a section of water at Blue Spring Heritage Center. As I had done all day, I pointed to a certain part of the water and told Selma I was going to use the floating moss and other natural elements in the water as the "top" of those trees. This is what we saw. 


I told Selma that I was going to show the image "upside down." The result was impressionism through photography. I wasn't looking at what was there; I was looking at what I could create from what I saw with my eyes. 


At the end of the lesson, Selma shared her "take-aways" from the day. She clearly understood that it isn't always what we see, but also what we don't see, that might make for an interesting image. In fact, she created some great images of her own that day. 

So, as hard it might be for you, deprogram your mind. Stop "taking pictures" the way we were taught since we were two years old. Instead, create images using your imagination. Start seeing what you don't see.

Contact me if you would like a 1-on-1 or small group lesson. Selma is one of my best testimonials.     


Tuesday, August 22, 2017

IN-CAMERA DOUBLE EXPOSURES


A lot of photographers still ask me how I create my in-camera double exposures. It's one of the techniques I use to create Impressionism through my photography. Unfortunately, not all cameras have a multiple exposure feature. However, if yours does not, you can create two separate images, following my step-by-step guidelines, then blend them with whatever photo editing software you use.

Throughout the years, I have come up with several double exposure techniques and approaches. 
For most of my double exposure creations I shoot on manual focus for more preciseness. Then, I follow these steps.

1a) I change my f/stop to a low number (wide opening), like f/4-f/5.6, then manually take the scene out of focus. 

1b) I take a test shot, making sure it's not totally out of focus, but enough out of focus to create the desired "halo" effect when I combine both images. I also test for the right exposure--it shouldn't be too bright. I prefer slightly underexposed because the sensor (or film) will be exposed to light twice during the process.

2) If I like my out-of-focus test shot, I engage my double exposure feature and set it for 2 exposures.

3) Without touching anything, I take my first shot, knowing that I know I am satisfied with Step 1b above.

4) I then take 3 key steps for my second shot: A) Increase my f/stop to f/8-f/16, depending on the scene, B) Refocus correctly on my subject, C) Underexpose the second shot by usually 2/3 of a stop! Remember, the sensor is being exposed to light twice. If you don't follow step 1b and this step, you will get an overexposed final image! 

5) I take my shot. If I don't like the results, I go back through each step and make necessary adjustments. I usually either change my degree of focus at Step 1a, under expose step 1b, and/or underexpose Step 4C.

When I follow these simple steps, I get varying results, depending on the subject. Each subject, composition, or specific lighting on the subject produces different results.See my varied results below. 

My "Heroes of The Alamo" was my first commercial double exposure in the late 1980s.
I first photographed a portion of a relief sculpture that stood about a block from The Alamo. I then superimposed it over a photo of The Alamo. I didn't adjust the exposure for the second shot because I wanted a "see-through" effect. 


The minute I saw these colorful wildflowers near Crested Butte, Colorado, I knew I had to create two renditions, including a double exposure. I followed my own guidelines, step
by step, to create this "flowers on canvas" feel to the image. Flora of any kind, I have found, are the most conducive subjects for double exposures.


I am including a wide array of examples so you can see the different effects various factors have on double exposures. In the example below, a bicycle in the snow. I converted the original to a B&W since there wasn't much color. The deep shadows were created by snow drifts close to the bicycle's back tire. 

The results of my double exposures are either an artistic water color or oil painting effect, or a dream-like effect--sometimes both in the same image.


This was created during one of my "Make The Common Uncommon" workshops. I saw a clock and I saw coins in a jar and the idea of "Time is money" came to mind. So, I started rearranging the clock, the jar, and the coins. Then I lit the scene with two flashlights, one that gave out a gray/blue light and another that gave out a yellow/gold light. After I made this arrangement, several of us took turns, spending several minutes each on creating our own renditions. 


I imagined a photo from a documentary with the title, "Bury Your Butts." The direction all the cigarette butts were facing, against the dark menacing background, was a perfect scenario for one of my surrealistic images. The ghostly halo around the cigarette butts added a sense of nightmarish endings.


I will conclude with a more pleasing example of my double exposures. I hear you saying, "Yes, please!" 

My last example is a little departure from my more traditional way of creating double exposures. The steps are basically the same, with one exception: Instead of taking the first image out of focus, I literally swirled my camera around a grouping of purple-colored flowers, then walked around until I saw a butterfly whose colors would complement the first blurred image. When I found the right butterfly, I then simply followed Step 4 above--underexposed the butterfly by 2/3 stop. And, voila!!! 


You can find more examples of my double exposures in my new book, RIGHT BRAIN PHOTOGRAPHY (Be an artist first). Contact me for your personal signed copy.

Have fun with double exposures. Do not be afraid to experiment. Allow yourself a little
imperfection--just flow with it. It's mentally and spiritually emancipating.  


www.elivega.net     vegaphotoart@gmail.com


Tuesday, July 18, 2017

BE YOUR COMPETITION'S COMPETITION


In one of the many classes I teach, I talk about being your competition's competition. 

I learned this valuable lesson when I was first learning photography: If you want to stand out, either, A) Photograph something nobody else has, or B) Photograph the same subject(s), but differently. In addition to this, I say, either do what others are not willing to do or don't do.

I'll start with this example. There is a popular natural arch in southern Utah with which thousands, if not millions, of photographers are familiar. It's called Mesa Arch, in Canyonlands. The magic of this arch is that it gives off this brilliant, surreal red/orange glow in early morning.
There are thousands of examples of this on the Internet. Just this one link alone will give you an idea.

When I want to photograph a commonly photographed subject, I do some research. When I researched Mesa Arch, I was looking, not only for what had already been done, but what had not been done. I saw many early morning, red/orange kinds of shots. I also saw one composite of the arch and the Milky Way which I thought was pretty cool. 

In 2014 I decided to do something different. I picked December as the month to go, hoping for snow-covered peaks on the La Sal mountains in the distance. My other decision was to photograph it at twilight, a few minutes after sunset, to pick up dark blues in the sky. My third decision was to do something else I had not seen: "paint" the arch.


I posted it on my Facebook page and someone commented that it looked like he was looking at the scene from inside an eyeball, comparing it to Salvador Dalí.


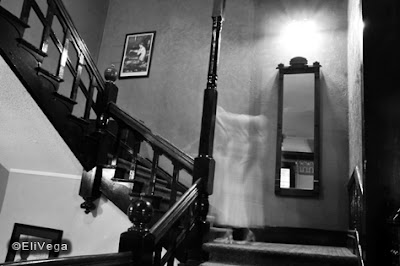
This next example is from my "Ghost of the Crescent" series. There is a beautiful and notorious Hotel in Eureka Springs, Arkansas--The Crescent Hotel. It has a reputation in some circles of being the most haunted hotel in America. 

It was that reputation that gave me an idea. I had only lived in Eureka Springs for a month before coming up with the idea. I commissioned the help of a woman I had met at a local gift shop to serve as my "ghost" model. We spent a couple of hours creating several images both inside and outside the hotel. For this shot, I first demonstrated for her what I wanted. I then gave her clear instructions: When I say "now," you just start walking slowly up the stairs. Don't look at me; just look up as you're walking. Click. I got my "ghost" during an eight-second exposure.   


I was in the whirlpool in my apartment complex in Colorado talking to an avid hiker. During our chat, I told him I was a photographer. He excitedly said, "Man, if you're a photographer, you've gotta check out Lone Eagle Peak!" He got my attention. I checked it out a couple of weeks later. 


So, how does this fit into my message? Well, first, it is a very unique peak, even for Colorado. Secondly, it is a 15-mile hike, round trip. Whew! Would you take a 15-mile hike, up to 10,000+ feet in elevation, just to "take a picture?" 

I went on-line before I went there and all I found were phone camera pics of Lone Eagle Peak taken by hikers. When I sent this image to one of my clients who produces calendars, she immediately responded with a Yes-- she had never heard of, much less seen photos of, Lone Eagle Peak. 


Garden of The Gods, in Colorado Springs, Colorado, was picked as the #2 best city park in the world a few years ago. The photos on this site will give you an idea as to why it's so popular.

Do what others do not do. I had never seen the Garden of The Gods photographed at night. If you ask any photographer why they have not done so, they will quickly reply with, "Why?" This is why.


This image of Garden of The Gods at night, is the cover of my new book, RIGHT BRAIN PHOTOGRAPHY, now in its third edition. This was a 5-minute exposure, about ten minutes after sunset. Like Mesa Arch, I "painted' the two formations in the foreground. With a 5-minute exposure, sensors and film pick up color in the sky not visible to the naked eye. it was pitch black that evening.

Here is another example from Garden of The Gods.This was a 3-minute exposure.


Do what others are not willing to do. It has been my observation that a lot of photographers do not feel comfortable asking people if they can photograph their property. I love talking to people, and I don't hesitate asking. The worst that can happen is they won't let me. If I ask, I might get some great photos; if I don't, I won't.  

There is this really cool museum along Highway 68 in New Mexico. I stopped, then walked inside to check it out. Can you say, OMG? The place had thousands of items, collectibles, and memorabilia that covered the 1930s, 1940s, and 1950s. I didn't hesitate to ask the owner if I could "take some pictures." I think he was honored that I was interested.

So, my message here is that a lot of photographers feel uncomfortable asking permission to photograph people's property. I'm glad I asked. Some of my favorite images in my collection were created because I asked permission.


I first heard about Rancho de Taos church in Taos, New Mexico when I was learning photography in Texas, in the late 1980s. I was fascinated with what I saw, with private lingering thoughts of, "Someday....." I later saw a photograph of the church taken by Ansel Adams. Years later I also saw a painting of it by Georgia O'Keeffe. 

Well, I finally got my chance several years later to see what I could do with it. And I did. I have several images of the church in my collection, taken from all angles. However, during my third visit to Taos, I wondered what else I could do with it---something I hadn't seen; something even I had not done before. 


So, I decided to try photographing, not the entire San Francisco de Así church, but only part of it, at night, with the stars flickering in the dark Taos sky. I converted the original to a B&W.


When you develop a mindset that you are others' competition, without being cocky about it, you start building self-confidence, and with confidence comes peace of mind, and peace of mind allows you to free yourself from whatever it is that holds you back. So, don't try to "take" pictures better that those you've seen. Create images that do not exist, that is, until you get a chance to create them! Have fun.

Contact me if you have any questions about my tip this month.