Wednesday, December 16, 2020

WINTER PHOTOGRAPHY 


Winter photography can be fun, tricky, and, yes, cold. It's fun because I love the outdoors and love to exercise. It's tricky because bright reflective snow can cause the built-in light meter to mistakenly give me exposures I don't want--it is not engineered to give me white snow.

Aside from the technical or artistic aspects, the first thing I take care of is my comfort. If I'm cold, get my socks wet, freeze my fingers, or don't have my head covered, it will be extremely difficult to focus on my photography. During my winter workshops, I have had students either walk back to their cars and wait for us or take very few photos because they were either tired or uncomfortable in the cold.

So, my overall advice is to dress appropriately, make sure you are in average-to-good shape, and know how to handle difficult camera challenges. The most difficult camera challenge is that, whether you have a $400 or $4000 camera, the built-in light meter is designed to give us "gray" snow. Not good. My rule of thumb is this: If the scene in your viewfinder has roughly 70% to 80% snow, take those shots at a +1 to a +2 overexposure. You might need to take some test shots to get what looks right to you. 

So, with that introduction, lete me share some examples from my winter walks and hikes.


Sprague Lake in Rocky Mountain National Park is one of my favorite lakes in the park. For one, it has a great backdrop, including the middle peak, Hallett Peak, at 12,713 feet.

There was a fairly equal distribution of bright, dark, and mid-tone areas in the scene, so not much need to go a +1 or +2. This was shot at -1/3 stop.


This beautiful old barn also had a great backdrop, in the middle of Steamboat Springs, Colorado. I don't have the metadata on this one, but I estimate a +1 overexposure.


No exposure compensation needed for this scene. There was an even distribution of midtone and light areas. This is beautiful Lake Isabelle in the Indian Peaks Wilderness of Colorado.


I closed in on these large aluminum flower decorations in Santa Fe, New Mexico to get more of an abstract, as opposed to the whole flower. I overexposed the scene to a  +2/3. 


This is also in Santa Fe--San Miguel Mission. I went with a +1 stop overexposure on this one. The building to left of the church is considered to be the oldest house in the U.S. 


Balanced Rock in Arches National Park in Utah is a great subject anytime of year. However, it takes on a different look in winter. I took a more artistic composition that day, rather than simply photograph Balanced Rock. This composition gives a sense of its context within the park. I went with a +2/3 on this one.


In Taos, New Mexico I found this composition. I included this one because, unlike the others, for which I overexposed the shot, on this one I underexposed the scene by a -1 1/3. Why? Just because it's winter doesn't automatically mean we will need to overexpose all scenes. It's a matter of the percentage of dark areas, medium-lit areas, and brightly lit areas in the scene.

In this scene, there is a big chunk of building, in the shade. When the built-in light meter sees this, it thinks it needs to overexpose the scene. One more time: it thinks it needs to overexpose the scene--that's what it's designed to do! And it applies whether you're shooting Aperture Priority or Manual. So, technically, I didn't underexpose the scene per se, but I underexposed from the point that the meter took me. It thought all that medium lit area needed to be overexposed. Does that make sense?


I left this one for last to show that shooting in winter is not just a matter of thinking with the left brain, i.e., it's not about only thinking of the technical know-how side of the brain. Sometimes it's fun to apply some right brain, or the creative aesthetics side of photography. The best photography, as I mention in my book, Right Brain Photography, is found where technical know-how and creative aesthetics meet. 

For this shot, a 25-second image, I chose December to photograph southern Utah's Mesa Arch at twilight, after the sun went down. I wanted the La Sal Mountains in the background snow-capped. Once I got my composition, I "painted" the underside of the arch with a large off-road emergency light. 


I hope I've given you enough to spark your interest, and motivation to bundle up and just go out there on a cold and not so cozy day and see what you can come back with.....

Have fun out there. And remember, never, never, put your brain on Auto Pilot--you will be disappointed when you see your images on your screen.

Let me know if you'd like a 1-on-1 one ZOOM lesson. They're only $35/hr. 


Monday, November 16, 2020

 INCLUDE WATER IN YOUR IMAGES


Water always adds more interest to our images and gives us more to include to improve our compositions. Water can also add mystique and mystery to our photos. It can be something as simple as droplets or can include the ocean, lakes, rivers, creeks, waterfalls, or cascades and brooks. 

As I share some examples from my experiences, I will explain what caught my eye, why I photographed it the way I did, and other thoughts and feelings that went into the creation of my images.

Let's begin with something that is not common in photography, and that is to photograph the reflection a the scene, knowing that I am going to display it "upside down" in the final photo. I really look for that type of scene, where doing so will work better than the actual scene I see with my eyes.


I'm sure all of you are thinking, "So, what's so great about this shot?" This might sound strange, but when it comes to photography the eyes see too much, and what they see can overwhelm us. We need to extract from what the eyes see. We do that by scanning the scene, which I spend a lot of sentences in my book, Right Brain Photography. 

After I scanned, my eyes went, not to the scene above, but to the reflections. The more I looked at it, the more I could see a surreal image of trees with early spring colors.I could also "see" an image ala Impressionism. In addition, if I froze the movement in the water with a fast shutter speed, I could add surrealism to the image. And I knew at the time I created the shot that I was going to display it "upside down." See the image after the one below to see the final result for my "Dream Transition."  


Okay, now I'll move on to something more traditional. I have photographed Sprague Lake in Rocky Mountain National Park in Colorado many times early in the morning. Every time I've shown up before most people wake up, I hoped to see that magical alpen glow, which is one of those moments in time we as photographers love to freeze for posterity. Of all my early visits to Sprague Lake, only once did I see what my imagination saw.

We saw this scene during one of my many field workshops in Rocky Mountain National Park.


Sometimes, nature makes it difficult for us to get what we want. Believe it or not, this scene is at an RV campground in Hot Springs, Arkansas. Most folks who park their RVs during their stay don't see this exact viewpoint because it's at a bit precarious spot. I had to hike down to it in uneven and uncertain terrain, hop over large damp boulders in the creek, then stand on them carefully as I got my shot. The level at which I had to get this perspective was too high to kneel down on the boulders and to low for me to easily look through my viewfinder---I'm sure some of you have found yourselves in this dilemma, right? Thank goodness for tilting back camera screens! 

I share this experience because if we want to be good photographers, we have to do more than understand the technical know-how side and the creative aesthetics side of photography. We have to do what it takes to make the common uncommon; the mundane insane. It's not enough to ask ourselves what f/stop, shutter speed and exposure we want or need. Speaking of exposure, I love shooting under overcast skies--it keeps me from having to think or "do HDR," as this image illustrates. 


For this waterfall shot, Ouzel Falls in Colorado, I got in close to the water flowing at the bottom of the falls, not the waterfall itself. I did that to better interpret the feeling I had when I was there--tranquil and peaceful. It wasn't a subject I was trying to photograph; it was a feeling.

When it comes to waterfalls or any moving/gyrating water motion, we need to ask ourselves what "look" we're going for. The answer to that question will determine what shutter speed we will need to achieve that. In this case, my shutter speed was 1/6 of a second! 


Speaking of waterfalls,if you haven't seen this waterfall, I highly recommend adding it to your bucket list! Multnomah Falls in Oregon. You'll need a wide angle lens for this. Vertical, for me, works best for most waterfalls, unless the surrounding terrain improves my composition.


Another body of water I highly recommend adding to your must-see list is Maroon Lake, which reflects the most photographed peaks in Colorado--Maroon Bells. Notice my composition. Even those small rocks sprinkled on the bottom of the image were intentionally introduced to add what I call "containment," which is one of 7 principles of composition I focus on. If you would like a 1-on-1 ZOOM lesson on composition, please e-mail me and I'll give you more information and tips.  


Bridge reflections always make for great subjects. This is Beaver Bridge near Eureka Springs, Arkansas, built in 1949 and still in use. Cars need to take turns crossing over the 1-lane bridge. This was taken early in the morning, with a thick fog hovering around the landscape. 


I found this beautiful scene in Luzern, Switzerland. I was attracted to the twilight hour reflections on the River Reuss. 


Water doesn't have to be photographed in the spring, summer, or fall. Winter is also fair game!


The state of Wyoming has some of the most dramatic scenes with water--waterfalls, lakes, ponds, hot pools, geysers, etc. Here are a few of my favorites from my birth state. 

Lower Yellowstone Falls from Artist's Point


One of the many natural thermal pools in the park--Midway Geiser Basin. I like to create abstracts by cropping a scene in-camera; in the field; at the time of shooting.  


I'll leave you with one of Yellowstone Park's most iconic sights to behold--Old Faithful. Taking advantage of the camera's continuous shooting mode is a must for these scenarios---just shoot, shoot, shoot, within a split second. In this case, this one image looks like a make believe nuclear explosion, with mushroom cloud and all. 


I hope this photo journey and examples have inspired you to go out and look for water to include in your images. I know, some of these examples were from far-away places, but, for most of us, we can find beautiful scenes within a day's drive, which might include going into neighboring states. Go to the internet and research "waterfalls in.....," state parks in....," "Wildlife preserves in...." Wherever that takes you, have fun!! 

Eli

Thursday, October 22, 2020

NATURE'S COLORS


My tip this month is not only applicable to autumn colors, but also for capturing spring colors, and forest colors in general.

Although the peak of fall colors has passed in some states, other states don't reach their peak until late October or early November. My tips apply to any scene with trees, at any time of the year.

 First, let me explain what I look for when I'm out in the middle of nature searching for nature's colors. I don't look for objects/subjects. I take away labels like "trees" and other labels we've been taught. Instead, I look for colors, primary colors, secondary colors, complementary colors. I also look for shapes, designs, and even moods and feelings. Then, and only then, do I ask myself how I can best translate all that into something we call a photograph?    

Additionally, when I see something with my eyes, I ask myself how would that look if.........       
I underexpose it by 1-stop, overexpose it by 2-stops, take it at ground level, use spot metering, etc. When I go through that mental exercise, I can see something before I see it. In other words, I do my own pre-processing in my mind and in-camera before I even see the final image. The better my pre-processing, the less post-processing, or fine-tuning, I'll need to do later.  

Sometimes the scene itself looks good, but I might create a second rendition through creative in-camera techniques. I will show a couple of examples of that in this blog. .   

Overriding all of the above, the conditions and factors I look for, or hope for, in most settings are overcast skies. I know, for many folks, that might sound counter intuitive. My desire for overcast skies has to do with my understanding of how that built-in light meter, which I spend a lot of time on in my book, Right Brain Photography. In my experience, the built-in light meter is the #1 problem in photography. In most cases, it does not give me what I look for in my photos, which goes back to why I love overcast skies. They give me nice, soft, even lighting distribution throughout the scene, without harsh shadows and blown out (over-exposed) areas in the scene. The built-in light meter does what it is designed to do more effectively and more efficiently. It really struggles with high contrast scenarios.Overcast skies make life easier for the meter,which, in turn, makes things easier for me.

Now, with that introduction. here are some examples of how I dance with nature's colors. 


Backlit scenes can make for interesting photos. Don't be afraid to shoot into the bright setting sun. You can always use your exposure compensation dial to make proper exposure readjustments in the field. I found this particular scene around 4:30 in the afternoon, which gave me those nice backlit yellows in the background.I positioned my tripod about two feet from the ground to emphasize the trail leading toward the grove of aspens.


I saw this scene from the road. While I was driving, I took a quick glance to my left and knew I had to turn around and get a closer look. I always follow my intuition.

After I found a safe place to park, I walked over to the scene and loved what I saw--nice gold aspens, white barks, and a puddle created in the middle of a 4-wheel road after recent rains. 
I liked the reflections of surrounding aspens in the puddles. I also liked the distant dark tree colors that gave interesting contrast to aspen golds and added depth and interest.


I found this grove of red and orange aspens in late afternoon. If I can't have overcast skies, I will shoot in either early morning or late afternoon when the sun is setting and the landscape  is evenly lit.I loved the less abundant reds and oranges, especially against the white barks. 


This next example is more on the creative side. As photographers, we program ourselves to think that everything in our images must be super sharp and have unbelievable color. I like to break out of that habit and add an artist's perspective, which is what I did here. 

This scene, surrounded by an early morning fog, felt mysterious yet peaceful; tranquil. In my attempt to translate that into a photograph, I moved slowly forward, with a shutter speed of 1/13 to intentionally blur the scene. It gave the image an Impressionistic feel. By the way, I don't mind shadows in my images--they give me mystery, interest and a sense of three dimensions. 


I love the transition of seasons, especially between late autumn and early winter. Such was the time when I found this scene on a mountainside in Rocky Mountain National Park.


For this scene, I overexposed the scene to keep the background yellows, yellow. If I had not done that, the scene, and those background yellows, would have been underexposed. When a major portion of the scene is bright or very light colored, the built-in light meter will underexpose the scene--it doesn't know any better. We have to help it out, i.e., override it. 


I'll throw in a little spring color as well. For this naturally decorated tree in the spring I created a double exposure to give it a "painterly" effect. Try that someday, if your camera has a multiple exposure feature. If you're interested in step-by-step instructions on how to achieve this look, feel free to contact me for a 1-on-1 ZOOM lesson. 


Now, this is a slight twist to today's theme. Yes, there is nature. Yes, there are trees, but there is a touch of humankind in the scene. I included it in this segment to show that adding lightness, or overexposing a scene, can add mood. Not every image has to be perfectly exposed and have off-the-wall sharpness. To me, it's boring to have all my images have the same qualities. I like variety. For this relaxing scene, I overexposed it +1 2/3 stops to create mood. There is no such thing as the correct exposure. There is only the right exposure, based on what we want.


Oh, and don't forget the importance of varying your perspective in photography--not every scene has to be photographed at eye level. For this image, I placed my tripod about two feet from the ground and leaning right up against this tree, shooting straight up to get this uncommon viewpoint. I couldn't even see through my viewfinder. I placed my camera on autofocus making sure it would focus about 1/3 from the bottom of the viewfinder (to increase my depth-of-field), and I adjusted my exposure to make sure the scene would not come out underexposed--I pre-set my exposure for a + 2 2/3 stops! I did that in order to keep the white aspens white and the nice bright yellows nice and bright.   


I'll leave you with one final and creative image--another double exposure. Just like in the world of music, variety in photography is good. It adds depth to our style and to our repertoire. This image looks different than the previous double exposure simply because the subject matter was different. Tulips in spring. I hope this encourages you to explore and expand your horizons. 


So, go out there and push the envelope, explore, get out of your comfort zone, try something different. Create images; don't just take pictures. Think like an artist, not a photographer.  

Feel free to e-mail me with any questions. Be safe!


Sunday, August 30, 2020

 DON'T JUST STAND THERE


Now that I've got your attention, tell me if you agree with this statement. Generally speaking, most of us walk around with camera in tow waiting for that invitation to bring our camera to our face. And, that is exactly what we do--we stand there and bring our camera to our face, at eye level. What would happen if we changed the definition of "eye level.?"

Here is my challenge for you. Spend an hour, half a day, or all weekend shooting from any level other than eye level, if it's physically possible for you to do so. Raise your arms as high as they will reach and shoot down at something. Put your camera on the floor or inches from the ground and shoot straight up. You get the picture? 

If you have a tilting back screen, that will make this a bit easier. If you don't, you will need to take a shot, re-position the camera and take another shot. 

So, why do this? I like to do this to get different and unique perspectives; to make the common uncommon and the mundane insane. 

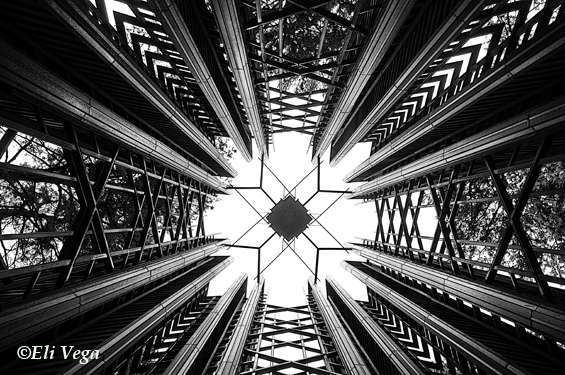
Let's move on to some examples. I'll start with this image. Before I explain, what do you think you are looking at here? 


The state of Utah capitol is one of the most beautiful capitols I have seen, and I've seen several. When you walk in, the size, design, and artistry of the interior grabs your attention immediately. If you stand in the center of the building and look straight up, you see its awesome dome decorated with murals. There is a huge chandelier hanging from dead center--those are lights from the chandelier you see; all those white round objects shaped in a circle. 

The tip of the dome is 165 feet from the floor. The chandelier hangs from a 95-foot chain!
So, how did I get this shot? I placed my tripod in dead center, opened its legs as far out as they go, lowered the center column as low as I could, placed my camera on the tripod facing straight up. Before I did that though, I set my camera for auto focus (with a 17 mm lens), and placed the focusing point in dead center. I set my f/stop to f/22. I always like to use more f/stops than I need. The small f/stop gave me a shutter speed of 1/4.

Now, let's go with just the opposite--shooting down. I was at Denver, Colorado's annual Chalk Art Festival. As I photographed several artists on their knees painting their pieces on the street asphalt, it occurred to me to take my camera strap from around my neck, extend my arms as far as I could, and shoot straight down. But, first I had to make some calculated estimates. My settings were: 640 ISO (to get a fast shutter speed); focal length of 17 mm; f/stop of f/11. Using the Aperture Priority setting, the camera gave me a shutter speed of 1/250. I set my exposure compensation at -1 stop. But, please, don't memorize these settings. They are based on the time of day, the weather that day (clear skies), the camera and lens I used, etc. Don't memorize settings or formulas. Memorize concepts! By concepts I mean facts like: If you are going to hand hold a shot, you are going to need fast enough shutter speeds to get a sharp (not fuzzy) photo; the higher the ISO, the faster shutter speed you'll get (when shooting Aperture Priority); etc If you memorize concepts, you will know what to do with your f/stops, shutter speeds, exposure, ISO, White Balance, etc--regardless of the situation.  


During one of my "shootings," I came across this great old antique hot rod. Here is the original photo of the car.

I set my lens on 17 mm, my auto focusing point on about 1/3 from the bottom of the viewfinder, ISO at 500, f;stop at f/8, and set my exposure compensation dial to +1.3--it was dark underneath and I wanted to get as much detail as possible. Those settings, on Aperture Priority, gave me a shutter speed of 1/30. My camera was on a tripod. So, again, taking the time to do this gives us those unique-looking photos; photos we're not used to seeing because......well, because we just stand there! 


As I walked along Pearl Street Mall (an outdoor mall) in Boulder, Colorado, I came across this bar/cafe that caught my attention. It was the light bulbs that grabbed my attention. As I always do, I asked if I could photograph the light bulbs--they weren't your everyday light bulbs. I wasn't interested in the bulbs in the bar--I was interested in the bulbs. I wanted to isolate them from their surroundings. So, I shot up at them. 

The bulbs were high on the tall ceiling, so I set my lens to 170mm to get a really tight shot of them, and f/25 to make sure I got everything sharp.

The more focal length, the more f/stop you need to get things sharp. That is a result of the change in aperture size as we go higher in focal length. For example, a 300mm lens at f/8 will have less depth-of-field than a 17mm at f/8 because its aperture size, even at the same f/stop, is larger. Test that out someday.


Now this is different than the images above. One Halloween season I bought a hand-sized hard plastic skull. I thought it would be fun to do an in-camera multiple exposure. I placed the skull on a low surface and shot down at it, then moved it once and rephotographed it, then did it two more times to create 4 skulls in a circle, as if they were talking to each other. I made all four shots shooting straight down. I converted the final image to a B&W photo.

In case you're wondering how I got them so perfectly aligned, this is what I did. I took some measurements, then placed Scotch tape where each of the four had to be. So, when I placed the skull for each of the 4 shots, I simply placed it where I had placed the small pieces of Scotch tape. 


                                                        "Heady Debate"


I was in the middle of a 1-on-1 lesson with a student in Idaho Springs, Colorado. One of the landmarks in the historic mining town is the still-standing ARGO gold mine and mill. Several feet in front of the main facility are several ore cars displayed in the yard, at eye level. I showed my student how we could get much lower and shoot up at the old ore cars, while placing the building and sign as a backdrop in order to create context. These shots were more interesting, more intriguing than the straight-on shots. 


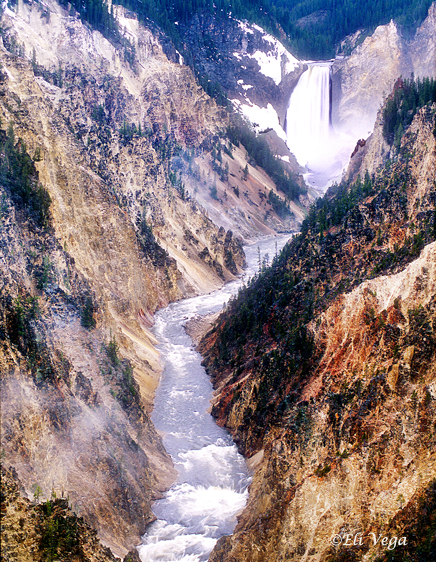
i will finish with this artistic assemblage of beautiful and naturally colored rocks I found near a dry creek bed along Owl Creek Pass in Colorado. I use the word assemblage intentionally, as I gathered several differently-shaped and differently-colored rocks together to create this image. After I got the composition that looked good to me, I shot straight down at them. 


So what are you waiting for? Don't just stand there. Go out and look at life differently. Think creatively; shoot creatively. 

As I say in my book, my right brain shakes hands with my left brain and says, "I have an idea, and this is what I need from you."

Have fun. Unfurl your soul. Stay safe! 

Eli   
  
 .    


Friday, August 21, 2020

 ORDER OUT OF CHAOS


I thought I'd do something different this month. I have chosen beautiful 210-acre Garvan Woodland Gardens (GWG) in Hot Springs, Arkansas as the backdrop for my tips this month. In any gardens like these, it is easy to become overwhelmed. There is so much to see, so many plants, flowers, landscaping, etc. Where do we start? What do we photograph? Where do we aim our camera?

Have you ever felt that way during your travels or weekend getaways? Now this might sound strange, but when it comes to photography, the eyes see too much. We need to reign our eyes in through a technique I call "scanning." I spend a lot of paragraphs on this in my book Right Brain Photography. Today I will just give you an abbreviated version of this approach.

If we try too hard, it will be too hard. By that, I mean there is an easier way. What I do when I encounter those OMG scenarios is to scan the area within my view. At this point, I don't even worry about the entire park or gardens--that's way too much to swallow. I follow my intuition and let it guide me. I don't doubt it; I just follow it. If I sense there might be something over there I simply walk over there and check things out. So, what am I looking for once I get "over there?" I don't photograph subjects. I look for color, shapes, lines, design, and even mood. Sometimes I get certain feelings from a place or a subject I see. The actual scenario or subject(s) become secondary. I obviously see it, but I look much deeper than what the eyes see.

I have been to GWG four times, so far. The following are extracts from those visits.

The first thing I do when I visit a place like this for the first time is to get a map, ask the staff to show me the highlights, and I also ask them if there are any features, displays, or current blooms that are out this time of year. 

One of the highlights in the gardens is this waterfall area. I don't do usually do HDR in nice open areas like this, but this particular day, at this sight, I was getting an extremely wide dynamic range of lighting, more than my camera could handle. My rule of thumb with HDR-created images (combining 2-3 images to create a single image) is to not make them look "HDRed." I don't like that "illustration" or "architectural rendering" look. That's why I never combine more than three images.  


I saw this bridge from several yards away, but didn't like the surroundings I saw from that distance. I kept walking toward it, carefulling seeing how the surrounding environment changed as I walked. I was looking at how the areas to the left, right, and behind the bridge were looking as I got closer. I liked the design of the bridge, but was looking for the best surroundings that complemented the bridge. All of a sudden, there it was! As I got close to the bridge I knew that was my shot. It was like a life metaphor. I like scenarios that give me what I call that "scene from a novel," used by authors to describe a feeling, a goal, a promise. 


A few years ago, the 'Gardens commissioned an architect to design a million-dollar "tree house" would fit in with the theme of the garden. As you can see from the image below, it works. 

All photos I had seen were of the treehouse itself, hovering above the gardens. However, when I saw it, I noticed that the designers had included an engraved space under the treehouse that replicated theme of "tree" house. The walkway I was standing on was too close to the scene. I had to use a 10 mm wide angle lens to capture it all.

This is what I call extracting. I extract something I'm "working on" and eliminate the rest, that is, I ignore everything else in order to better focus on the results I want.  


One of the highlights of these gardens is Bridge of the Full Moon. The trick is to find the best perspective. I wanted more than just a "smart phone" picture of it. After scanning the scene, I saw this. It didn't hurt that the scene was sprinkled with spring colors. The "smart phone" picture would have been of, well, just the bridge. However, I wanted to incorporate the essence of the environment in which the bridge was built--the creek, trees, plants, hillsides.   


A Japanese garden is a must for any decent gardens. There is one in Portland, Oregon, in Denver, Colorado, and at Garvan Woodland Gardens. For this scenario, my goal was to capture the garden, the koi and its surroundings. Again, the spring colors added the exclamation point. 

All the principles I use to create my compositions were present that day. However, I had to be patient for some of those principles to come together. I wanted fish to fill in that empty lower right-hand corner (containment). It took several minutes of waiting patiently for the most colorful koi to swim in that specific corner. The other composition principles which I incorporated were: the small green tree on the lower left and the small white trees on the left (containment), the curving stone path (leading line), the big white tree (balances out other areas in the scene. The center of interest was the entire scene.  


You can't visit GWG without at least walking into Anthony Chapel. It is one of three glass chapels in the state. There are two others in the U.S. outside of Arkansas. It is a big chapel, so be sure to take a wide angle lens--at least 18 mm. You will also need a tripod, or a camera that will give you great images at high ISOs. If shooting without a tripod, a lens with vibration reduction will come in handy. 


Not far from the chapel is a beautiful five-story bell tower. In order to amplify it's surreal qualities, I put my camera on the ground and shot straight up at it, then converted the image to B&W. I used a 10mm-24mm lens, set at 10mm.


There is even a little cave you can walk into. Shooting from the inside looking out, you definitely will need some degree of HDR. I used three images to get this one. I wanted to keep the inside darker than the outside to make it look the way it looks and feels when you're in there. 


Photo enthusiasts who have taken my classes or workshops know that I can't be on a photo shoot without creating my right brain photography  During one of my visits to GWG, I saw a section that had an endless sea of colorful tulips. Absolutely beautiful. I created several images that day, but this one gave me the best feel of what if felt like when surrounded by and immersed in color and vibrance. This is an in-camera double exposure.


I hope I have given you some ideas, techniques, and approaches to take with you next time you visit a botanical garden, arboretum, or Chinese garden. What I shared with you is a portion of my I.S.E.E. SOMETHING paradigm--use your Intuition, scan, extract, and eliminate everything around you to help you focus. 

Don't get overwhelmed, stay focused, and, most importantly, have fun!

Contact me if you would like a 1-on-1 ZOOM lesson.  
vegaphotoart@gmail.com