Wednesday, May 20, 2020


HOW TO PHOTOGRAPH FIREWORKS

Hopefully we will all get a chance to watch fireworks on the 4th of July, 2020.

If you do find a good safe spot to watch them, here are some tips that will help you go home with some great shots you can hang on your wall, share with friends, or share on social media. All you need is a few basic tools.

1) A basic digital camera, on a good sturdy tripod. It doesn't have to be expensive,
   just as long as it has a 'BULB' setting (read your manual).
2) A telephoto focal length for most, not all, shots. 200 mm to 300 mm should be good 
    enough. It will depend on how far you will be from the fireworks.
3) A piece of material big enough to cover the front of your lens. It can be something as 
    simple as a piece of copy paper folded in half, your camera manual, etc.

Now let me show you how they all work together. 

CAMERA:
ISO--I like to set my ISO at 100
F/Stop: My f/stop will be at f/8-f/11. If my images are coming out too bright at f/8, I quickly switch to f/9, f/10, or f/11--whichever is giving me the best exposures. I just experiment with the first 1-3 blasts, check my display screen, and adjust accordingly.
Shutter: I set my camera to BULB. My piece of paper becomes my shutter speed (I'll explain that shortly)

IMAGE FORMAT: I usually shoot JPEG Fine and Vivid, but any format works--TIFF, RAW.
LENS (no need for IS or VR setting):
Focus:
I like to shoot most of my fireworks blasts way out high in the sky, when they hit their apex and go "boom." That's when all the cool streams of color begin to flower and open up!
Forget Auto Focus--sorry. I set my focus to near infinity since all fireworks will be several yards away from you, way up in the night sky. That's where f/8-f/11 come in-- if you're a little off on your focus point, f/8-f/11 will cover any margin of error. In other words, that f/stop range will cover several yards closer or farther than the actual fireworks location.

Once you feel that all shots are looking good and not out of focus, stay with that f/stop throughout the 20-30 minute show! The only reason I would change the f/stop is if the images are coming out too bright--then I might switch to f/9--f/11.
TRIPOD: You can't do this without a good sturdy tripod--one that goes up at least to eye level. You can't do this on a mono pod or resting your tripod on a boulder or your car's roof.
PIECE OF PAPER:   Yes, I've used a piece of 81/2 x 11 piece of paper folded in half. As long as the material you're using is opaque so as not to allow light to hit the lens. Besides, there won't be much light hitting the lens when you're aiming at the dark sky. I've used my camera manual or a small piece of cardboard. 

THE PROCESS:  Okay, so I've got all the tools I need, now how do I pull this off? First, I don't expect every single image to be perfect. This is why I just shoot, shoot, shoot as much as I can until the show is over. Some bursts will be out of view; some will be just a flicker;
some will be only partially in the viewfinder. That's okay, I know I will get several great shots during the night. My process has never failed me.


Now, here is the fun part--the process I use during 20-30 minutes of fun colorful bursts.

I place my camera on the tripod and adjust all my settings as mentioned above. I aim my camera toward the general area I believe the bursts will be. I'll adjust later once the fireworks start. I use a wide enough coverage to make sure I will cover most of them. This is an estimate; not science. I know I'll get several chances to get it right. 

I always use my 3-foot cable release so I'll be ready and quick when the show starts. I keep my lens cap on until showtime. I also have my "cover" (piece of paper, cardboard, etc) ready for action. 

When the first burst comes up, I take my lens cap off and aim my camera to where I saw the first burst. I keep it there, with the tripod head loosened. When the next one comes up I keep adjusting both my focusing and focal length until it seems like I'm covering the bursts just about right, knowing that some will still be off to the side, etc. 

When I think I've got my aim just about right, I lock my camera in place and I'm ready to start capturing the fun, knowing that I might make adjustments if necessary. But I have to be quick in making those adjustments. 

So, now I have my lens cap off and cover my lens with my cover (the piece of paper). When the next burst goes up, I quickly release the cover and click my cable release. When the burst starts to dissipate, I quickly cover my lens with my cover, BUT I still have the cable release depressed! In other words, my lens is still open--it's just covered up with my cover.
When the next burst goes up, I then take away the cover again. THEN I release the cable release. In essence, what I've done is taken a double exposure--two bursts on the same image!! 

I continue this process until the show is over. Sometimes I'll do two bursts, then I'll do three, then I'll do just one if it's an awesome one. Back and forth, back and forth. 

At the end of the night I will end up with three bursts on the same image, or two, or just one. 

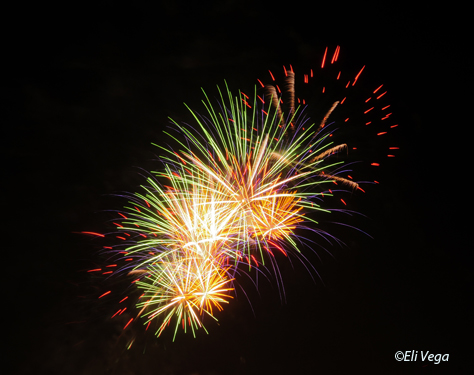
Now that I have explained at length the tools, techniques, and process I use, let me share some of the results from several 4th of July displays I have photographed. 


This was two bursts on the same image. The fun of it is that you never know exactly what you're going to get, but you know it's going to be fun. But, if we don't plan, we won't get lucky. 


This one was three or four different bursts. I don't want to zoom in too tight. I want to leave myself some breathing room around the edges just in case something like this happens. If the bursts are a little off, I can always crop the image to center them as needed. 


This was a fun one! This also had to be three or four bursts on one image. 


This one was surreal and Star Trekish.


Sometimes I do use a wide angle lens just for something different, as I did for this shot.
You can see fireworks and nearby buildings and structures. The fireworks smoke comes from me doing close to the fireworks platform. It adds to the feel of the image. 


I loved this patriotic red, white, and blue display. Some pyrotechnic companies get very creative. 


If you are lucky to find a fireworks display near a body of water, take advantage of of it! Sometimes, if I think the venue is appropriate, I will get some fireworks vertically.   


These two beauties showed off this particular night. Note the cropping.


You just never know what surprises you're going to get during the night. Just keep shooting--1, 2, 3, or even 4 bursts. I believe this one was 3 different bursts. Sometimes, when you do more than one single burst, they don't even look like fireworks.


As a finale, don't forget to find fireworks displays over a lake if you can--it adds an extra dimension to the excitement of 4th of July. This one looks like a neon palm tree on psychedelic steroids. 


Surely you feel patriotic by now. I hope you get a chance to see some fireworks this July. Copy and paste as much of my blog and take it with you before you leave for your fireworks night show. 

I sure hope we won't have to "ZOOM" our fireworks this year!  😮


Monday, April 20, 2020

FLORA PHOTOGRAPHY
(Not just pretty pictures of flowers)


Even in spring/summer of 2020, we can find great flowers or plants to photograph while "keeping our distance." We don't have to wear face masks in front of beautiful flowers! 

Flora, or flowers and plants, provide us with some of the most colorful, psychological, and artistic subjects to photograph. Done right, we can bring out their true palettes, make them shower us with differing degrees of feelings and sensations, and create pleasing 
compositions. This is not about masculinity or femininity. It's about art

Some of the key factors I look for when photographing flora are:

1) Lighting. I highly prefer overcast days if they're outside, or indoors with natural side  lighting from nearby windows. If I find a great specimen lit only by artificial lighting, then I change my White Balance to fit the situation. Sometimes AUTO White Balance does a better job than Incandescent/Tungsten or Florescent WB. 

I usually, not always, stay away from bright sunny days. The stark, harsh lighting from sunlight creates deep shadows and sometimes blown-out highlights that usually don't make for an acceptable image. That said, I have at times taking a negative and turned it into a positive. 

2) The specimen itself. I look for a specimen or group of specimens that are fresh and without major flaws. Some minor flaws can be "covered up" with photo editing software.

3) The environment. Sometimes, if the background is too ugly or difficult to handle photographically. I will use my 32" white diffuser as a backdrop. This gives my subject(s) a studio-like appearance, like I photographed it in my studio. Sometimes I will use my large non-reflective black material, which I carry with me when photographing flora. That too gives it a studio-like appearance. My decision to use either my diffuser or black material depends on the subject and its colors. It is strictly a personal choice. 

Sometimes, given the subject and/or how I'm feeling that day, I might go beyond creating a pretty picture of a pretty flower. I like to experiment with various in-camera techniques, like double exposures, my swirling technique, zooming, or moving my camera slightly downward, left-to-right, right-to-left, etc. I prefer these in-the-field photographic challenges to spending hours getting creative with photo editing software. The former requires photography skills; the latter requires computer skills.  

So, with this introduction, let me share a few examples.


This is one of many double exposures in my collection. You can visit my website for more examples. I provide more detail about this in my book, RIGHT BRAIN PHOTOGRAPHY. Basically, the first step is to take a slightly out of focus shot of the subject. I then take an in-focus shot of the same subject, underexposing it by about 2/3 of a stop to make sure the combined image doesn't come out over exposed. It's a really cool technique to practice on.  


For this image I applied my Swirl technique. This is hard to do for a lot of my students, but I have seen several great images created by some of them. It takes practice, persistence, and patience....and persistence. Once you master it, you can't stop! 😉 And, please, for you left brain photographers, don't let perfection be your goal--just loosen up and flow with it. As the artist Jackson Pollock once said, "I like it when I don't have total control."

It usually works better without the tripod; just hand-held. Place your right hand index finger on the shutter button. Your left hand will hold the camera from the bottom of the camera. You are going to swirl the camera without changing the position of your left hand, and just pivot/swirl around that point. You can swirl to your left or to your right, whatever feels more natural to you. I tend to swirl to my left; counter-clockwise. Be careful not to create an arch with your camera; just swirl. Again, it takes practice. Try it. You'll like it, and maybe get hooked on it! 


I'm sure you can relate to this real life scenario. You come across this beautiful specimen, but no matter where you stand or move, the background is just terrible and distracting. Sometimes, even when you use a wide open aperture (low number f/stop, like f/7.1), it still isn't good enough. What to do? Well, we have a choice of just moving on to something better, or.......

This is what I do. I either use my white diffuser or my large black piece of flannel material and use them as a backdrop. This works amazingly well. It gives my final image that studio-like look. Unless I told you, you would never guess the image was created outdoors in the middle of the day. The diffuser or black material convert my backgrounds to backdrops. 

For this beauty, I used two techniques: a double exposure, and I placed my diffuser behind the subject to eliminate a very busy, ugly, and distracting background. 


Oh, by the way, if you just happen to find a great specimen, a great background, but an overly bright sunny day, create your own overcast sky by using your diffuser to diffuse the light hitting your subject. Just place it between the sun and your subject--voila!


White-on-white can create awesome artistic renderings. It can also be black-on-black. When I saw this iris, I knew it would look good with a white background, my diffuser. What happens is that some of the white from the subject simply blends into the background, which gives the image an ethereal feel.


This is how that same flower looked without the diffuser. Big difference, no?
Visit my website to see how images look when I use a black background. I used my black flannel material for "Peppers #1" and "Purple Majesties."  


And, yes, sometimes I do like to photography the subject "as is" However, even then I need to pay attention to the background. In this case, the background was not ugly or busy, but I didn't want it to compete for attention with my center of interest. The easy solution was to,  1) Bring out the 200 mm lens, which inherently has less depth of field, and, 2) Couple that with an f/9 f/stop, which blurred the background nicely. 


Plants also provide great opportunities.for photographic ventures. I was attracted to these palms. In real life, they don't seem like much to the naked eye. I was in the middle of a workshop and kept saying to my students to "tighten up" and go for those abstracts. In order to enhance the greens and yellows, I underexposed the scene by a -2/3, which is equivalent to giving the scene 75% less exposure than the camera light meter thought I needed. 

You noticed I did not mention what this subject is. If I label the subject, I confine myself to trying to photograph, in this case, the palmsFor this type of subject, I am more interested in the lines, design, lighting, and shapes rather than the subject itself. I don't photograph subjects; I photograph what the subjects give me.


Composition applies as well to flowers and plants. Before I even take the camera out of my bag, I spend several seconds or a few minutes looking at my subject and deciding what I am going to include within those four corners and what I am going to leave out; how I am going to position the elements in the scene; whether it would be more effective and more powerful if I create a landscape image or vertical. For this scene I chose vertical. Doing so eliminated several other plants and flowers that weakened these four lilies and the lily pads, which served as the foundation for them. 

I try as much as possible to make the elements in the scene contain the viewers eye within the four corners. Can you see that? It's called composition, the #1 step in every image I create.    


So, keep your distance and go find some great specimens and experiment, explore, and be bold. Don't 'let perfection get in the way. Have fun, and be safe.

Thursday, March 19, 2020

HUMOR IN PHOTOGRAPHY


In light of the fears and concerns regarding the world-wide COVID19 virus, I thought I'd keep things light this month by talking about humor in photography.

Whenever I am out and about with my camera, I'm always on the lookout for the humor in life--the kind of humor that can be interpreted through a photographic image.  The subjects or situations that make me laugh or smile include the surreal, the unexpected, unintended messages, the funny or simply cute.

In today's self-quarantined, paranoid, and fearful condition, I hope my images bring a laugh or smile to you, whether you're at work, at home or out and about as you keep your social distance from others.  


I stopped at a convenience store to gas up. After I went inside, and before I paid, I decided to look for a protein bar to eat on the road. As I walked around the small store, I saw this. I asked the owner what the cat's name was. He said, "Mr. Pibbs."


We're not the only ones "stocking up." Do you think this will carry him over until after hibernation? I didn't know squirrels could open their mouths that wide!


I will let you interpret this sign. I don't know about you, but it made me wonder what the juxtaposition of those two words was trying to say. Hmm? 


I was in the parking lot walking to my car after doing some shopping. I promise, I did not stage this. This is exactly what I saw. Message: Don't dog and drive!!


I saw this scenario during a visit to Switzerland about ten years ago. I call it "Salvador Dali Bike." Remember Dali's melting clocks? Were the tires "melted" before or after the bike was locked to that fence? 


Are these real-life examples of what we call "Love Birds?"


Even in the animal kingdom families make appointments for their "family picture." 


Awww, that feels so good! 


Whatcha lookin' at? 


Oh, come on, this will be fun.


Okay, I'm done!


I hope these images brought you some laughs, or at least a smile. Keep your spirits and hopes high. We will get through this. Stay safe and strong. 


Thursday, February 13, 2020

CLASSIC CARS

A lot of folks, of all ages, admire classic cars, whether they are shown as originals or as customs. It's much more than just taking pictures of cars--that can be boring. For me it's about capturing the car's essence, its character, it's uniqueness; its "trademark." style.

Lens choice and perspective are two key factors I use for this type of subject. Exposure is also critical, as many of the cars are in broad daylight and are extremely reflective. So, be careful with that challenge. You might have to over-expose a lot of your images in camera. 

So let's take a look at some of these works of art, starting with this beauty.


I took a totally unconventional angle of this 1957 Buick in order to emphasize the design of the curves and circles. The focus is on the vehicle's design rather than the car itself.


In order to isolate this 1953 Chevy from its busy surroundings, I got in close  with a 17 mm lens and shot it vertically to further isolate it. I overexposed it by a +1 stop to keep it from going too dark. 


For this 1951 Pontiac, I closed in on nothing but its hood ornament. Although I liked the original image, I found the ornament's design (shapes and curves) so interesting that I converted it to an art piece by using a photo editing application called "Glowing Edges." I used a close-focusing zoom lens set at 250 mm in order to extract the hood ornament from the confusing and distracting space around it.


When I photograph the whole car I like to take a unique perspective. For this beautiful '57 Chevy Bel Air I got close to the fin, got a corner perspective and, with a 10 mm lens, was able to emphasize it's trademark fin. In order to keep the black dark I under-exposed it by a -2/3 of a stop. 


 Another way to isolate a classic vehicle from its environs is to convert everything but the car to B&W. That is what I did with my nephew's awesome customized 1939 Ford. It really made his car "pop." In case you're new to this, it's a simple photo editing process. First, you "select" the car carefully. What I do after I select it, I enlarge the image really huge so I can double check my selection, making sure I didn't cut off parts of the car and that I covered all of the background carefully. When I'm satisfied with my Selection, I then convert the background to B&w and make adjustments to it until I am pleased with the blacks, grays, and whites. The result is something like this.


Sometimes it's just the color of the car that will make it "jump out" from the others. A good example is this white Ford pickup. I over-exposed this scene by 1-stop to keep it from going gray.


I found this beauty as I drove by Pindall, Arkansas. My composition was there for the taking. The owner ran a nearby woodworking shop and gift shop and had some of his carved chickens and roosters in the pickup bed, I guess ready for delivery. Whatever the reason, they added to my composition!   


I saved this last example for those of you who like to have fun with photo editing software. I photographed this elongated Caddy, then converted the background using an application called "Glowing Edges," like one of the images above, except on this one I just applied it to the background. 


In summary, for me it's much more than just taking pictures of cool cars. I consider the colors, shapes, the surroundings, any issues I might have with exposure, the backgrounds, and any unique characteristics of the car before I go "click." After the fact, I might decide to do something a little extra, to take it beyond a photograph--just for fun.  

Friday, January 24, 2020

PORTRAITS OF THE HISTORIC & ICONIC


I love history, therefore I really like to aim my camera at old, historic and iconic buildings, statues, and structures. My first tip is to refrain from simply taking pictures of them. Doing so makes you a tourist, not a photographer. Treat them like you would any subject-- consider the composition, lighting, timing, exposure, technique, and time of day or year.

I treat them like a portrait, trying my best to capture their beauty, uniqueness, best features, or any photographic perspective that brings out its history. The word itself includes a story. 

So, let me start with what remains my most unique approach and technique. The story behind this structure is key to the approach I took.

The Alamo in San Antonio, Texas has a super interesting story. It was that story that led my right brain to come up with the idea of superimposing the heroes of the Alamo onto the facade of the structure. Using my camera's built-in multiple exposure feature, I photographed a section of a nearby obelisk depicting the heroes of the Alamo and superimposed it in front of The Alamo. I explain this technique in Right Brain Photography, available through Amazon.


This is the oldest bar in Denver, Colorado--The Buckhorn Exchange. I like photographing buildings and structures at twilight. Interior lights are on at this time of day which  brings out details and shows off my subject's character.Additionally, if the building has interesting sides, I like to include them too. It gives the structure a three dimension look. 


Since we're in Denver, let's check this beauty downtown-- The Brown Palace. Many dignitaries and celebrities have stayed there, including The Beatles The corner where two streets meet at 45-degree angles was the perfect spot from which to shoot. The dark twilight hour allowed me to use slow shutter speeds, which gave me those cool car light streaks.  


Millions of people know of the photogenic Mormon barns along Mormon Row near
Jackson Hole, Wyoming. As for composition, perspective and angle were key in depicting the context in which these barns were built--near the Grand Tetons. A low angle, about two feet from the ground, gave the barn heightened prominence and placed the mountains near equal to the barn's roof.


There is a beautiful stucco Catholic church in Taos, New Mexico known colloquially as Ranchos Church. Surprisingly, it's backside, to me, has more artistic value than the front, which looks like so many other stucco churches. Evidently Ansel Adams and Georgia O'Keeffe thought so too. 

I had seen tons of photos and paintings of this beautiful 1815 church. All of them were during the day. During one of my several trips to northern New Mexico, I wanted to do something different. So, I went out after sunset to see what the shapes and angles looked like at night. I liked it. It's a study of color, shapes, and form. The subject itself is secondary.  


St. Francis Xavier in Lucern, Switzerland was built in 1677. It's majestic presence is obvious. I wanted to pick up that character through my camera, so I got up early one morning to get that nice warm glow to it and the city in general. From that angle and perspective, it's beauty was repeated in its reflection in the Reuss River. The interior of the church is just as awesome as its exterior. Mt. Pilatus serves as the backdrop. 


The next two examples are in the little quaint and historic town of Eureka Springs, Arkansas, in the northern Ozarks. The first one is probably the most photographed building in town-- The Flatiron building. If I shoot before delivery trucks arrive, I can have the whole town to myself--no people, no cars; just the town showcasing its charm. 


Another iconic and much-visited structure in town is glass-encased Thorncrown Chapel. What I often do is go on-line and see what photos others have taken. I don't look so much what's been done, but what has not been done. 95% of photos I saw were in the daytime. The ones in the evening were shot straight on; looking right at the front of the structure. What I didn't see was a three-dimensional perspective.

One day I called their office to ask permission to photograph it after visiting hours. They allowed me to go after hours, at twilight. I had the entire grounds to myself. The situation allowed my to look for different angles. This was the angle I had not seen. 


The final two examples are in the underrated city of Hot Springs, Arkansas, which has its history rooted in natural and healing natural spring waters, nature, gambling, and mob visitors. It certainly has its share of historic and iconic buildings and structures. 

Here are just two of the many I have seen and photographed. I'll start with the iconic MALCO theater. It has a rich history and story. Before racial integration, there was a "Colored" back entrance where tickets were purchased for their balcony view of current movies. The ticket booth is still there as a reminder. President Clinton frequented the movie theater during his youth. It is now home to Maxwell Blade's magic and comedy show. The Art Deco building holds its own among other historic and iconic buildings in the city. 


Angel's Italian restaurant in the heart of downtown is in another historic building that reminds me of something I would see in Chicago. Nighttime seemed like the right time to bring out it's "Ay Tony!" character. Once I set up my equipment and decided on my composition I waited for cars to clear so I could get a clear shot of the corner restaurant. While I waited, this man walked out and stood on the corner. I knew that was the moment to go "click." The time of day, composition, lighting, and the human element all  gave me more than just a snap shot of Angel's. 


Every city and town has unique historic building, structures, and statues. Go out there some early morning, late afternoon, or evening and see if you can bring out their character, charisma, and charm.