Wednesday, March 15, 2023

 HDR PHOTOGRAPHY


Most of my HDR work is for my commercial work, mainly for the hospitality industry. For all other types of photography, however, I don't do much with HDR.

Let's start at the beginning. HDR photographic digital photography has been with us since around the turn of this century. High Dynamic Range. I will try to explain it in simple terms.

During film days, the terminology was film "latitude." Some films had more latitude, or ability, to give us good exposures for both the darkest and brightest areas of the scene. They weren't perfect, but much better than other films. If a scene has high extremes between dark areas and bright areas, we say it has high dynamic range. Neither films nor sensors are capable of doing a good job in those given conditions. Enter HDR photography. 

HDR photography has a process, and it involves a combination of taking pictures, combined with the use of photo editing software. The most common process is this:

1)  Take up to seven (7) photos of the same scene, giving a different exposure to each of the seven images. For example, take pictures at -3 stops, at -2 stops, -1 stop, at -0-, at +1 stop, +2 stops, and at +3 stops. That's seven images, ranging from extremely dark-looking images to extremely bright-looking images. 

2) With the use of HDR software, all seven images are opened in the software--all seven! The software is designed to take all seven differently-exposed images and magically narrow the high dynamic range between them to give us a great-looking image with no washed-out areas or extremely dark areas--something films or sensors do not have the latitude to accomplish on their own. That's a lot of work for a piece of software to do, huh? 

When we try to take pictures of scenes that have a wide range of dark areas and bright areas, without the use of HDR technology, we are often disappointed. We will see some blown-out (over-exposed) areas as well as some extremely dark shadows. HDR software corrects that. 

I don't like the look of most HDR-ed images. I can hear you now, "What? After all that explanation about the magic of HDR technology, and you don't like it?" Let me explain. The end result of combining seven differently-exposed images, coupled with extra post-processing with that same software, produces an image that, to me, looks like an illustration, an architect's rendering, or a colored etching, rather than a photograph. Now, true, some folks like that look. I don't. 

I guess I wouldn't mind photographic illustrations or "etchings" so much if photographers admitted that the end result was accomplished with computerized HDR processing. But that's not what happens. They are usually sold or shown as a photograph.

In the art world, by contrast, we see watercolors, oils, pen & ink, acrylics, and, yes, even mixed media. They all stand on their own. 

Photography has evolved by leaps and bounds, especially since 1998 or so. But, maybe because it is a relatively new field, compared to art-on-canvas, we have not come up with a name for photography off-shoots, like HDR and other techniques. We just lump everything into one medium we call "photographs" or "photography."  
 

So, back to my dislike of that "illustration/rendering/etching" look.  


This HDR-ed image has that "look" I've been talking about.


This image, though processed with the same software, looks more natural. They may not be the best examples, but they illustrate my point.       


According to a lot of the literature on the subject, HDR is intended images to replicate what our eyes see, that is, no shadows. However, we do indeed see shadows in many daylight scenarios. Additionally, as a photo artist, I like shadows. They give my images that 3-dimensional feel. Too many HDR shadowless images I have seen look too "flat," because there are no shadows. They are also void of emotion; of feelings. I prefer to translate emotions and feelings onto my images. I don't want the scenes I photograph to look "documented."

So, okay, I'm not very fond of HDR. Do I ever apply HDR to my images? Yes, but only under two conditions. 1) Commercial work, where clients don't like shadows--they want every inch of the image to have as much detail as possible. 2) Yes, for some scenarios when the spectrum between darks and lights is too extreme. However, even when I feel I have to, I don't want them to look like an illustration or an architect's rendering.


So, how do I use HDR and still maintain the look of a photograph? I use a modified process.  I call it my "7/3 formula." I take seven images, just the way I described previously. However, and here's the key, instead of opening all seven in my HDR software, I only open three! Which three I use is subjective. I usually use the one shot at -2, -0-, and +2. The others are there just in case I don't get what I like. And I do use other combinations until I get what I like. Bottom line: always just three. Below are 
just a few examples that gave me that "natural" feel.


To piggyback on what I've said about my likes and dislikes, I will often photograph a scene to which most photographers would apply HDR, but I don't. The technical variables are there-- extreme range between the dark areas and the bright areas. However, as explained before, I love to translate the feelings and sensations I felt when I was there onto what we call "a photograph." Below are a few examples of where I did just that. I go against todays HDR norms; often dogmas.

Early morning, just as the sun broke the horizon. Buck Canyon, Canyonlands, Utah. I liked the subtle layers of topography and dark-to-light in this scene. I would have lost that through HDR.


In order to translate the peaceful and serene feeling I felt that morning, I changed my White Balance to fluorescent. Shadows gave this scene mood. 


Without HDR, the bright colorful sky stands out against the more earth tone mountains. 


In summary, when I decide to photograph a scene, I ask myself, what made me stop? I then work backward from that and try to translate my answer into something we call a photograph.

Whatever you do, whatever your preferences, likes, and dislikes, just go out there and have fun with it. Let the outcomes reflect you.

Feel free to contact me with any questions or if you want a short 30-minute ZOOM lesson. 


Friday, February 17, 2023

LIGHT, LIGHTING, & TIMING


Light. It can be harsh or gentle; vibrant or muted. It can come from above or from an angle.    It can be sunlight or human-made light--like from car lights or street lights.

Lighting. It can be from studio lighting. A subject can also be creatively lit by "painting it with light."

Timing. It is extremely crucial in photography. It includes the time of day or the time of year-- the seasons. It can also include our reaction to those quick, elusive seconds in the field.

This month, I will share what I have done with light, lighting, and timing out in the field.

We'll start with human-made lighting. For the image below, I had to be extremely patient. I chose late afternoon after sunset, but before twilight. First, I got my composition. Then, I set my camera to get a long 20-second exposure. A tripod is a must for this! I then patiently waited until that exact moment when vehicles were exiting the tunnel and others were entering the tunnel. It took planning, knowing the basics of photography (small apertures/long exposures), anticipation, and lots of patience.

The result was this surreal image. A friend once commented that it looked like a dragon was inside the tunnel spewing fire.

This scene was much darker than it appears in the final image. Long exposures soak in a lot of light; more than the eye can see. Additionally, the speeding vehicles virtually disappear, while their streaks of light, during twenty seconds, are recorded on the film or sensor.


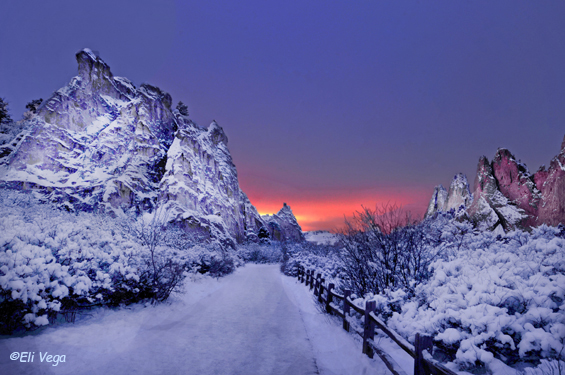
The natural winter sunlight for this image was very early morning before the sun actually broke the horizon line. At that time of day, we get those beautiful hues not present when we go out after sunrise. Those colors are the reward; they are what make the common uncommon.

Garden of the Gods, Colorado Springs, Colorado


Here is another scene where timing was an intentional factor. I like shooting during that time of year when I see late summer still clinging on while early fall begins to wave its magical wand. I love the combination of greens, golds, and yellows. 


The timing on this next one was similar, with most aspens showing off their colors, the evergreens showing off their greens, and other trees somewhere in the middle. The time of year was the main factor for this one. 

Maroon Bells, Colorado


Weather conditions can also influence the look and feel of scenes. It was foggy the morning    I saw gentle light falling on this stone bridge and pond. Colors don't always have to be bright and vibrant. Like in the movies, the lighting needs to match the moment--no need to create more vibrance than there was in the scene. Enjoy, and capture, those soothing, floating moments. 


The time of day was key for this next example. I saw this scene the day before, at midday. It didn't look like much, but, knowing more or less where the sun would come up the next day,    I suspected this scene would surprise me in the early morn. It did. I wasn't disappointed.

Buck Canyon, Canyonlands, Utah


Do not hesitate to photograph after sunset, especially if you tend to always use a tripod regardless of lighting conditions. I created this image several seconds after sunset, giving it a one-minute exposure. With that much time, the film or sensor just soak up unimaginable light. I love the quality of light and quality of color this time of day gives me.


For this last example, I "painted" these beautiful formations at Garden of the Gods with two off-road emergency lights. I spent five (5) minutes slowly "painting" them, emphasizing the outer edges. The long exposure is why the night sky still looks blue and why the clouds seem to be moving.


Creating images like these I am sharing this month requires getting outside our comfort zone. For many, it's not fun getting up before sunrise or continuing to shoot after sunset. However, as you have seen, it is definitely worth sacrificing sleep and comfort to create images that can often end up being one-of-a-kind images. I doubt that even I, who created these images, can go back to these places and recreate them. All factors that contributed to them will differ--factors like atmosphere, the stage of the autumn season, accumulation of snow, where the sun rises or sets.....the list goes on.

The theme I follow, which I talk about in my Right Brain Photography book and classes, is "impermanence." Get it then! It will change. The moment is impermanent. 

Monday, January 23, 2023

 CLOSE-UP PHOTOGRAPHY


We can get pretty close to any subject of interest nowadays with just about any lens. And, with a close-focusing zoom lens set at telephoto focal length, we can make the subject look like it was a lot closer to us than it really was.

One of the attributes I like about close-up photography is that sometimes we can get so close to the subject that we take it totally out of context. We start getting those mysterious abstracts that confuse the viewer. It's hard to tell what it really is, which works in our favor. When we eliminate the label--that "thing" with which we identify objects, we add interest, mystique, and mystery. 

 My first image is a good example of taking a subject out of context. What do you see? An oil slick? Oil from a car in a parking lot? It is nothing but a puddle of water I saw while hiking, at an elevation of 10,800.' Not a car in sight. Nature's art. 


I saw the shape of an abstract blue horse when I approached this scene. What you see is part of a frozen lake with dark rocks showing at the bottom of a shallow part of the lake. 


I was at a marketplace in downtown San Antonio, Texas. One vendor was selling delicious-smelling papitas (potato slices) with chili peppers on top. I decided to get really close to one of the peppers while letting the background blur out.  


I'm not much on alcoholic drinks, with the exception of a glass of wine now and then. But, oh, I love my coffee! I went out with a friend for a late breakfast at a local coffee shop. The waitress brought our drinks first, as we waited for our entrees. I looked down at my cup and said to my friend, "Look at my cup! Nothing but bubbles." I just happened to have my camera to capture the moment. The color and design on the table were a perfect fit against the tan cup and dark brown coffee bubbles.


For this next example, I did an in-camera double exposure of these tulips. I get a unique glow when I use my double exposure technique. In a nutshell, here are the steps. First, I always use a tripod in order to line everything up perfectly. Secondly, I take the first image slightly out of focus--that's what creates the glow, or halo. Then I take a second photo in sharp focus. I also underexpose the second shot, usually by 2/3 stop. I do this so that the final image does not come out overexposed. Remember that when we do a double exposure, we expose the sensor to light twice! That's why I underexpose the second shot, before I take it. 


This one is really a mind-bender. What do you see? if you had been with me, you would have seen three (3) aspen trees. I distanced myself from the trees and photographed them with a telephoto lens, which compressed the distance between the three trees. The result was a total abstract. There is one tree in almost dead-center. There is another one in the back to the left; another in the back to the right--that one takes up a little more space than the other two. Look for them. 


I hiked along a dry creek bed looking for something to photograph. I didn't have a plan; I just left myself open to whatever grabbed my attention. As I walked the edges of the dry creek, I saw all these smooth and colorful rocks. The best geological explanation I could come up with was that the once-running creek had rounded the edges of these beautiful rocks. Their color, however, left me without answers. One answer I did have, though, was that I had to photograph them. 

They were scattered throughout. I decided to gather them up and create my own natural arrangement. It worked! 


This last close-up is of a butterfly. Using a 300 mm lens, I was able to close in and really blur the background, which made the butterfly "pop." I was careful in placing the butterfly against that light blue in the background.


I hope I've given you some inspiration and ideas for some experimentation. 

So, get out there and look for some interesting subjects and get in close and personal. With some creative techniques and approaches, you can get close in and make the common uncommon and the mundane insane. Have fun!! 

If you have any questions, or if you'd like a personal ZOOM 1-on-1 lesson, don't hesitate to contact me.   

Saturday, December 17, 2022

WINTER PHOTOGRAPHY 


This is a preview of my new class offerings in 2023: "Landscape Photography." I am offering it to several Osher Lifelong Learning Institutes (OLLI) throughout the country via ZOOM. I am also offering it as my 3-day field workshop in July at Rocky Mountain National Park in Estes Park, Colorado. Contact me for more details if you're interested. 

Today, I will share just a small segment of "Landscape Photography"-- winter photography. The first thing to know is to dress warmly. If you are uncomfortably cold, you will not be able to get those great winter shots. You might not be able to take any shots at all if it is  I have had students go back to their cars to warm up while the rest of us were having fun on frozen lakes. 

For starters, do wear a winter cap and ear muffs. They sell hoods that cover the face (with eye openings) and ears. I like to wear a heavy winter jacket with a hood, in case of snow flurries. Good waterproof gloves come in handy. I also carry those very thin gloves and I cut holes for my "camera fingers," for when I get ready to shoot. I put on long johns under comfortable pants, then slip on ski pants over them! I can't feel a thing. I'm comfortable all day. Hand warmers and body warmers, made by various brands, can help keep hands and parts of your body warm. The last thing is good, calf-high water-proof boots. I slip my ski pants inside the boots and I'm ready to roll! Snowshoes I leave in the car on clear days. 


Okay, let's go shoot! 


In addition to photographic skills, camera know-how, and warm clothing, we also need the willingness to accept discomfort. It can be bitter cold in winter in parts of the country. Not everyone has the willpower needed. This first image was taken on an extremely cold day. And, yes, my brain that morning before I left the house was saying, "Do you really wanna do this?." It was worth it.


The time of day to shoot can give us different looks, or "feels." We can invite emotion when we photograph in the early morning, as in this next shot. I was there before sunrise and patiently waited until around 6:30 to get this shot. The warm hues along the horizon really added an extra layer of beauty to this scene.


Speaking of willpower, I hiked up to 10,900' to Lake Isabelle in the Indian Peaks Wilderness of Colorado. It was a safe, slow hike, but, again, well worth the effort. There wasn't a person in sight! 


One year, for a totally different experience, I spent Christmas day in Arches National Park in Utah. Santa was good to me that year! This is well-known and popular Balanced Rock.


The weather when I photographed this next scene was on my side that day. When seen on a clear day, you can see hints of Colorado Springs, the city, in the background. But that day, low thick winter clouds hid the city and gave me this clear shot of Garden of the Gods. Believe it or not, this is a city park. The recent soft snow looked like powdered sugar on these formations. 


I found this ranch and red structures at the foothills of these beautiful mountains just outside of Pagosa Springs, Colorado. What you see in the background is the entrance to Wolf Creek Pass. In order to get this composition, I had to drive off the main road, onto a narrow gravel road about a quarter of a mile or so.


This was another extremely cold day. My fingers tingled when I took my gloves off. This is a good place in my tip of the month to mention that when shooting in winter, the number one problem, or challenge, is how the built-in exposure light meter reacts to bright snow. 

I take these steps to increase my chances of getting great snow images, without them coming out washed out, or overexposed. I shoot on Aperture Priority. I override my light meter, nine times out of ten, from a plus 1/3-stop to a plus 2-stops, depending on the brightness and how much snow is in my image. Anything over 1-stop is severe, by photographic standards, but it's a must if we want to get the best snow images possible. The built-in light meter doesn't know that I don't want gray snow, which is what it gives me if I don't override it. 

This next image is a perfect example of when I simply had to tell the built-in light meter what I wanted, not what it thought I needed. It's about getting the right exposure, not the "correct' exposure. I created this image with film. I don't have the metadata for it, but I estimate that I overexposed this scene by about +1 1/3-stops to + 1 2/3-stops.


The contrast in this scene between the red formations against white snow really appealed to me. It was just a matter of deciding which of the various formations I was going to include within the four corners of my viewfinder, and where I wanted to place that mountain in the distance.


So, if it's snowing in your part of the world, fight the urge to sleep in or to stay in with a nice warm cup of coffee and go out there! Explore. Be adventurous and go out and get those great winter shots! Don't just be alive. Live! 

If you want a quick 30-minute "How-To" ZOOM lesson, contact me and I'll cover the key areas you would like to cover.


Have fun.

Tuesday, November 8, 2022

 TRAVEL PHOTOGRAPHY


To me, travel photography is about traveling abroad, exploring parts of your own country or state, or even traveling outside your comfort zone in your own county. That can include weeks of travel or simply taking a day trip.

Travels can take us to cities or towns, the countryside, or even into the woods; into nature. I have images that cover them all. However, for this month's tip, I will focus on the most standard definition of travel photography--cities and towns. 


During my trip to Switzerland several years ago, I preferred to walk in the cities/towns of Zurich, Luzern (Lucerne), and Zermatt. I can see so much more when I walk--it minimizes those rehashed "vacation" pictures. 

I did just that in Luzern. I just walked and walked for blocks, looking for Lion Monument.
When I travel, I don't just look for the "Top 10 Things To Do In......" I don't just aim to photograph places listed in travel guides. I leave myself open to whatever I see; to whatever happens.

Such was the case when I saw Lion Monument in Luzern. I saw a group of tourists gathering in front of it. As they gathered, I started seeing good compositions developing. Then, to add to that, a young lady just happened to walk into my composition, just a few feet from me, as she too admired the monument. I was about two feet from the ground. click!

There wasn't much color in the scene, except for one man's red umbrella. It occurred to me to convert the image to black & white, except for that one red umbrella. 


And, yes, I do have a photo of the Lion Monument, but this image is more dynamic and has a lot more interest than just a picture of the monument. The lion, by the way, was artistically carved into the rock. 

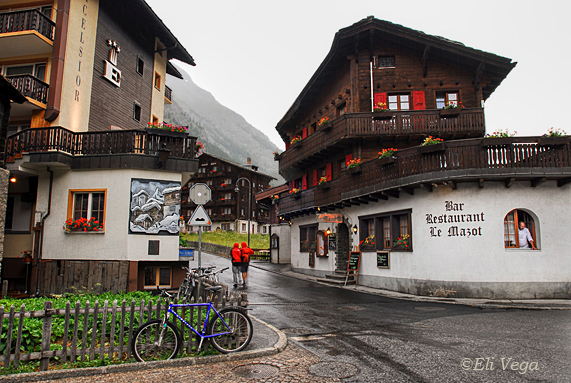
Several miles from Luzern, bordering Italy, is the beautiful town of Zermatt, nestled into a box canyon, like Telluride, Colorado. From town, you can see The Matterhorn, which serves as an awesome backdrop. I do have some beautiful images of the famous Matterhorn, but for this month, I want to share another scene that yells, "Switzerland." I loved this composition: the structures, especially the bar, the couple walking up the street in rain gear, and the blue bicycle. Just as I got ready to get the shot, a worker at the bar opened the side window, as if to say, "You want me to improve your composition?"

My tip here is to capture the culture of a place, not just the expected; the popular; the most photographed. For example, the bicycle, though not something your eye first goes to, represents the culture of Switzerland. In every city or town I visited, there were tons of folks riding their bikes to work or around town, but without the "Lance Armstrong wanna-be" outfits. 


Now we go to New Orleans, Louisiana, or NOLA, or Nawlins, however you pronounce it.  Among the many photos I have from my six visits to "The Big Easy," this one still stands out. This young street performer was entertaining us with his patched-up tuba. Culture. That's what I go for in many of my shots.

Notice I didn't photograph the entire tuba or his entire body. Cropping, in-camera, often gives us more dramatic, more striking, and more provoking images. 


Similarly, in Chicago, I saw another street performer, a man with a saxophone. As I did with the young boy in New Orleans, I cropped tightly in-camera; I zoomed into his hat, which, to me, was his "signature." I loved his sunglasses carefully placed on his black hat. This image is more a reflection of character; personality, rather than the physical man himself. 


I visited the small, quaint and historic town of Eureka Springs, Arkansas. The entire downtown is on the U.S. National Register of Historic Places. What that means is they have stringent city ordinances as to what you can build downtown and what you can or cannot do when you submit applications to the city to renovate your business building or personal home, if they're within the designated preservation area. What that also means is that you can visit there in 1988, then again in 2018 and the town looks the same--like time stood still.

Knowing that history, I decided to get up very early one morning, before normal life woke up, to photograph the frozen-in-time downtown. I'm glad I did. I later converted the image to an early-era sepia photo. Ghostly, huh? Not a human in sight. This was taken in the late 1990s.  


Seattle, Washington. I have only been there once, but I took advantage of my short visit. I always believe that no matter how much we plan and prepare, we should always leave ourselves open to a little bit of luck. Such was the case when I visited Seattle. The city, I assume, had contracted with an artist to (temporarily) paint several downtown trees blue, yes, blue! I took advantage of the surrealism of this scene. Not only were there blue trees, but silver and copper figures sprinkled throughout this downtown courtyard--look for them. 


Salt Lake City, Utah, and the state are known for their LDS (Latter Day Saints, or Mormons) history. There is beautiful landscape scenery around the area, but Mormonism pretty much blankets its culture, business, politics, and religion. That said, they are meticulously detailed about presenting their religion to visitors and guests. That is clearly seen in this photo of Temple Square, right in the center of downtown. The square covers five city blocks. The temple itself was completed in 1893. 

For this photo, I liked the combination of the temple, Temple Square, and visitors enjoying their visit. Notice how immaculate the grounds are.


Taos, New Mexico, More specifically, the Taos Pueblo. It is one of the longest continuously-inhabited communities in North America. Some of the oldest settlements in New Mexico date back 1500 years! Below is a photo of how the pueblo looks today. 


I always say that I know no strangers. I talk to everyone everywhere I go. The Taos Pueblo is no exception. During one winter visit, I started a conversation with one of the local artists in the pueblo. He invited me into his abode, which doubled as his house and studio. His name is Meko. He was kind enough to let me photograph him in his small, intimate, and colorful studio/ home. As I said earlier, I like to capture culture when I travel. This is not Hollywood. This is real life. 

My photography is much more than a depiction of my technical skills as a photographer. It reflects my love of, and respect for, life, cultures, and everything out there for me to see, experience, and enjoy.


I hope I have given you some ideas and approaches to travel photography. Enjoy your travels; enjoy photographing them. 

E-mail me at vegaphotoart@gmail.com with any questions you might have, or if you would like a field lesson if I'm ever in your town or if you live nearby Hot Springs, Arkansas. 

Wednesday, October 19, 2022

 DIFFERENT WAYS OF PHOTOGRAPHING WATER


How many different ways can we photograph water? Well, it's virtually endless. There are waterfalls, beaches, rivers, lakes, ponds, and even puddles. However, it's not the subject, so much as the way we photograph the subject. Think perspective, timing, time of day, time of year, or weather. 

Below are examples of what and how I incorporated water into my compositions. I'll start with a scene that was not easy to photograph. It was a cold winter day in October, in Colorado. In those conditions, I had to take a 4-mile round-trip hike to beautiful Lake Isabelle. As you can see, It was well worth the effort. The message here is: Do what others are not willing to do.


I photographed this soothing, tranquil scene in the early hours during a very foggy morning in Hot Springs, Arkansas. It's called Stone Bridge. This scene does not have this "feel" at all during a sunny morning. Weather is the keyword here. 


We have seen hundreds of waterfall images. They are indeed beautiful to behold. However, for this next image, I decided to capture the essence; the "feel" of the waterfall, similar to what I did above with the bridge and pond in heavy fog. Although I took several photos of the actual waterfall, this one turned out to be my favorite. Sometimes, photographing just a small part of the subject can have more impact, whether it's dynamic or soothing. 

This is Ouzel Falls in Rocky Mountain National Park, Colorado.  


Now, for this next image, I did photograph the entire waterfall. I captured both the waterfall and the creek it creates. This is Fish Creek Falls near Steamboat Springs, Colorado. I prefer to photograph the context in which a waterfall is, rather than just the waterfall itself. 


I found this composition near the Grand Tetons in Wyoming. I liked the way the Snake River meandered along the landscape, with the Grand Tetons as a backdrop. The lighting is what attracted me that morning. The foreground lit by the sun, while the clouds sprinkled sunlight on the mountains, gave this scene a three-dimensional feel. 


The water in this scene created interesting geometric shapes--a sort of surreal look. This is beautiful Garvan Woodland Gardens in Hot Springs, Arkansas. 


Sometimes, it's the not-so-obvious that grabs my attention. On a nice summer day, I hiked, again in Colorado, after heavy rainfall. There were several puddles of water along the trail. The hikers that day, including me, had to hop over the puddles along the trails.

On my way back down from the hike, a puddle grabbed my attention. I no longer saw a simple puddle of water; I saw art, nature's art in the puddle. My message here is this: Don't just look for something to hit you between the eyes and say, "Here I am. Photograph me." Sometimes the most subtle, the less conspicuous, can be gems just waiting for us. We need to see; not just look.


This scene was not difficult to find. It is a short, easy hike to Maroon Lake, where you can sometimes see the reflection of majestic Maroon Bells, two of fifty-six "Fourteeners" in Colorado--peaks that are at least 14,000' in elevation. It is important to arrive early at any lake before the breeze starts to pick up. That is how we pick up those beautiful reflections, which we simply cannot see when the mountain breezes sweep across the surface of lakes and ponds. 


So, go out and look for water. It's everywhere. But, don't just set out to see the obvious. Look all around you. Something exciting is waiting for you to see it. Look with your eyes; see with your imagination.

Have fun!