Wednesday, March 17, 2021

 BARNS


There is something about barns that grabs my attention. They have character, whisper history to us, have varied designs, and are part of our sociological fabric. 

If you're like me, you have your own collection. If you don't, I hope my examples motivate you to take some day trips on those "blue roads" that lead between towns and cities. You'll be surprised what you might find.


Let's start with this old iconic Mormon barn in the shadows of the Grand Tetons in Wyoming. 
I positioned myself and the barn in order to accentuate the context in which this beautiful barn was built. 


This old barn would be disappointed if it knew that it had been converted to living quarters!
It's hard to tell from this photo, but the barn is right in the middle of town now--Eureka Springs, Arkansas.


So, who do you think is winning this battle? This falls under the category of surrealism.


I don't know where I acquired this ability, but I have great peripheral vision, which really comes in handy when (carefully) driving. Such was the case as I drove back home a couple of weeks ago, after an overnight stay at a lodge on the highest mountain in Arkansas--Mount Magazine.

In a matter of seconds, I spotted this barn to my left. I just had to turn around to get a slower and closer view. I loved the huge bail of hay that had been chipped away by horses. The remains looked like some sort of scary creature. The nearby skull hanging outside the barn just added to my composition!  


I saw this giant beauty outside of the small town of Heber City, west of Park City, Utah.


I "painted" this red barn after sunset, shining my off-road emergency flashlight all over the  barn, including the small trailer at the back of the barn. I walked around the side, then along the front of the barn, as I "painted" the surface, spending a little more time shining light inside the barn--that section inside the front of the barn. The BULB setting is required for this type of photography. In this case, it took me about two minutes to finish painting the barn.


Steamboat Springs, Colorado gets the prize for my barn photos. The small town was my canvas for four (4) of my favorite barn images. 

This is one is right in the middle of town. The town just grew around it.


I loved this setting--the cowboy walking his horse back to the barn in the background. The blanket of snow on the barn's roof really adds interest to this scenario.


This is the most iconic barn in the entire state of Colorado. I just happened to photograph it before the historic town (Steamboat Springs) was overtaken with real estate development. Another photographer told me this scene doesn't look like this anymore--there are condominiums now that fill the backdrop. Sad.  


This modest but interesting barn is on the outskirts of town, just south of the city limits.


Here is a caveat when shooting barns, or any subject, in the snow. The bright snow will trick your built-in meter and histogram! To get a good acceptable image, you will need to overexpose your images by 1-2 stops, in order to keep your whites from going too grayish on you!  


You might talk to your local historical society or museum, or your state historical society and ask them if they know of old barns in your county or state. If you are interested in knowing exactly where the barns in my blog are located, please feel free to e-mail me and I will give you directions.


Thursday, February 18, 2021

 PHOTOGRAPHING LAYERS


If we really look, layers are all around us. We can find them in nature, hillsides, in the sky, inanimate objects, etc. They are interesting, unique, artistic, and can at time give us some cool abstracts.

Let me share some of the layers I have found while observing life with my camera.

Let's start with this farm field in eastern Colorado. We usually associate Colorado with mountains and skiing, but the eastern prairies give us a different kind of beauty.


These mountains near Luzern, Switzerland, created some layers in a blue haze. It's not always necessary, nor desirable, to have complete detail in our images. Sometimes the opposite can be more pleasing and effective.


Here are more mountain layers, but from the state of Arkansas. This view is from Petit Jean Mountain in central Arkansas. It's a beautiful area to explore. This scene was at sunset. And, yes, the awesome colors looked just like that. 


I found these layers at Garden of the Gods in Colorado Springs, Colorado. The big peak in the background is Pikes Peak, one of Colorado's fifty-six "Fourteeners"-- peaks that are over 14,000' in elevation.


This 1929 staircase in The Arlington Hotel in Hot Springs, Arkansas, creates really artistic curved layers.  Like I said, I see layers everywhere.


 Now these are layers! A combination of farm and mountain layers. Couldn't resist! 


I saw this layer of clouds at sunset. I didn't have my camera, so I rushed home, grabbed my camera, and ran to this site before the sun went down! Thank goodness I was only a block away! I hadn't seen anything like this. I haven't seen anything like this since then. In my book, Right Brain Photography, I talk about the concept of impermanence. When we see something as unique as this, we won't get a second chance. 


This is a different look at layers. I saw different layers of nature--water, dunes, and a mountain range, all harmonizing to give me a great composition.


It's easier to see layers if we take the labels off. For example, in the image above, if we see "creek," we will tend to photograph the creek. If we see "sand dunes," we will tend to photograph the dunes, etc. Message: don't get addicted to labels; the labels we were programmed to learn in order to identify things in life. 

Okay, I'll throw one more in just for fun. Can you see layers? Not benches, not rocks, not
trees............layers. Now go challenge yourself and look for them. 


Visit me on my website and LIKE me on my Facebook page. 


Monday, January 18, 2021

 PRIMARY COLORS

If we study color theory, we learn about something called The Color Wheel. On the color wheel, we will see the 3 primary colors: Red, Blue, and Yellow. If we mix red with blue we get purple; if we mix blue with yellow we get green; if we mix yellow with red we get orange--the secondary colors. If we keep mixing primary colors with secondary colors we get tertiary colors.

When we see the complete color wheel, we see what looks like a 12-piece pie, with cooler colors on the left and more vibrant, exciting colors on the right.  


I keep these relationships in mind when I'm out shooting. The combination of colors gives me certain moods, which I often translate to a photograph. The end results, though not for all images of course, are soothing, calming images or exciting, vibrant images. 

My tip, and assignment, for this month is to introduce primary colors into out images. They can be either the primary color in the scene, or they can be part of the image. The key is that they are evident in the image--Red, Blue, or Yellow.

With that introduction, I will now share images where I introduced primary colors, which is my tip of the month. They might not all evoke a feeling of tranquility or excitement, but the gist of my tip this month is to think primary colors. 


This scene, though extremely interesting, had very little color. Most of the color in the scene was bland--grays, browns, deep greens, other dark colors, and then there was this one red umbrella that one of the men was holding. There was a light drizzle that day.

For this image, I converted the image to B&W, except for the red umbrella. The eye can't help but be drawn to it.


It was early morning, so I knew I had to work fast bedore I lost that early morning feel. Additionally, I decided to change my White Balance to Flourescent to see what it would do and I loved it! It gave me the cool blue colors that matched my feelings that morning--soothing, contemplative, and peaceful.


Here's what that same scene looked like under Daylight/Sunlight WB. BIG difference.
The colors in this image are not at all peaceful and tranquil. 


In this image, taken at an Asian Dragon Festival, the predominant color is primary red, with primary yellow and the secondary colors of purple and green. Beautiful assortment of color on these umbrellas.


Yellow! It jumps out at you from this sunflower turninig itself toward the sun for health and nutrition. I shot it from behind. When I do that, knowing that the built-in light meter is going to darken the flower, I always override the meter by overexposing the image from what the meter thinks I need. In this case, I overexposed it by a + 2 & 2/3!!! Don't be afraid to override that undependable light meter, even when you're shooting manual exposure. My primary go-to exposure mode is A, or Aperture Priority. 


This surreal image of a pinball machine has lots of primary colors, mainly reds and blues.
I like to photograph subjects that most of us take for granted; subjects that may be considered mundane.  


In this scene, not only did I see the primary colors of red and yellow, but secondary and tertiary colors as well. Red and yellow are the two most arresting colors, even if there are small amounts of them in the image.  


Red. It's hard to miss in this scene in the middle of a great autumn. This image was taken a week after 9-11, thus the American flag. 


There is a lot of blue in this scene--the blues in the background and in the reflections.
Believe it or not, this is under a city car bridge, in Boulder, Colorado. Someone painted a mural on the bridge support. There is a walking/jogging path toward the lower part of the scene. I decided to hop over puddle so I could get to the other side to pick up the relection of the wolf in the puddle. 


There are secondary and tertiary colors in this scene, but they can't compete with primary yellows for attention. I used spot meterinig for this scene in order to make the yellow "pop." I spot metered from the yellow tulip to the right. 


So, go out there and look for those fun primary colors. They are everywhere and any time of the year. Reds and yellows are so vibrant that whatever your subject is, it becomes the center of attention. Have fun!

If you ever need some 1-on-1 instruction, we can do it safely through ZOOM. Please feel free to e-mail me and we'll schedule one soon! 


Wednesday, December 16, 2020

WINTER PHOTOGRAPHY 


Winter photography can be fun, tricky, and, yes, cold. It's fun because I love the outdoors and love to exercise. It's tricky because bright reflective snow can cause the built-in light meter to mistakenly give me exposures I don't want--it is not engineered to give me white snow.

Aside from the technical or artistic aspects, the first thing I take care of is my comfort. If I'm cold, get my socks wet, freeze my fingers, or don't have my head covered, it will be extremely difficult to focus on my photography. During my winter workshops, I have had students either walk back to their cars and wait for us or take very few photos because they were either tired or uncomfortable in the cold.

So, my overall advice is to dress appropriately, make sure you are in average-to-good shape, and know how to handle difficult camera challenges. The most difficult camera challenge is that, whether you have a $400 or $4000 camera, the built-in light meter is designed to give us "gray" snow. Not good. My rule of thumb is this: If the scene in your viewfinder has roughly 70% to 80% snow, take those shots at a +1 to a +2 overexposure. You might need to take some test shots to get what looks right to you. 

So, with that introduction, lete me share some examples from my winter walks and hikes.


Sprague Lake in Rocky Mountain National Park is one of my favorite lakes in the park. For one, it has a great backdrop, including the middle peak, Hallett Peak, at 12,713 feet.

There was a fairly equal distribution of bright, dark, and mid-tone areas in the scene, so not much need to go a +1 or +2. This was shot at -1/3 stop.


This beautiful old barn also had a great backdrop, in the middle of Steamboat Springs, Colorado. I don't have the metadata on this one, but I estimate a +1 overexposure.


No exposure compensation needed for this scene. There was an even distribution of midtone and light areas. This is beautiful Lake Isabelle in the Indian Peaks Wilderness of Colorado.


I closed in on these large aluminum flower decorations in Santa Fe, New Mexico to get more of an abstract, as opposed to the whole flower. I overexposed the scene to a  +2/3. 


This is also in Santa Fe--San Miguel Mission. I went with a +1 stop overexposure on this one. The building to left of the church is considered to be the oldest house in the U.S. 


Balanced Rock in Arches National Park in Utah is a great subject anytime of year. However, it takes on a different look in winter. I took a more artistic composition that day, rather than simply photograph Balanced Rock. This composition gives a sense of its context within the park. I went with a +2/3 on this one.


In Taos, New Mexico I found this composition. I included this one because, unlike the others, for which I overexposed the shot, on this one I underexposed the scene by a -1 1/3. Why? Just because it's winter doesn't automatically mean we will need to overexpose all scenes. It's a matter of the percentage of dark areas, medium-lit areas, and brightly lit areas in the scene.

In this scene, there is a big chunk of building, in the shade. When the built-in light meter sees this, it thinks it needs to overexpose the scene. One more time: it thinks it needs to overexpose the scene--that's what it's designed to do! And it applies whether you're shooting Aperture Priority or Manual. So, technically, I didn't underexpose the scene per se, but I underexposed from the point that the meter took me. It thought all that medium lit area needed to be overexposed. Does that make sense?


I left this one for last to show that shooting in winter is not just a matter of thinking with the left brain, i.e., it's not about only thinking of the technical know-how side of the brain. Sometimes it's fun to apply some right brain, or the creative aesthetics side of photography. The best photography, as I mention in my book, Right Brain Photography, is found where technical know-how and creative aesthetics meet. 

For this shot, a 25-second image, I chose December to photograph southern Utah's Mesa Arch at twilight, after the sun went down. I wanted the La Sal Mountains in the background snow-capped. Once I got my composition, I "painted" the underside of the arch with a large off-road emergency light. 


I hope I've given you enough to spark your interest, and motivation to bundle up and just go out there on a cold and not so cozy day and see what you can come back with.....

Have fun out there. And remember, never, never, put your brain on Auto Pilot--you will be disappointed when you see your images on your screen.

Let me know if you'd like a 1-on-1 one ZOOM lesson. They're only $35/hr. 


Monday, November 16, 2020

 INCLUDE WATER IN YOUR IMAGES


Water always adds more interest to our images and gives us more to include to improve our compositions. Water can also add mystique and mystery to our photos. It can be something as simple as droplets or can include the ocean, lakes, rivers, creeks, waterfalls, or cascades and brooks. 

As I share some examples from my experiences, I will explain what caught my eye, why I photographed it the way I did, and other thoughts and feelings that went into the creation of my images.

Let's begin with something that is not common in photography, and that is to photograph the reflection a the scene, knowing that I am going to display it "upside down" in the final photo. I really look for that type of scene, where doing so will work better than the actual scene I see with my eyes.


I'm sure all of you are thinking, "So, what's so great about this shot?" This might sound strange, but when it comes to photography the eyes see too much, and what they see can overwhelm us. We need to extract from what the eyes see. We do that by scanning the scene, which I spend a lot of sentences in my book, Right Brain Photography. 

After I scanned, my eyes went, not to the scene above, but to the reflections. The more I looked at it, the more I could see a surreal image of trees with early spring colors.I could also "see" an image ala Impressionism. In addition, if I froze the movement in the water with a fast shutter speed, I could add surrealism to the image. And I knew at the time I created the shot that I was going to display it "upside down." See the image after the one below to see the final result for my "Dream Transition."  


Okay, now I'll move on to something more traditional. I have photographed Sprague Lake in Rocky Mountain National Park in Colorado many times early in the morning. Every time I've shown up before most people wake up, I hoped to see that magical alpen glow, which is one of those moments in time we as photographers love to freeze for posterity. Of all my early visits to Sprague Lake, only once did I see what my imagination saw.

We saw this scene during one of my many field workshops in Rocky Mountain National Park.


Sometimes, nature makes it difficult for us to get what we want. Believe it or not, this scene is at an RV campground in Hot Springs, Arkansas. Most folks who park their RVs during their stay don't see this exact viewpoint because it's at a bit precarious spot. I had to hike down to it in uneven and uncertain terrain, hop over large damp boulders in the creek, then stand on them carefully as I got my shot. The level at which I had to get this perspective was too high to kneel down on the boulders and to low for me to easily look through my viewfinder---I'm sure some of you have found yourselves in this dilemma, right? Thank goodness for tilting back camera screens! 

I share this experience because if we want to be good photographers, we have to do more than understand the technical know-how side and the creative aesthetics side of photography. We have to do what it takes to make the common uncommon; the mundane insane. It's not enough to ask ourselves what f/stop, shutter speed and exposure we want or need. Speaking of exposure, I love shooting under overcast skies--it keeps me from having to think or "do HDR," as this image illustrates. 


For this waterfall shot, Ouzel Falls in Colorado, I got in close to the water flowing at the bottom of the falls, not the waterfall itself. I did that to better interpret the feeling I had when I was there--tranquil and peaceful. It wasn't a subject I was trying to photograph; it was a feeling.

When it comes to waterfalls or any moving/gyrating water motion, we need to ask ourselves what "look" we're going for. The answer to that question will determine what shutter speed we will need to achieve that. In this case, my shutter speed was 1/6 of a second! 


Speaking of waterfalls,if you haven't seen this waterfall, I highly recommend adding it to your bucket list! Multnomah Falls in Oregon. You'll need a wide angle lens for this. Vertical, for me, works best for most waterfalls, unless the surrounding terrain improves my composition.


Another body of water I highly recommend adding to your must-see list is Maroon Lake, which reflects the most photographed peaks in Colorado--Maroon Bells. Notice my composition. Even those small rocks sprinkled on the bottom of the image were intentionally introduced to add what I call "containment," which is one of 7 principles of composition I focus on. If you would like a 1-on-1 ZOOM lesson on composition, please e-mail me and I'll give you more information and tips.  


Bridge reflections always make for great subjects. This is Beaver Bridge near Eureka Springs, Arkansas, built in 1949 and still in use. Cars need to take turns crossing over the 1-lane bridge. This was taken early in the morning, with a thick fog hovering around the landscape. 


I found this beautiful scene in Luzern, Switzerland. I was attracted to the twilight hour reflections on the River Reuss. 


Water doesn't have to be photographed in the spring, summer, or fall. Winter is also fair game!


The state of Wyoming has some of the most dramatic scenes with water--waterfalls, lakes, ponds, hot pools, geysers, etc. Here are a few of my favorites from my birth state. 

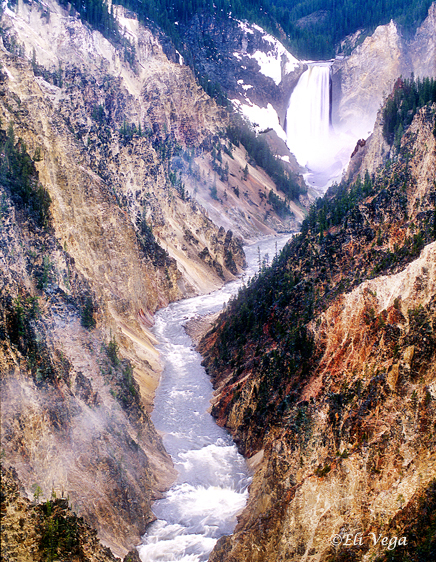
Lower Yellowstone Falls from Artist's Point


One of the many natural thermal pools in the park--Midway Geiser Basin. I like to create abstracts by cropping a scene in-camera; in the field; at the time of shooting.  


I'll leave you with one of Yellowstone Park's most iconic sights to behold--Old Faithful. Taking advantage of the camera's continuous shooting mode is a must for these scenarios---just shoot, shoot, shoot, within a split second. In this case, this one image looks like a make believe nuclear explosion, with mushroom cloud and all. 


I hope this photo journey and examples have inspired you to go out and look for water to include in your images. I know, some of these examples were from far-away places, but, for most of us, we can find beautiful scenes within a day's drive, which might include going into neighboring states. Go to the internet and research "waterfalls in.....," state parks in....," "Wildlife preserves in...." Wherever that takes you, have fun!! 

Eli