Thursday, January 24, 2019

A TOUCH OF COLOR

I'm doing something different this month. I'm going to take you to the digital lab, where you can have some creative fun playing around with what I call hybrid photo art, created with a combination of a camera and obvious software applications. 

This is about what we can do when we add just a touch of color to any image. It all begins with a color image, then deciding which parts will have some color and which parts will have no color--basically a black & white image effect. It can be a lot of fun, but not every image, every scene, every subject is conducive to this type of application.

I use this technique sparingly. There are primarily two reasons why I would ever do this, and these are: 1) To create a surreal effect, 2) To convey or illicit a message or thought. As you look at the following examples, ask yourself what message or thought resonates with you. 

There are a few steps I take to create this effect. There's nothing magical or novel about it, but it does require a few key steps. 

1) I first decide if an image might be conducive to this application. This step is totally subjective, so use your own creativity and decision-making here. The most often scenarios for me are when I sense a story, see surrealism, being in the present yet photographing something from the past, or if there is only a hint of color in the scene.

2) Once I make that decision, I then decide which parts I will convert to B&W and which portions I will retain as is. This step too is subjective--you be the judge of your own creation.

3) Once I make that decision, I use the Quick Selection tool to select the area in which I will retain color. I first let the tool make the selection as I'm guiding it along. I then zoom into the image so I can take a closer look at how accurately the quick selection tool made the selection. I make necessary adjustments to make sure it selected the area(s) I want. In some cases, to really fine-tune this step, I might use the Color Replacement tool to add color back in to a few missed small areas, or to convert a few missed small areas to B&W. Zooming in is critical for making those small but important refinements.

4) When I'm satisfied with my selection, I click on Selection, then Inverse. I am now working on the part of the image I don't want in color, then click on:
Image--->Adjustments-->Black & White. You can also click on Desaturate, but I prefer Black & White. 

As I move from one step to another I am always making other adjustments as needed--contrast, color, vibrance, etc. It's all subjective.


When I'm satisfied with the results, I save my "dash of color" image as a copy, always keeping the original image intact.           

So, with that introduction, this first example depicts a message I had when I created it. It is an old diner in downtown Denver, Colorado, Denver Diner, on Colfax Avenue. It's an iconic 1950's diner. I wondered what that old diner might have looked like if I had photographed it in 1959, juxtaposed against what it looks like today. I titled it "Now & Then." 


I saw this beautiful Lion Monument in Lucerne, Switzerland. Although I like the original image, there wasn't too much variance in color in the wet scene that day, except for one man's red umbrella. 

I see a few levels of surrealism in this scene: a stone lion in a park on a wet day; a European scene visited by primarily Asian visitors; the perfectly aligned cobble stones leading the eye to the lion. The red umbrella against a black and grey background added an additional layer of surrealism.


I discovered this place where they sell chilis, the kind used by Mexican restaurants in their salsas. The owners let me go inside and get some shots. There were tons of ristras, or arrangements of chilis hanging up to dry throughout the warehouse. I had fun photographing them.

When I looked at my images, a sense of surrealism swept over me. I came up with two renditions, each with its own interpretation. What message or feeling resonates with you when you see them? 


In my book, Right Brain Photography, now in its fourth edition, I talk about the role impermanence plays in the realm of photography. With that in mind, I saw this old, colorless long-abandoned house along Highway 62, between Eureka Springs and Rogers, Arkansas. It was around around Christmas time and someone had hung a beautiful large red bow above the remains of the front door. I saw surrealism, big time! 


This is the scene as seen with the naked eye.. As I state in my book, I see with my imagination, not my eyes.  


These last two examples are similar. They are both art related. The subject is Plein Air artists painting around one of the most historic towns in the U.S--Eureka Springs, Arkansas.
The idea that ran through my mind was modern-day painters painting buildings that could only be photographed in black & white during their heyday. Only the paintings and palettes are in modern-day color.


So, experiment and use your selective judgment as to what you'd like to do. Go back through your archives and see if you have any images conducive to this application--- abandoned cars or tractors, classic car shows, old barns and houses, florals, etc.

Have fun with it! E-mail me if you'd like to see any of the above photos "as shot."  


Wednesday, December 19, 2018

TRANSLATING FEELINGS ONTO A PHOTOGRAPH


Feelings are not easy to translate onto a two-dimensional object called a picture, photo, image. The reason is that when we are in the field, we see and  feel the experience. Most of of us only photograph what we see. This month I will take us into the feeling side of the brain--the right brain.

Feelings, according to psychologists, reside in the brain's right hemisphere. What that means is that if we are strongly right-brained, we are more likely to pick up on feelings elicited from an image. When I show my images, I know my images have touched someone when I hear exclamations like "Oh my" or "Oooh." Now let's look at the other side of that spectrum. If we are strongly left-brained, we are more likely to analyze and critique.


Has this happened to you? You feel great when you're out there shooting, but you go home and say, "Hmm? It looked much better when I was there." More than likely, you felt something when you were there, but now it's just a picture; a picture without emotion on your monitor.

With that introduction, let's get started. I will show how I try to best translate my feelings onto a two-dimensional object called an image. I do that at the time, in the field, in-camera.
If I don't, that feeling is gone. No photo software or app can bring it back. Why? Because they depend on me, and I no longer "have it."


Can you feel the peace and serenity in this image? My right brain always tells my left brain what to do. That day, I changed my White Balance to Florescent instead of Daylight in order to translate my feelings. I felt so tranquil seeing the sun rise above the cool valley below.
                                                           
                                                              This is how I felt


                                                               This is what I saw 


I was at Ouzel Falls in Rocky Mountain National Park in mid-summer. It was really gushing down that day! I saw the waterfall, but it wasn't the sight of the waterfall that got my inner attention. After I photographed it, I knew I hadn't captured the feeling the falls stirred inside me. The water was so powerful I could feel the earth vibrate under me. I could hear the calming roar of the water. I could feel the mist on my face. Even with the loud rushing water,   I felt peaceful; meditative.

So, how do I translate that feeling? I continued looking for other options. Then I found it! Photographing just the bottom of the waterfall, where its powerful waters violently hit the boulders below, was the composition I needed for my translation. My right brain told my left brain what to do and how to translate my feelings that day: get underneath the falls and use a slow shutter speed (1/6).     

    
                                                                 This is what I saw


                                                              But this is how I felt


Now that you know what I go through to translate my feelings, let me show you a few more end results. What do you feel? What resonates? I'd appreciate your feedback. Please feel free to e-mail me

This was part of a Christmas "Living Windows" event downtown Eureka Springs, Arkansas. . These were real people replicating a biblical scene. I was on an assignment for a local hotel, so I got some good "straight" shots. However, I also wanted to give them some options for their website. For this shot, I used spot metering, metering off of Jesus' robe, in order to give it a more pastoral feel. It has a more inherent feel to the scene, rather than seeing every single part of the scene equally exposed. As I tell HDR addicted photographers, it's okay to have some shadows. Van Gogh and Rembrandt did. It gave depth to their paintings.      


If you care to see the "straight" shot, feel free to e-mail me


There is a 700 ton formation in Garden of The Gods city park in Colorado Springs. It's called Balanced Rock. You can find photos of it on this link

It is an extremely mysterious piece of geology. However, seeing it during midday just doesn't illicit that mystery, that charm, that feel of intrigue. So, one day I decided to photograph it at night, right after sunset so I could record some of the left-over cobalt blue in the sky. Additionally, I painted it with my special flashlight. That combination gave me that sense of mystique Balanced Rock deserves. 


A lot of photographers squirm when I tell them I often underexpose my images, anywhere from a -2/3 to a -3!! The result I am after is just the opposite of HDR, which tries to give the entire scene a 1-exposure look--every inch to be evenly exposed. A lot of those images look "flat" to me. By underexposing a scene, it makes bright subjects and bright colors pop--they really stand out, as backgrounds go dark as a result.

This is image is at Mud Lake in Colorado, near Nederland. I loved the white bark on the aspens and the yellows, but at midday, they just didn't show off their true colors. By underexposing the scene by a -1 1/3 I kept that exciting "autumn" feel. Technically, I gave the scene 133% less light than the built-in light meter thought I needed for a "correct" exposure.  


Sometimes what I sense in my environment, as I take an emotional pulse reading, brings out the creativity in me. When I sense something I let my imagination see for me. 

I was in the middle of a huge field of wild flowers in a high country meadow. The incredible vibrant colors seemed to swirl all around me.


So, I just had to make them swirl. This is a double exposure. The first image was a straight shot of the field of wildflowers. For the second image I applied my now-famous "swirl" technique where I literally swirl my camera (sans tripod) to create this effect.

That same day I also felt like they were coming at me from all directions. I just started applying long-proven in-camera techniques, like zooming in and zooming out of a scene.


You need a slow shutter speed to allow you time to zoom. I used 1/25.


This last example is one of my personal favorites. I have created many fishing themes before, but this one really gave me that feeling of sheer solitude and freedom--the freedom to do what you enjoy, when you want, how you want, where you want, and as long as you want to do it.

I set out that early cool September morning in Holiday Island, Arkansas. I didn't know what I would find, but I had to find out that cool and foggy morning.

It didn't take long to find this seemingly relaxed woman fishing at Table Rock Lake. She wasn't in a yacht, but she didn't need one to enjoy her freedom for relaxation. She seemed so content. 

There are no strangers in my life. I said hello and introduced myself. She told me her name was Mobey. We talked for awhile as she told me about how much she liked that spot. I asked her if she'd mind me taking some pictures as she fished. She didn't mind at all. In fact, I think she was flattered. The feelings that came over me were instantaneous--an immediate connection with the calming enjoyment of just sitting there, on a plastic bucket, fishing. I felt relaxed and care-free just watching her and photographing her, as the fog maintained its density and coolness, transforming the background into a movie set backdrop. The scene and image beg the question, "What's important in life?"


 So, whether you are predominantly left or right-brained, surely you have feelings. Get in touch with them next time you're out with your camera and try to retain those feelings, thoughts, or sensations and translate them onto an indelible image. Have fun with it.  


Monday, November 19, 2018

ETHICS IN PHOTOGRAPHY


During my last visit to Colorado this past September, I had a 4-hour lesson with one of my former students. We drove to his chosen location and during the drive he had his first question for me--ethics. We're talking here about the ethics of photography. More specifically, to what extent do we manipulate our images before it reaches the level of "cheating." 

This has become a common question ever since the advent of Adobe Photoshop 1.0 in 1990, and the advent of the first digital camera with a memory card slot in 1995. I first started hearing and reading about this ethics question about ten years ago, with gained momentum the last five years. 

The timing of the facts is not as important as the ethics discussion itself. For this month I will break down this discussion into five camps, or perspectives on the subject.

1) Post processing is photography.
2) The client perspective
3) Today's photography audience--the general public
4) In-camera photography
5) My perspective   


Folks who are convinced that their perspective is the right perspective, see this as a debate, not a discussion. I see it as a discussion because if it works for you, it works for you. If people are buying tangible photographic products or services from you, you are doing the right things the right way that work for you.

So, let's get started. You decide what's right or wrong, good or bad, ethical or unethical for you. You decide how far you are willing to go and still feel comfortable with yourself.

I'm sure there are other perspectives, but for now, let's take a look at these five. My comments are not based on methodically researched studies, with defensible correlation coefficients. They are based on what I have seen and read on-line or in magazines, discussions I've had with other photographers, and observations I've made from teaching literally hundreds of photographers at all skill levels throughout my career.


First perspective: Post processing is photography.

Some photographers who picked up a camera for the first time around the advent of digital photography and Photoshop, or some who love to spend hours in post-processing, do not see a demarcation between photography and post-processing. To them, the camera is just a tool to "take" the picture. The real photograph is created in post processing. Therefore, everything that follows is photography, and therefore is ethical. It's not cheating.

This is exactly the same perspective Ansel Adams took with his photography. He was "photoshopping" before Photo Shop was invented. He created improvisations in the lab to "photoshop" his images, including dodging and burning and even "spot healing"--getting rid of unwanted objects in the original photo. A good example is "Moonrise Hernandez," where he eliminated undesirable clouds.    

Some photographers in this camp did not learn photography during film days. Therefore, they never had to learn how to get it right in camera. Several of my photography students, even advanced photographers, did not know how to use the exposure compensation dial. Yes, even that is done by some through post-processing. One professional-level student did not know how to engage BULB on his camera, and got upset when I tried to help him. 

To summarize, for this camp of photographers, there is no difference between photographic skills and post processing skills. To them, taking a picture, coupled with post processing is photography.  


The client perspective.

"Client" here is defined as the buyer of prints or folks who pay for photographic services. The list is too long to include here, but they include purchases for wall decor or businesses who need commercial photography, hospitality, etc. 

This one is pretty straight forward. As I say in my "How To Make Money With Your Photography In Your Spare Time" class, if someone pays you for your prints or services, it was good enough for them. This area of photography is not about us--it's about them. I have sold prints of images which I didn't think were necessarily my best efforts. Businesses have paid me for photographic services, i.e., images which they asked me to adjust, which I didn't much care for, but, it's about them, not me. 

Sometimes I make suggestions, but need to still let them decide. On the other side of that, some have left it up to me, saying, "I'll leave it up to you. You're the photographer." But when they see the results, they frown. That can be very frustrating. I have learned to ask them to give me an idea of what they want; what they expect. Even when they don't know, I continue to quiz until I get at least a hint. Sometime they just don't know what they want until they see the results.  

Some clients prefer that the images we take reflect their property or product as accurately as possible--nothing fancy; not overdone. The photography translation is, not too saturated or overly sharpened. On the other hand, some clients just want to get potential buyers' attention, regardless of whether the final image looks "real" or not. As one real estate developer once wrote, "We don't sell buildings. We sell fantasies." 

Bottom line, they are seeking our skills, but the final "look" is for them. We can only guide and suggest, but not decide for them.


Today's photography audience--the general public.

I was teaching a photography class in Dallas, Texas in the mid 1990's. A student asked me what I thought of the future of digital photography. I told her that photos will have a different look about them, but we will eventually become to accept the new norm and get used to the new look.

From what I see today, the general public doesn't care, or even know about, the distinctions between in-camera photography versus highly post-processed images--they just like the wild, the unique, the outlandish--without questioning or caring about how images are created. I see that in many on-line social media platforms. 

I have heard peoples' comments about both paintings and photos, like "Oh cool." Some get all excited about "interactive photography" which, through the use of apps, can show movement in a still photograph. Again, the unique; outlandish.  

I have posted what I considered some of my best landscape images on social media platforms, but only got mediocre-to-average attention from readers. But, when I posted this photo of a rooster, the "hits" went wild! It confirms my observations about what the general public likes.


In-camera photography.

Many photographers, ranging mostly from amateur to advanced; from millennials to baby boomers, prefer to learn as much as they can about what they can get out of their cameras and lenses. They learn about all the useful tools already designed into camera bodies and lens design. Three of the most commonly discovered tools which my students comment about are: 1) How to create in-camera double exposures, 2) Spot metering, and 3) The BULB setting. All three are tools which some more advanced photographers either don't know about or never, or seldom, use.

A lot of photographers, especially advanced and professional photographers, who learned photography during film days had to learn how to get the best in-camera images possible. They did that by understanding the inner workings of the tools mentioned above, and other tools, which helped them with both technical quality (left brain) and creativeness (right brain).       

Some photographers in this camp also delve into some post-processing to fine-tune their images. 


My perspective.

My perspective on the subject is somewhere between the above perspectives,
leaning toward creating the best possible images in-camera. I know my camera and lenses and what they are capable of creating. I already have a lot of great tools at my disposal, literally at my fingertips.

In addition to the great camera tools mentioned above, throughout the years I have  experimented with creative use of certain tools (cameras, lenses, and filters), using techniques which the engineers did not have in mind. I spend a lot of time talking about this in my new book, RIGHT BRAIN PHOTOGRAPHY (Be an artist first). You can also see a cross section of my photography on my website

That said, I also know that lenses, cameras, sensors, and memory cards aren't perfect. In the past, from the days of Daguerreotype photographers in the 1800s through the 1990s, we had to do the best we could with what we had. As mentioned before, Ansel Adams, and others before him, improvised with what he had at his disposal. 

Today, we have additional software tools that can add to what our tangible tools cannot accomplish. The best example I can think of is the built-in reflected light exposure meters. The best in-camera light metering systems cannot give us the desired exposures on every area of the scene we are photographing. Notice I said "desired," not "correct." 

However, some photographers use these software tools in lieu of the tangible tools we have. I prefer to use them to fine-tune my photography. I try to get 80%-90% of what I want in camera, then fine-tune the other 10%-20% with the software I use. These are estimates, of course. For some images I do little to no software fine-tuning. At the other extreme; especially commercial commissioned photography, I might spend 30 minutes or more on an image.

I don't do much software fine-tuning on my landscape images, and I never use HDR on them. I prefer to get it right the first time, and fine-tune them later if needed. For my landscape work, I estimate that I spend 5-20 minutes on 80%-90% of my images. Now, some photographers may ask, "What? Is that all?" There are several reasons why I don't spend an hour or more "post processing" my images. 

1) I know how to get the most mileage out of my camera, lenses, and filters.  
2) I am not anal--my images don't have to look "perfect." They must look extremely good, 
    but not necessarily perfect. And, besides, "perfect," to me, can look too mechanical, and
    sometimes even "flat," i.e., every single inch of the image looks identically exposed. 
3) I prefer a nice three dimensional feel to my images. I don't mind a few shadows here and
    there. They add interest, depth, and help direct attention to my center of interest.
4) Like all photographers, I want my images to look great. At the same time, I don't want
    them to look unreal--greens not found on the color wheel; over-sharpened mountains    
    that are a mile or more away.


Sharp quality lenses, especially if you know how to use them, minimize the time needed on the use of photo editing software, i.e., "post processing." I shoot primarily JPEG large/fine, and convert them to lossless TIFF before I fine-tune them. Sometimes, if JPEG doesn't give me what I want, I might shoot TIFF. The only time I use RAW is for extremely low light situations, like the cover of my book, RIGHT BRAIN PHOTOGRAPHY. The comparisons below are all at 75 ppi.   


RAW


TIFF FOR COMMERCIAL WORK


JPEG LARGE/FINE


I hope this discourse on the subject of photographic ethics has helped you assess your own shooting style and to also help you decide what works for you, based on what you want to accomplish.

As always, if you have any questions, please contact me, visit my website, or checkout my Facebook business page (Eli Vega Photography)

Keep shooting. Keep practicing. And, most of all, don't take yourself so seriously--have fun with it!! 


Friday, October 19, 2018

HOW TO CREATE STARBURSTS & SUNBURSTS IN-CAMERA


You don't have to buy or download an app or purchase software to create starbursts or sunbursts. I am going to add a photography skill to your repertoire this month. You will be able to say, "Yes, I did this using my photographic skills." So, here we go.

I have enjoyed doing this for many years. It adds more interest to my photos and enhances my compositions. I have added "bursts" to street/road/highway lights, car lights, light bulbs, etc. I can even get a sunburst from the sun. 

The solution lies in f/stops, yes, it's that simple. The larger the f/stop (i.e., the smaller the aperture in your lens), like f/10 or higher, the greater the starburst. Also, larger light sources, like the sun, require a larger f/stop. In other words, you don't want to use f/stops like f/2.8, f/4, or f/5.6. Your particular lens make & model and focal length may make a difference as well. All this to say, you will need to bracket your f/stops until you get the amount of "burst" you want. Experiment. This is more art than science.

With that introduction, here are some examples. I will also share some "behind the camera" explanations on some of these examples.


For this early morning downtown scene, with a focal length of 25 mm, I used f/11 to get this nice starburst from the street light.


I don't have the data on this one, but I'm guessing I used a focal length of 17 mm and an f/stop of f/11-f/16.


With a 10 mm lens, I only needed an f/stop of f/8 to get these nice starbursts on the hotel.


With a huge light source, the sun itself, I had to go with f/32, with a focal length of 48 mm.


Ripley's Believe It Or Not, in Branson, Missouri. With a focal length of 24 mm, I used an f/stop of f/16, which added a nice touch to the side of the building. Oh, and that left side of the building that looks like it's about to fall off--it's actually built like that!


I included this image to show that when you don't use a small aperture (high number f/stop), you don't get starbursts. I used an f/6.3 and a focal length of 48 mm. 


On this Titanic-shaped building, which is actually a museum, I used f/16, with a 25 mm lens.


The Denver Art Museum is one of the most uniquely designed museum buildings I've seen.
It's a big building, so I had to use a 17 mm lens, set at f/18.


I'll leave you with one more sunburst. Again, it's not a small street light or light on a building--it's the almighty sun. In order to get a 'burst,' I used an f/25 with a focal length of 36 mm.


Yes, a pattern does develop when you see these examples. The two key points are:

1) The larger the light source, like the sun, the more f/stop we need to get a 'burst.'
2) The smaller the focal length of the lens the less f/stop we need to get a 'burst.' For example, the aperture size in a 10 mm lens, like f/8 used on the hotel above, is smaller than f/8 on a 70 mm lens. It's not the f/stop, per se, but the size of the aperture that makes the difference. 

Sometimes I will use more f/stop than needed, just to make sure. An example would be the Denver Art Museum above. I could probably have used f/14 or f/16 (with a 17 mm focal length), but, since nothing was moving, I opted for f/18.  

I hope this encouraged you to go out get some 'bursts.' Experiment with different focal lengths, different f/stops, and different light sources--the three key factors. Have fun.       


Saturday, September 8, 2018


PHOTOGRAPHING DOORS & WINDOWS


I've had a fascination for doors and windows for several years. It started in the '80s when I lived in Texas and would take spontaneous photo trips in out-of-the-way places, often taking the small blue roads on the map. I found myself attracted to old abandoned and dilapidated farm houses and barns. Their doors and windows called out my name.

Since those days, I find a lot of doors and windows interesting to photograph. What I try to translate through my images are their aging bodies, their history, designs, unique features, or even feelings I get from them when I am in their presence. If they could talk, what stories would they tell? What is their message for us?

I don't see them as doors or windows. I see them as human made objects that speak to us.

From a technical perspective, photographing doors and windows is pretty straight forward--get your composition that works best for you, set the depth of field you want, and get the best in-camera exposure you can possibly get. The aesthetics part of it is finding the art and emotion in something as simple as a door or window. Enjoy.

I don't see them as doors or windows. I see them as human made objects that speak to us. What do you hear them saying? I have included the thoughts or messages I feel they conveyed to me.


What I hear is, "Please. Come in. All are welcomed." What to you hear or feel?


The message here for me is just the opposite from the previous image. I get two messages here. "Bricks are not enough to keep you out." "Just another brick in the wall."


This was an old abandoned hotel room. There were still old, dirty rusty box springs inside.
Perhaps hundreds of couples or families stayed in this room.  I wonder what their stories were. 


What fascinated me about this window were the plants growing from the inside. What feelings or thoughts do you get? 


You can hardly see the door in this image. Over the years, it has been taken over by nature. It's as if humans eventually stop existing, but not nature. What are you sensing? 


I thought I would have some fun with this window and include myself in the reflection. Like the window, part of me is broken and shattered. You can translate that in different ways. What's your translation?


This image has both doors and windows. It begs so many questions. Who lived or worked here? Where did those red doors lead to? I wonder if that emergency escape was ever used? 
What resonates with you?   


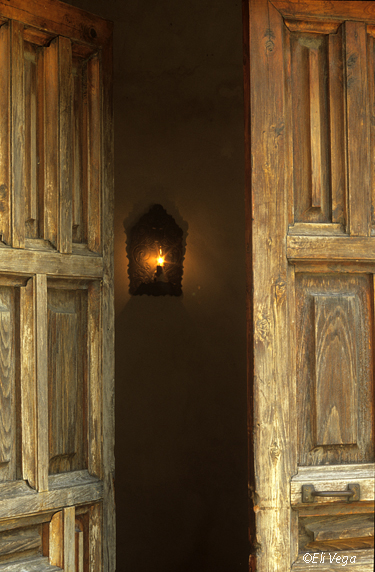
This last example depicts doors that open into an old Spanish mission in San Antonio, Texas. it was established in 1731. They still hold services. No telling how many people, young and old, have knelt inside and prayed for help, healing, better days, pardon, or consoling. What do you see or hear behind those closed doors? 


I hope you have enjoyed a sliver of my collection, thoughts and feelings behind these doors and windows. I find a lot of them in those small towns that never make the news, or in the alleys in those small towns. 

I had dinner in one of those small towns in Texas. The small sign behind the cash register read, "Not much happens in a small town. But the rumors sure make up for it."

So, get your map out or tap into your mobile device GPS, grab your gear and go find some interesting stories and messages. They're waiting for you.