Friday, October 19, 2018

HOW TO CREATE STARBURSTS & SUNBURSTS IN-CAMERA


You don't have to buy or download an app or purchase software to create starbursts or sunbursts. I am going to add a photography skill to your repertoire this month. You will be able to say, "Yes, I did this using my photographic skills." So, here we go.

I have enjoyed doing this for many years. It adds more interest to my photos and enhances my compositions. I have added "bursts" to street/road/highway lights, car lights, light bulbs, etc. I can even get a sunburst from the sun. 

The solution lies in f/stops, yes, it's that simple. The larger the f/stop (i.e., the smaller the aperture in your lens), like f/10 or higher, the greater the starburst. Also, larger light sources, like the sun, require a larger f/stop. In other words, you don't want to use f/stops like f/2.8, f/4, or f/5.6. Your particular lens make & model and focal length may make a difference as well. All this to say, you will need to bracket your f/stops until you get the amount of "burst" you want. Experiment. This is more art than science.

With that introduction, here are some examples. I will also share some "behind the camera" explanations on some of these examples.


For this early morning downtown scene, with a focal length of 25 mm, I used f/11 to get this nice starburst from the street light.


I don't have the data on this one, but I'm guessing I used a focal length of 17 mm and an f/stop of f/11-f/16.


With a 10 mm lens, I only needed an f/stop of f/8 to get these nice starbursts on the hotel.


With a huge light source, the sun itself, I had to go with f/32, with a focal length of 48 mm.


Ripley's Believe It Or Not, in Branson, Missouri. With a focal length of 24 mm, I used an f/stop of f/16, which added a nice touch to the side of the building. Oh, and that left side of the building that looks like it's about to fall off--it's actually built like that!


I included this image to show that when you don't use a small aperture (high number f/stop), you don't get starbursts. I used an f/6.3 and a focal length of 48 mm. 


On this Titanic-shaped building, which is actually a museum, I used f/16, with a 25 mm lens.


The Denver Art Museum is one of the most uniquely designed museum buildings I've seen.
It's a big building, so I had to use a 17 mm lens, set at f/18.


I'll leave you with one more sunburst. Again, it's not a small street light or light on a building--it's the almighty sun. In order to get a 'burst,' I used an f/25 with a focal length of 36 mm.


Yes, a pattern does develop when you see these examples. The two key points are:

1) The larger the light source, like the sun, the more f/stop we need to get a 'burst.'
2) The smaller the focal length of the lens the less f/stop we need to get a 'burst.' For example, the aperture size in a 10 mm lens, like f/8 used on the hotel above, is smaller than f/8 on a 70 mm lens. It's not the f/stop, per se, but the size of the aperture that makes the difference. 

Sometimes I will use more f/stop than needed, just to make sure. An example would be the Denver Art Museum above. I could probably have used f/14 or f/16 (with a 17 mm focal length), but, since nothing was moving, I opted for f/18.  

I hope this encouraged you to go out get some 'bursts.' Experiment with different focal lengths, different f/stops, and different light sources--the three key factors. Have fun.       


Saturday, September 8, 2018


PHOTOGRAPHING DOORS & WINDOWS


I've had a fascination for doors and windows for several years. It started in the '80s when I lived in Texas and would take spontaneous photo trips in out-of-the-way places, often taking the small blue roads on the map. I found myself attracted to old abandoned and dilapidated farm houses and barns. Their doors and windows called out my name.

Since those days, I find a lot of doors and windows interesting to photograph. What I try to translate through my images are their aging bodies, their history, designs, unique features, or even feelings I get from them when I am in their presence. If they could talk, what stories would they tell? What is their message for us?

I don't see them as doors or windows. I see them as human made objects that speak to us.

From a technical perspective, photographing doors and windows is pretty straight forward--get your composition that works best for you, set the depth of field you want, and get the best in-camera exposure you can possibly get. The aesthetics part of it is finding the art and emotion in something as simple as a door or window. Enjoy.

I don't see them as doors or windows. I see them as human made objects that speak to us. What do you hear them saying? I have included the thoughts or messages I feel they conveyed to me.


What I hear is, "Please. Come in. All are welcomed." What to you hear or feel?


The message here for me is just the opposite from the previous image. I get two messages here. "Bricks are not enough to keep you out." "Just another brick in the wall."


This was an old abandoned hotel room. There were still old, dirty rusty box springs inside.
Perhaps hundreds of couples or families stayed in this room.  I wonder what their stories were. 


What fascinated me about this window were the plants growing from the inside. What feelings or thoughts do you get? 


You can hardly see the door in this image. Over the years, it has been taken over by nature. It's as if humans eventually stop existing, but not nature. What are you sensing? 


I thought I would have some fun with this window and include myself in the reflection. Like the window, part of me is broken and shattered. You can translate that in different ways. What's your translation?


This image has both doors and windows. It begs so many questions. Who lived or worked here? Where did those red doors lead to? I wonder if that emergency escape was ever used? 
What resonates with you?   


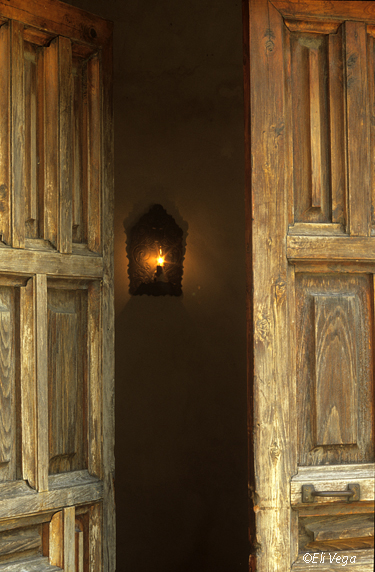
This last example depicts doors that open into an old Spanish mission in San Antonio, Texas. it was established in 1731. They still hold services. No telling how many people, young and old, have knelt inside and prayed for help, healing, better days, pardon, or consoling. What do you see or hear behind those closed doors? 


I hope you have enjoyed a sliver of my collection, thoughts and feelings behind these doors and windows. I find a lot of them in those small towns that never make the news, or in the alleys in those small towns. 

I had dinner in one of those small towns in Texas. The small sign behind the cash register read, "Not much happens in a small town. But the rumors sure make up for it."

So, get your map out or tap into your mobile device GPS, grab your gear and go find some interesting stories and messages. They're waiting for you.


Monday, August 20, 2018

PHOTOGRAPHING ANIMALS


When it comes to photographing animals, and that includes winged fine-feathered friends, non-technical abilities and attitude are as important, if not more so, than the technical skills. I include these among the top of that list:

1) Patience--go ahead and get that first impulsive shot, but wait.....wait. Something else might happen!
2) Anticipation--most of us are not trained in animal behavior, but we can predict the probability that something might get their attention and thus give us a better shot. We can also watch them for a few minutes and see what behavioral patterns they exhibit.
3) Composition--cropping on the computer is not composition. We can carefully position ourselves to get the best possible compositions in the field--backgrounds; perspective; elements to include or exclude; eye flow; "center of interest" considerations; etc.
4) Pre-shoot preparations. What will the right brain instruct the left brain to do? What exposure, ISO, f/stop, shutter speed, focusing point, shutter release mode (etc) will work best for what I want? The key here is what I want; not what the built-in light meter thinks I need.  

With that introduction, let me share some examples of how I approach photographing animals. It's not just the animal or bird I photograph, but the experience, environment, the moment, the animal's characteristics/mannerisms, etc.

A note of caution regarding the technical data I share. Do not use the data as formulas or recipes--it doesn't work that way. There are several variables involved, and they don't give us the same identical settings. Those variables are: Cameras are calibrated differently, different lenses react differently to light, weather conditions vary, and even the direction of the sun varies. Additionally, 
I "dial in" my settings based on the look I want.


For this first example of elk at Nymph Lake in Rocky Mountain National Park, patience and anticipation paid off. I took some exposure test shots then made some adjustments. I waited to see if the elk were going to do anything other than graze. I had my composition, f/stop, exposure, and shutter speed ready to go--all I had to do was wait for the right moment. Then, in a flash, one of them put both feet in the lake. Click! 
You can't just "take" a picture when something happens--it's too late then.

f/10, ISO 500, 1/125, 300mm lens. Exposure: -2/3


This was at a drive-through nature preserve in Grand Prairie, Texas. When I saw this guy resting in shallow waters, I quickly shut the engine off, rolled down the window and quickly got my shot. You have to overexpose a scene with this much white/bright area. Technical data not available, but I used a small f/stop (wider aperture) to blur the background.


Late fall in Colorado can be lots of fun. Fall colors are still present, but early snowfalls are almost a sure thing. When I saw this coyote camouflaged against fall colors, I knew it was going to be a good image. I had to move very slowly so as not to startle him.
f/9, ISO 500, 1/800 (hand-held), 400mm lens. Exposure: -1 1/3


This little guy was not going to let a little snow ruin his lunch. He kept breaking through the snow until satisfied. There was a lot of snow around him, so I overexposed slightly.

f/8, ISO 400, 1/1000 (hand held), 210mm lens. Exposure: + 1/3


Sand Hill Cranes are fun to photograph. Every year, during their migration, they make a stop at the Monte Vista National Wildlife Refuge in Colorado. The backdrop is the majestic Sangre de Cristo mountains, one of my favorite mountain ranges in the state.

I knew where they were going to land. All I had to do was decide on my composition, f-stop (depth of field desired), and my exposure. The rest was just a matter of waiting for some to come in for a landing. It was interesting to see how some opened their "landing gear" sooner than others. All I had to do was click when the moment was right.

f/11, ISO 400, 1/1600, 400mm lens. Exposure: - 2/3
   

I saw this mysteriously still crocodile in the water at the Fort Worth (Texas) zoo. I wanted to emphasize the menacing teeth more than anything else. Technical data not available, but I used shallow depth of field to bring attention to his mouth and teeth. 


For this mountain goat and her calf, I wanted to highlight their high altitude habitat and topography (14,000' above sea level). I included not only the edge of Mt. Evans (Colorado), but the distant mountain ranges as well as part of my composition. Technical data not available, but I used a high f/stop (small aperture) to make sure I covered the entire area, from near to far. They were moving slowly, so a fast shutter speed was not necessary.


Hummingbirds are difficult to photograph, mainly because they don't stay still. When you think you have the right shutter speed to "freeze" them, then click, they've moved positions! This is where the continuous shooting mode (I shoot TIFF for that) comes in handy. But, just like with any other scenario, I get my composition, determine what f/stop I'll need to cover any movement of the birds, and decide how I want the lighting to look--my exposure. Then I patiently wait and wait and shoot and shoot. If I walk myself through these steps, I can improve my chances of going home with some keepers. 

Luckily, there was a nice dark background behind this hummingbird feeder. I like this image because he looks like he's going, "Ahhh. That was good." 

f/10, ISO 2000, 1/2500, 150mm lens. Exposure: -2/3 (to darken the background)


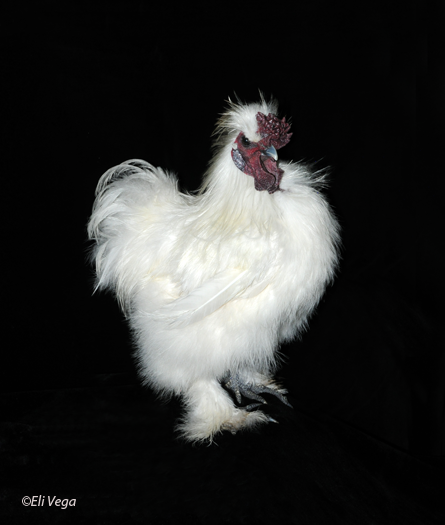
I saved the most unexpected guest for last. We've heard of people portraits, but rooster portraits? I visited an acquaintance last month. While I was visiting, along comes this white fluffy rooster casually walking along the carpet! What? Fred says something like, "Oh don't mind him. That's Lord Brisbane, my pet rooster." Pet rooster? I had never heard of such a thing. After I got over the shock of the surreal moment, I composed myself. I could not let this opportunity slip through my fingers. 

In my Right Brain Photography book, I talk about impermanence--nothing, especially moments, last forever and life is ever changing. We should not wait when we have a one-of-a-kind moment. Lord Brisbane was one of those moments. 

I asked Fred if I could return the next day with my camera. I told him what I had in mind. We would build a makeshift stage for the Lord, cover it with my large piece of velvet-like non reflective material, then see if the rooster would pose for me. To my surprise, it worked! 

I used a simple on-camera flash, but underexposed its output by a -3 stops. I was very close to the rooster and didn't want to overexpose him. I used the TIFF setting (for continuous shooting), with Picture Control set to "standard" (not vivid)-- I didn't want to warm up those beautiful white feathers. Then I clicked and clicked. I was amazed to get three awesome images. This one is my favorite. I introduce you to Lord Brisbane.  

f/11, ISO 800, (flash), 24mm lens. Exposure: flash set for -3


So, even if you already have images of animals and birds and such, go out and see if you can find something different, or photograph the same type of animals in a different way. Go look for chicken coops, farms, ponds and lakes, or even a nearby 14,000' mountain.

Want a 1-on-1 lesson? Give me a shout!     

www.elivega.net     Visit me on my Facebook page (Eli Vega Photography)           


Sunday, July 8, 2018

OVEREXPOSING SCENES IN-CAMERA--WHY?


My blog last month was about underexposing scenes. This month, I'm going the opposite direction. Don't be afraid to overexpose scenarios you come across. I know, the most common advice, tips, and how-to recommendations would say, "Don't do it!"

There are several scenes that would look better overexposed. Let me show you several examples and explain why. The overriding reason why I would ever do this is simply related to what I see in my imagination, not what I see with my eyes. In other words, I don't try to get the best image of what I see. My goal is to create what is hidden underneath; to create what's not there. Confused? Here are some results of overexposure.

Let's start with this one. It was mid-morning during one of my field workshops, not midday. There was a lot of sun coming in behind all these branches, trees, winter-dry weeds, and flowers. If I had let my built-in light meter (and its heel-tapping cousin, the histogram) determine what the "correct" exposure would be, this scene would have been extremely underexposed. Instead, I overexposed it by +2 stops to bring out the sunflower. That's like telling the light meter, "I want you to give this scene 200% more light than you think it needs." The result is an airy, dream-like, mystical feel to the image. The fact that the sunflower is properly exposed is secondary.

If you have difficulty knowing when overexposing would be the thing to do, here are a couple of easy steps to remember: 1) Ask yourself, is the scene back lit (sunlight is behind your subject)? If yes, 2) Just ask yourself, "What would it look like if......?"   


For this next scene, I saw this beautiful grove of aspens, coincidentally near Aspen, Colorado. They were in the shade in late afternoon. Rather than underexpose to get those vibrant darker hues, I instead overexposed them. Again, what if? I liked the results of a      +1 1/3 overexposure. For one, it really brought out the white aspen bark and the mellow yellow leaves in the background. As my students know, I have an art major background, which is why I like these painterly like effects.


On the same trip, by the time I got to the iconic Maroon Bells near Aspen, I was way too late to get that traditional shot of the peaks. Rather than kick myself in the butt for not timing it right, I decided to go with the flow and create something out of the light I was given. The sun had gone down on the other side of the mountains, leaving the face of the mountains and the neighboring valley in late afternoon shade. It was getting dark, at 5:15 pm in late September. I wanted to see what I could turn the scene into by overexposing it by a +1 1/3, from what was already a long exposure. The effect was surreal.

I knew when I saw the scene through my viewfinder that there would be too much lake in the foreground. I cropped the final image to downplay the lake and draw more attention to Maroon Bells. The overexposure brought out the perfect dusting of snow.


I like getting up early, really early, for some of my photo shooting excursions. This particular day, I was heading west around 5:00 am in late July. As I checked my rear view mirror, I saw this "must do" scenario!!! I quickly stopped, pulled carefully over, and got my gear. I had to work fast. Click!  I overexposed the scene by + 2/3 to bring out detail in the landscape and sky.

By this time, you're probably wondering, "How does he know how much overexposure to give any scene?" Right? Don't let anyone fool you. This is more art than science. I don't know exactly how much is enough. True, sometimes I estimate and I "get it." However, most of the time, I bracket. But, I bracket extremely fast! My favorite tool in my toolbox is the exposure compensation dial, or, as I call it, the + and - dial. I have taught myself to work that puppy with lightening speed +1/3, + 2/3, +1. And I do it faster than it took me to write it!!


I will be leading my annual 3-day field workshop in Rocky Mountain National Park, Colorado this coming August 2nd-4th. Please contact me if you'd like to join us.

It was during one of my RMNP workshops that we saw this awesome moose in Sprague Lake. I quickly yelled out to my students, "Overexpose this one." One student told me later that she wondered why I was telling them to overexpose a scene in the middle of the day. This is how explained it to her: 1) The moose comprised a rather small portion of the scene, 2) There was a lot of bright area around him, 3) He was very dark. The over abundant sunlight throughout the scene would underexpose an already dark subject--the moose.

So, I quickly bracketed the scene, overexposing it. A +1/3 worked best for the scene. Usually, without the moose in the scene, I would have underexposed the scene by 1/2-2/3 to make the colors pop. In this case, to have done so would have turned the moose almost black! 


I included this last example, an abstract, in this discussion to point out that the concept of overexposing a scene applies to all scenarios--- landscapes, scenics, flora, and, yes, even abstracts.

I knew that the bright sky above, reflected in this small body of water, would underexpose the scene. I wanted to keep the white of the reflected clouds in the sky and the blues from the sky (notice the sprinkling of blue spots throughout). In order to achieve that, I had to overexpose the scene by + 2/3. 


Before I conclude, let me include a typical exposure compensation scale on most cameras.
They look something like this. On my camera, it goes to a -3 and a +3.

-2...-1 2/3...-1 1/3...-1...-2/3...-1/3...0...+1/3...+2/3...+1...+1 1/3...+1 2/3...+2

So, now you know what I meant in this blog when I said I overexposed a scene. I over-
exposed them from a +1/3 to a +2. For example, when I aimed my camera at the first example above (the sunflower), my built-in light meter told me I needed a shutter speed of 1/3200 (my camera set at f/8). It was very bright that day. A +1 overexposure would have been 1/1600; a +2 overexposure was 1/800, which is the shutter speed used on that scene.    

Now, go out there and put this to practice. Don't be afraid to override your built-in light exposure meter. You be the judge; you take charge and decide what your images will look like......then share them with us! Have fun.

Contact me if you want a 1-on-1 lesson or a presentation to your group.      


Friday, June 22, 2018

UNDEREXPOSING SCENES IN-CAMERA--WHY?

Why would I want to underexpose any image, especially when the camera histogram tells me "Don't do it?" Well, there are several reasons: the built-in reflective light meter might tend to overexpose the scene (example, dark subjects or scenes), I might want to make the colors "pop," the scene might look good, but a bit "blah," I might want to enhance colors at midday, or I might want to create an artistic rendition of what the naked eye sees. There are even times when I want a daytime scene to look like nighttime or late evening.

Let me share some examples and explain my thinking and the process taken to achieve the results.  

When my center of interest (my main subject) is lit by the sun but the background is not, I like to either spot meter on the subject or use my +/- exposure compensation dial, depend-ing on the situation. For this scene, I underexposed it by a -1 1/3 for two reasons: to make the flowers pop, and to darken the background. The end result is a subject that easily stands out from everything else and it nicely converted the background to a backdrop. It takes a lot less effort than doing it with my editing/fine-tuning software. Besides, I like to challenge my photographic skills, not my photo editing skills.


Underexposing this beautiful sea creature by 1-stop enhanced the colors, showed off its translucent characteristics, and darkened the unsightly background.  


We have all heard the "warning heard around the world:" Don't shoot at midday, the colors are bland and washed out. For this scene, Blue Mesa Reservoir near Gunnison, Colorado, I underexposed the reservoir and mountains by a -1 stop. It made the colors pop at midday, 12:15 pm. 


I found these beautiful lilypads also at midday, 11:20 am. And, yes, they did look washed out and bland, until I decided to photograph them at a -2 1/3 underexposure! As I have said many times, I do not listen to my histogram. This is why. The light gray shapes you see
in the water are cloud reflections.


In order make the wooden horse sculpture stand out from the background, I extremely underexposed this scene by -2 stops. In the final image, the background looks much darker than it did to my naked eye. I knew that would happen; that's why I like to underexpose a lot of my images, especially those shot between sunrise and sunset. 


This next example is one of several where I make a daytime scenario look like it was photographed in late evening or nighttime. I shot this at a -2 1/3, at 6:30 pm to really darken an already late evening. I used a lens aperture of f/32, not because I needed that much depth of field, but to get that nice sun burst.

Please remember what I always say: Never ask yourself what f/stop, shutter speed, lens, composition, or exposure you should use. Ask instead, "What do I want this to look like? What message am I getting? What feelings am I getting? And how can I translate that into a photograph?"


For this last example I will use a Before and After. This Before is an estimation of what this scene looked like to me as I stood there.


Rather than get lost in terms like "dynamic range," "film latitude" and the rods and cones in our eyes, let me break it down to the basics. There are two key details for my tip this month.

1) We need to understand what the eyes are capable of seeing/recording when we look at scenes with a wide range of dark and bright objects, like the scene above. Our eyes can take the darkest part of a scene and lighten it for us. They can also take the brightest part of a scene and darken it for us. What we end up really seeing is a scene that doesn't seem to have that much contrast. Herein lies the challenge for us as photographers: When we see a scene with our eyes that doesn't look that interesting, we keep walking, looking for something to "hit us between the eyes." We end up saying, "Ah, it's ok, but nothing worth stopping for....."
2) Our cameras, especially the capabilities of film and digital sensors, are not as good as our eyes in recording both very dark areas and very bright areas in the same scene at the same time. But, instead of always looking for technical solutions to that problem, I often take advantage of that negative in our camera technology and turn it into a positive.

That said, I took the same scene you see above, which didn't look all that spectacular, and underexposed it by a -1 2/3. I call it "Out of the Shadows."


Now, go out there and find those "so-so," "blah," or unimpressive scenes with your eyes and convert them to something awesome with your camera! Use that exposure compensation dial, or, as I call it, that +/- dial. It's magic!

I offer private 1-on-1 and small group lessons on this topic. Contact me if interested. You can also call me if you live in northwest Arkansas or Colorado: 720-251-1775.    


Saturday, May 26, 2018

PHOTOGRAPHING CLOUDS

They're all around us.My eyes see clouds, but my eye's mind sees color, shapes,
form, feelings. At certain times of the day or under certain weather conditions, they
can be awesome subjects to photograph.

I don't necessarily look for them; I let them find me and call out to me. What I do is leave myself open to listen.

The key factors to photographing clouds include both photographic and personal. Photographically, I prefer manual focus so that my auto focus mechanism won't have to figure out where to focus; 17mm-50mm focal length, in most cases, to get it all in; and definitely rely on my exposure compensation dial to keep the darks dark and brights bright.  


On a personal level, I have to act fast before the clouds and lighting change. To do that,
I need to be familiar with my equipment. I also need to understand what to include within the four corners of my viewfinder, and what to exclude in order to translate the awesomeness and beauty of nature's formations.    
  
Let me share some examples and explain what went into each one. At least half of these were created from a place I lived for eight years in Boulder County. I had a great view from my decks of the skies and sunsets over the Flatirons near Boulder, Colorado. 


I'll start with this one. I don't know why, but sunsets over the Flatirons in Boulder County are some of the most awesome sunsets I have ever seen, anywhere. This is just one of several examples. I underexposed the scene by 1/3-stop to keep the vibrance of those colors. I used a 300mm lens to get really close to the clouds and fill my frame with them as much as possible.


As I was coming home one afternoon, I saw this colorful sky backdrop of layers and layers of amazing colors! I hurried to my place, got my camera, and grabbed a few quick shots.      I include just a thin sliver of trees on the horizon for context. Honestly, it looked just like that! After I finished the shoot, I just stood there in awe. I used my wide angle lens to get the entire natural canvas in my viewfinder. You've got to be ready for these opportunities. They are once in a lifetime moments. 


I was driving around Dillon Lake near Frisco, Colorado when I saw this phenomena. Identifying cloud types is not my forte. I don't even try because I photograph the shapes they create, not the clouds themselves. The clouds repeat the colors and shapes of the Rockies below. The 12,000' and 14,000' peaks also give the clouds a good sense of scale.


A huge thunderstorm quickly formed one late afternoon. They looked menacing and beautiful at the same time. The setting sun gave the clouds those incredible hues. I like the Van Gogh colors.


I don't know what you see, but I saw a giant bird flying in the sky. Seconds later its "head" floated away from its body. 


Late one evening, as I stood on my deck sipping a glass of red wine, I just happened to look up at the sky. Time to put the wine down! I had to work fast for this one and use my exposure compensation dial like crazy, in 1/3 increments until I got this feel to the image. For obvious reasons, I call this piece "Zorro Moon."   


I call this image "Clouds on Fire." They looked like smoke from a distant fire.


It is extremely rare to see twin clouds, especially when they look like UFOs!! Nature is a great artist; we just need to be ready to see and photograph its art. I underexposed the scene by a -1 full stop to enhance the contrast. Most clouds need to be photographed at high shutter speeds; some of them move fast. For this image I used a 1/500 speed. In case you're wondering, no, it's not a Photoshop composite.  


I was shooting straight up at these dramatic dark clouds and sun rays. It gave me a strong spiritual feeling when I was preparing for the shot. I underexposed the scene by a -2/3 in order to keep the darks dark and keep those soul-reaching rays pronounced.   


I just had to include this last example, though it could be debated as to whether they are technically clouds. I like this image of whispering virga over the Flatirons. Like the image above, it has a sense of spirituality, surrealism, and sensuality combined.  


So, what are you waiting for? The skie's the limit. Almost half of my examples were created  at sunset. Find a great spot where you live and go there every single evening for a week and see what you can find. You too can get those once-in-a-lifetime images.