Wednesday, July 19, 2023

 STREET PHOTOGRAPHY


My definition of street photography is any scene we see while walking in and around cities and towns. I enjoy this genre because it gives me slices of life; fast-disappearing slices of life that are gone in an instant. 

Photography is the only medium that freezes a second in time; often a split second in time, never to be duplicated, even by its creator. 

My first example is the one photograph on which I get the most commentary. I titled it "Urban Sole."

I patiently waited until she sat down on the bench and all the other commuters got on a train and vanished. For just a few minutes, she was the only human at this train station. Then, she too was gone; gone into the mysterious night, leaving me with questions: who is she? Where is she coming from and where is she going? Isn't she afraid of being there all by herself? Why is she dressed like that? 

What questions does this image stir in you?


This is downtown San Antonio, Texas, called The Riverwalk. On any given Saturday, this area is wall-to-wall people enjoying the history, old architecture, the numerous choices of restaurants, and just being in a "happening" place. 

You might wonder, why doesn't this image reflect that? Well, I decided to be at this location at around 7:00 am, on a Saturday, hoping the partiers would not be up that early on Saturday morning. I was right. The result was a very surreal image--lots to do, but not a single soul in sight. The only person I saw was an early-morning breakfast cook who took a quick cigarette break, then disappeared back into the restaurant. 


I saw this middle-aged man, a contortionist street performer, in Boulder, Colorado's downtown Pearl Street (open) Mall. He told me that scientists at the University of Texas once studied him to find out how he was able to do what he does with his body. I never found out what the results of the study were, but he told me it comes naturally. He's even smiling while he has one leg behind his back and over his shoulder while he juggles three balls!!! 


Let's stay with Boulder for a while. There is this vehicular bridge that spans over Boulder Creek downtown. I walked under that bridge and, to my pleasant surprise, saw this really cool mural on one of the bridge's support beams. Right next to it, and in-between the two support beams, runs Boulder Creek and a walking/running trail. I was on that trail when I saw the wolf mural. 

It had rained the day before, so there were several puddles under the bridge, beside the trail. As I stared at the mural and looked back at one of the puddes, I imagined that if I jumped over that puddle and got low to the ground with my tripod, I might be able to get a reflection of the wolf in the puddle. I titled it, "City Dweller."   


Street performers are everywhere, in cities big and small. Mike was in Chicago, across the street from the Art Institute of Chicago.I took several full-body photos of Mike, but I really like this tight close-up that reflects his character; his persona, without even seeing his face. 


As I walked around downtown Crested Butte, Colorado, I was in the mood for java; a little cup of coffee. As I sipped my coffee in the quaint courtyard sprinkled with umbrella-covered tables, I saw tons of license plates decorating the exterior walls. Texas, Tennessee, Colorado, and other states were represented, randomly nailed to the walls. When I finished my coffee, I walked around to the other side of the building and found this! No-brainer. Get it. Now! I traveled several states without moving. Composition, as always, was the key to this image--the bike, the pot, the light, the windows, and, yes, the license plates.

You can't see them from this low-resolution image, but there are plates from Colorado, Texas, Missouri, Iowa, Tennessee, Arizona, Washington, and California. 


Since we are in Crested Butte, how's this for street photography? I couldn't resist. It was like a scene from a Norman Rockwell painting. The locals ride all over town on bicycles locally known as "Townies." The storefront doors and signs, the bench with a newspaper on it, the old Western architecture, and, of course, the "Townie," really completed my image, titled "The Slow Life." 


I saw these homeless young folks in downtown Boulder. I wanted to give them some money and I also had a choreographed idea, so I decided to do both. I politely approached them, gave them some money, and asked if they would oblige me with an idea I had. They didn't hesitate. 

I love the dogs, their non-judgmental companions. One of them even has his own backpack. I also like the contrast between the two young men and the woman and the beautiful silver sculptures in the background. Note the guy on the right. He has his old weathered boot patched up with red tape. The homeless. We have stereotypes about them. I wonder what stereotypes they have about us? 


I spent a couple of hours with my camera in the French Quarter in New Orleans. I came across this cute boy playing a tuba that seemed twice his size! Note the duct tape he used to make sure he continued entertaining folks and making money. 


This is my last example, also from downtown Boulder. Yes, throughout my career, Boulder, Colorado was a great canvas for my photography. 

This husband and wife were unique street performers--they took their baby to the streets to join them. Over a period of two years or so, I took several photos of this couple and their baby, but this remains one of my favorites. It focuses on the beautiful uniqueness, avant-garde, and bohemian style of the young mother. Note her tattoos, ear lobe, attire, and artistic fedora. I wondered how she could carry and play that huge accordion. It must have been heavy. Oh, and their baby, on her husband's back, is staring at Mommy as she performs. Cute. 

She also has a Mona Lisa-like smile. You don't know if it's a smile of approval. Is she used to people taking her picture, or tired of it? In either case, it's one of my favorite street photography images. 


So, head downtown, or any part of any city or small town, and see what you can find. Go with an open mind. Don't overanalyze--just have fun with it!! 

Wednesday, June 21, 2023

 TREES


Trees. How many ways can you photograph trees? Trees? Are they even viable subjects to consider when looking for interesting subjects to photograph? If we take a right-brain approach to life, the answer is a resounding, "Yes." We can make the common uncommon. 


These trees, early in the morning, gave me a sense of awe, especially the way the early sun rays exposed themselves in between the trees. In order to translate the scene to what I felt, as opposed to what I saw, I switched my White Balance to fluorescent, which gave me a look that best matched my feelings that morning.


Here is another similar example where I applied the same technique. However, for this example, let me show you the Before and After. Below is the scene before I switched my White Balance to fluorescent. This scene too gave me a sense of awe; a feeling of tranquility.


Here is that same scene after switching to fluorescent. Big difference! 


For these trees, I placed my camera against the aspen on the left and pointed it straight up. Knowing that the bright sky would result in my built-in exposure light meter giving me an underexposed image, I increased my exposure setting by a +2 2/3, before I placed the camera against the tree. Perspective. Alter your perspectives from time to time to add variety to the look of your images. 


Try creating double exposures, again, to make the common uncommon. It can give your images an art-on-canvas look to them. Please search previous posts where I walk you through the steps I take to create my double exposures. If you can't find it, please e-mail me, and I'll add you to my monthly newsletter list and share with you the steps I take. 


How about photographing mostly the leaves on trees, and not the trees per se? I positioned myself to where I got the leaves backlit. 


Tree reflections always add an extra bonus to any image. If you can find colorful trees and their reflections, consider yourself lucky.


And, finally, find art in nature, as I describe it. This is a close-up of an old giant stump I found in Rocky Mountain National Park. I saw a face. Again, detach yourself from the labels--in this case,
a "tree." 


If you don't look at trees as "trees," you will be amazed at what else you will see. Explore, see beyond the obvious, and have fun with your new creations!! Enjoy. 

Monday, May 22, 2023

 LEADING LINES


Leading lines in photography add interest, eye flow throughout the image, and can contain the viewer's eye within the four corners of the image. They can lead the eye toward the center of interest, or to another interesting part of the photograph. 

If I see a leading line in a scene, I take advantage of it, knowing that it will enhance my composition. It is usually not obvious. It's psychologically subtle. It's not something that causes us to say, "Oh, look. A leading line." 

I have used roads, fences, tree branches, hiking trails, and other elements in a scene as leading lines. Though not always present in any given scene, I do look for them.

Let me show you the different types of "leading lines" I have looked for and introduced into my compositions, starting with this awesome autumn scenario just outside of my favorite town in Colorado--Telluride. I found this along the winding road that leads to the small airport just a few miles south of town. I liked the way the ranch fence leads your eye toward the center of the scene. The area had just received a dusting of snow, creating beautiful snow-capped mountains--the San Juans in the distance.                                                                              


In this next scene, I saw several leading lines, created by the topography around Maroon Bells near Aspen, Colorado. Can you spot them? They all lead toward the center of the image.

©Eli Vega


I thought the hiking trail led the eye easily toward the hiker. You can't help but follow the trail toward him. I also used tree branches at the top of my viewfinder to lead the eye back into the scene. These are no accidents. I look for them before I even get my camera out of my bag. If they're there, I'll incorporate them into my creations.  

 
©Eli Vega


This next hiking trail leads to the highest peak in Colorado--Mt. Elbert, 14,430' in elevation! The trail takes a quick downward slope, but in the scene, as you can see, it looks like it comes to an end. You have to admit, though, it does lead you into the grove of aspens.

This image would have a totally different feel and look to it without the hiking trail. It makes me want to be there. Oh, wait. I was there.  

©Eli Vega


In this next image, I used the road that leads your eye right into the heart of the scene. You can't help but follow it, as it disappears into the distance.

©Eli Vega


Here, a combination of a trail and a fence lead the eye right into the heart of this scene. When it comes to photography, sometimes the eyes see too much. We look to the left, to the right, and right ahead of us and feel overwhelmed with everything. We get so overwhelmed that we don't know where to aim our cameras. It is for this reason that I like to stop, take a deep breath, and ask myself, "What made me stop." And I get in touch with my own answer. I then look at all the elements that are around me--the trail, the fence, the giant rock formations, the trees, etc. 

The question we need to ask ourselves is, "How can I best arrange all the elements before me in a way that will give me the best, most powerful, most interesting composition? Where do I place that large formation to the left? Where do I place the trail and the fence?" In other words, I don't just go, "Oh wow," and just shoot. I think it through before I shoot. 

©Eli Vega


This last example is part of my "Impressionism" series of images. I created this impressionistic image by moving slowly forward into the scene, with my shutter speed intentionally set at 1/13th of a second in order to get a sense of movement. That was my main purpose for creating this image. However, even with that in mind, I did see the road, knowing it would become a leading line in the final image, leading the eye into a mysterious, unknown place.

©Eli Vega


Next time you're out and about with your camera, look for those often-ignored leading lines. I believe you'll start seeing a difference in your images.

Have fun with it. E-mail me if you would like a 1-on-1 field lesson on this topic. 


Wednesday, April 19, 2023

 DO WHAT OTHERS ARE NOT WILLING TO DO


There are so many activities a lot of people are not willing to do, and that includes photographers. Many of those reservations are psychological. I take advantage of that reality by doing just the opposite. The end result is often a one-of-a-kind image that even I won't be able to replicate.

Here are some examples. Who likes getting up at 3:00 a.m. just to get that perfect shot? Who likes hiking several miles to get a shot? Sub-zero temperatures are also deterrents for a lot of folks. Another hesitation by a lot of people falls under the category of "the art of conversation," as someone once told me I had. I don't know if it's an art, but most people don't like talking to strangers, much less for the purpose of taking their picture. I do! 

Let me share several images I created by simply doing what others are not willing to do.


It can get extremely cold in Steamboat Springs, Colorado, close to the Wyoming border.
I went out one day when it was so cold my fingers felt numb and tingled when I took my gloves off. I 
kept walking in calf-deep freezing snow until I came to this spot. Yes, a lot of discomfort, but it was worth it. Photos like this don't tell the whole story--they just have the feel of "coldness," without a hint of what the photographer had to do to get the shot. 


Talking to strangers. I really enjoy talking to strangers. Doing so has given me a collection of interesting, intriguing, and even funny stories to share. And, some cool photographs to boot! 

I was in downtown Boulder, Colorado, along famous Pearl Street Mall, when I saw a man sitting quietly inside a Starbucks. The scene reminded me of masterful portrait paintings, like those of Rembrandt.

I went inside, approached the man, politely introduced myself, and told him I was a photographer. I asked him if he would mind if I took his picture from outside the window. I made him comfortable by telling him he didn't have to do anything at all--just continue doing what he was already doing. He kindly obliged. When I finished, he signed a model release.

"Michael" 


There is a mountain peak in Colorado that doesn't even look like it belongs in Colorado, or in the US. A stranger, an avid hiker, told me about it after a short conversation in a public hot tub. When I told him I was a photographer, he quickly said, with excitement in his voice, "Man, you need to check out Lone Eagle Peak!" I had never heard of it. 

That evening, I went online and found a few photos of the peak. It was a no-brainer--I had to check out Lone Eagle Peak!  The man who told me about it did warn me that it wasn't easy getting there, adding that it was a fifteen-mile hike! Did that cause me hesitation? Oh, yeah. But I had to try it. It was a very long and tiring hike. I'm glad I did it. It took a 12-hour hike to see this 12,920' unique beauty.   


North Central Arkansas. As I drove down a narrow two-lane paved road, out in the middle of nowhere, a unique building grabbed my attention. I carefully pulled over and parked on the shoulder. I grabbed my gear and walked closer to the building. It looked abandoned. I looked around to see if there was anyone around to ask permission to take some photos. Not a soul around. 

The building had several uniquely-placed windows along the facade--very strange. 


I took several shots before I heard the sound of music. I looked around and wondered where it was coming from. No clue. I then proceeded to get closer to the building to get some close-up shots. The sound of music got stronger; louder. Oh my God, I thought, it's coming from inside!

I hesitantly knocked on the door. I heard a deep gravelly voice say, "Come in." Again, hesitation. I have to admit, I was afraid that if I opened the door, it would be my last day on earth. I was totally wrong. Inside was this gentle giant of a man. Although the rest of the story is extremely interesting, I will skip it for this blog. However, if you are interested in knowing "the rest of the story," feel free to e-mail me.  

John, ironically, was his name--Big Good John. He was on his bed, on his stomach. We talked for several minutes before I got the nerve to ask him if I could take his picture. He appeared to be naked underneath the blanket. He quickly grabbed his pillow and pulled it underneath his huge upper body. Click. This is what you get when you do what others are not willing to do. 


There is a great historic structure in Colorado that represents the state's mining history. It's called Crystal Mill. I had seen several photos of it, and I knew I wanted to see what I could do with it. What I didn't know was its exact location or how to get there. Surprise!

After investigating further, I decided I was going to pay for a group Jeep tour that took folks down to the mill. I had tried it before, on my own, in my SUV, but decided it wasn't a smart idea. After just a few yards, and seeing some big rocks and boulders, it became obvious that I wasn't going to make it to the mill! 

There were four of us in the Jeep, plus the driver. I have never been on a wild, bumpy ride like that, nor do I ever want to again. Several times on the way to the mill, a good three miles down the rugged mountainside, my butt went air-bound. I really had to hold on. But, as you can see, it was worth the nail-biting and discomfort.


Let me take you back to Pearl Street Mall in Boulder, Colorado. On another occasion, I happened to walk by this bar & grill in the middle of the afternoon. I saw these huge light bulbs hanging from the ceiling. I had never seen light bulbs that big before. I just had to go in and get a closer look. After I took a second look, I just had to ask one of the workers if I could "take a picture." I always say it that way. Even though I know I am going to create an image from my own perspective of life, they see me as "taking a picture." So, here's my picture; an image I wouldn't have created if I had been shy, hesitant, and not daring to ask a business if I could take a photo of their property. To a lot of folks, it feels intrusive. If you ask, you might get it. If you don't, you won't. 


The reason I am sharing so many examples from Colorado is that I lived there for fourteen years, and I really took advantage of the state, and the surrounding states of Utah, Wyoming, and New Mexico. That said, here is yet another one.

Eldorado Canyon, near Boulder, is a very small and narrow canyon--nothing like other grand canyons in the state. However, it has some extremely interesting, photogenic, formations, crevices, and cliffs. I had taken several photos of it, but one day I decided to get up extremely early in the morning and be there before sunrise. I disrupted my sleep and went out on a cold morning, but I'm sure glad I did. 


I encourage you to get outside your comfort zone. It's not easy, but the more "keepers" you take home, the easier it gets. It has been worth it for me.

Have fun, and e-mail me some of your "keepers" someday!  


Wednesday, March 15, 2023

 HDR PHOTOGRAPHY


Most of my HDR work is for my commercial work, mainly for the hospitality industry. For all other types of photography, however, I don't do much with HDR.

Let's start at the beginning. HDR photographic digital photography has been with us since around the turn of this century. High Dynamic Range. I will try to explain it in simple terms.

During film days, the terminology was film "latitude." Some films had more latitude, or ability, to give us good exposures for both the darkest and brightest areas of the scene. They weren't perfect, but much better than other films. If a scene has high extremes between dark areas and bright areas, we say it has high dynamic range. Neither films nor sensors are capable of doing a good job in those given conditions. Enter HDR photography. 

HDR photography has a process, and it involves a combination of taking pictures, combined with the use of photo editing software. The most common process is this:

1)  Take up to seven (7) photos of the same scene, giving a different exposure to each of the seven images. For example, take pictures at -3 stops, at -2 stops, -1 stop, at -0-, at +1 stop, +2 stops, and at +3 stops. That's seven images, ranging from extremely dark-looking images to extremely bright-looking images. 

2) With the use of HDR software, all seven images are opened in the software--all seven! The software is designed to take all seven differently-exposed images and magically narrow the high dynamic range between them to give us a great-looking image with no washed-out areas or extremely dark areas--something films or sensors do not have the latitude to accomplish on their own. That's a lot of work for a piece of software to do, huh? 

When we try to take pictures of scenes that have a wide range of dark areas and bright areas, without the use of HDR technology, we are often disappointed. We will see some blown-out (over-exposed) areas as well as some extremely dark shadows. HDR software corrects that. 

I don't like the look of most HDR-ed images. I can hear you now, "What? After all that explanation about the magic of HDR technology, and you don't like it?" Let me explain. The end result of combining seven differently-exposed images, coupled with extra post-processing with that same software, produces an image that, to me, looks like an illustration, an architect's rendering, or a colored etching, rather than a photograph. Now, true, some folks like that look. I don't. 

I guess I wouldn't mind photographic illustrations or "etchings" so much if photographers admitted that the end result was accomplished with computerized HDR processing. But that's not what happens. They are usually sold or shown as a photograph.

In the art world, by contrast, we see watercolors, oils, pen & ink, acrylics, and, yes, even mixed media. They all stand on their own. 

Photography has evolved by leaps and bounds, especially since 1998 or so. But, maybe because it is a relatively new field, compared to art-on-canvas, we have not come up with a name for photography off-shoots, like HDR and other techniques. We just lump everything into one medium we call "photographs" or "photography."  
 

So, back to my dislike of that "illustration/rendering/etching" look.  


This HDR-ed image has that "look" I've been talking about.


This image, though processed with the same software, looks more natural. They may not be the best examples, but they illustrate my point.       


According to a lot of the literature on the subject, HDR is intended images to replicate what our eyes see, that is, no shadows. However, we do indeed see shadows in many daylight scenarios. Additionally, as a photo artist, I like shadows. They give my images that 3-dimensional feel. Too many HDR shadowless images I have seen look too "flat," because there are no shadows. They are also void of emotion; of feelings. I prefer to translate emotions and feelings onto my images. I don't want the scenes I photograph to look "documented."

So, okay, I'm not very fond of HDR. Do I ever apply HDR to my images? Yes, but only under two conditions. 1) Commercial work, where clients don't like shadows--they want every inch of the image to have as much detail as possible. 2) Yes, for some scenarios when the spectrum between darks and lights is too extreme. However, even when I feel I have to, I don't want them to look like an illustration or an architect's rendering.


So, how do I use HDR and still maintain the look of a photograph? I use a modified process.  I call it my "7/3 formula." I take seven images, just the way I described previously. However, and here's the key, instead of opening all seven in my HDR software, I only open three! Which three I use is subjective. I usually use the one shot at -2, -0-, and +2. The others are there just in case I don't get what I like. And I do use other combinations until I get what I like. Bottom line: always just three. Below are 
just a few examples that gave me that "natural" feel.


To piggyback on what I've said about my likes and dislikes, I will often photograph a scene to which most photographers would apply HDR, but I don't. The technical variables are there-- extreme range between the dark areas and the bright areas. However, as explained before, I love to translate the feelings and sensations I felt when I was there onto what we call "a photograph." Below are a few examples of where I did just that. I go against todays HDR norms; often dogmas.

Early morning, just as the sun broke the horizon. Buck Canyon, Canyonlands, Utah. I liked the subtle layers of topography and dark-to-light in this scene. I would have lost that through HDR.


In order to translate the peaceful and serene feeling I felt that morning, I changed my White Balance to fluorescent. Shadows gave this scene mood. 


Without HDR, the bright colorful sky stands out against the more earth tone mountains. 


In summary, when I decide to photograph a scene, I ask myself, what made me stop? I then work backward from that and try to translate my answer into something we call a photograph.

Whatever you do, whatever your preferences, likes, and dislikes, just go out there and have fun with it. Let the outcomes reflect you.

Feel free to contact me with any questions or if you want a short 30-minute ZOOM lesson. 


Friday, February 17, 2023

LIGHT, LIGHTING, & TIMING


Light. It can be harsh or gentle; vibrant or muted. It can come from above or from an angle.    It can be sunlight or human-made light--like from car lights or street lights.

Lighting. It can be from studio lighting. A subject can also be creatively lit by "painting it with light."

Timing. It is extremely crucial in photography. It includes the time of day or the time of year-- the seasons. It can also include our reaction to those quick, elusive seconds in the field.

This month, I will share what I have done with light, lighting, and timing out in the field.

We'll start with human-made lighting. For the image below, I had to be extremely patient. I chose late afternoon after sunset, but before twilight. First, I got my composition. Then, I set my camera to get a long 20-second exposure. A tripod is a must for this! I then patiently waited until that exact moment when vehicles were exiting the tunnel and others were entering the tunnel. It took planning, knowing the basics of photography (small apertures/long exposures), anticipation, and lots of patience.

The result was this surreal image. A friend once commented that it looked like a dragon was inside the tunnel spewing fire.

This scene was much darker than it appears in the final image. Long exposures soak in a lot of light; more than the eye can see. Additionally, the speeding vehicles virtually disappear, while their streaks of light, during twenty seconds, are recorded on the film or sensor.


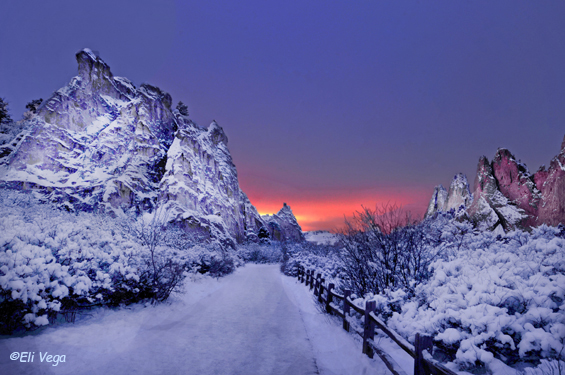
The natural winter sunlight for this image was very early morning before the sun actually broke the horizon line. At that time of day, we get those beautiful hues not present when we go out after sunrise. Those colors are the reward; they are what make the common uncommon.

Garden of the Gods, Colorado Springs, Colorado


Here is another scene where timing was an intentional factor. I like shooting during that time of year when I see late summer still clinging on while early fall begins to wave its magical wand. I love the combination of greens, golds, and yellows. 


The timing on this next one was similar, with most aspens showing off their colors, the evergreens showing off their greens, and other trees somewhere in the middle. The time of year was the main factor for this one. 

Maroon Bells, Colorado


Weather conditions can also influence the look and feel of scenes. It was foggy the morning    I saw gentle light falling on this stone bridge and pond. Colors don't always have to be bright and vibrant. Like in the movies, the lighting needs to match the moment--no need to create more vibrance than there was in the scene. Enjoy, and capture, those soothing, floating moments. 


The time of day was key for this next example. I saw this scene the day before, at midday. It didn't look like much, but, knowing more or less where the sun would come up the next day,    I suspected this scene would surprise me in the early morn. It did. I wasn't disappointed.

Buck Canyon, Canyonlands, Utah


Do not hesitate to photograph after sunset, especially if you tend to always use a tripod regardless of lighting conditions. I created this image several seconds after sunset, giving it a one-minute exposure. With that much time, the film or sensor just soak up unimaginable light. I love the quality of light and quality of color this time of day gives me.


For this last example, I "painted" these beautiful formations at Garden of the Gods with two off-road emergency lights. I spent five (5) minutes slowly "painting" them, emphasizing the outer edges. The long exposure is why the night sky still looks blue and why the clouds seem to be moving.


Creating images like these I am sharing this month requires getting outside our comfort zone. For many, it's not fun getting up before sunrise or continuing to shoot after sunset. However, as you have seen, it is definitely worth sacrificing sleep and comfort to create images that can often end up being one-of-a-kind images. I doubt that even I, who created these images, can go back to these places and recreate them. All factors that contributed to them will differ--factors like atmosphere, the stage of the autumn season, accumulation of snow, where the sun rises or sets.....the list goes on.

The theme I follow, which I talk about in my Right Brain Photography book and classes, is "impermanence." Get it then! It will change. The moment is impermanent.