Sunday, August 30, 2020

 DON'T JUST STAND THERE


Now that I've got your attention, tell me if you agree with this statement. Generally speaking, most of us walk around with camera in tow waiting for that invitation to bring our camera to our face. And, that is exactly what we do--we stand there and bring our camera to our face, at eye level. What would happen if we changed the definition of "eye level.?"

Here is my challenge for you. Spend an hour, half a day, or all weekend shooting from any level other than eye level, if it's physically possible for you to do so. Raise your arms as high as they will reach and shoot down at something. Put your camera on the floor or inches from the ground and shoot straight up. You get the picture? 

If you have a tilting back screen, that will make this a bit easier. If you don't, you will need to take a shot, re-position the camera and take another shot. 

So, why do this? I like to do this to get different and unique perspectives; to make the common uncommon and the mundane insane. 

Let's move on to some examples. I'll start with this image. Before I explain, what do you think you are looking at here? 


The state of Utah capitol is one of the most beautiful capitols I have seen, and I've seen several. When you walk in, the size, design, and artistry of the interior grabs your attention immediately. If you stand in the center of the building and look straight up, you see its awesome dome decorated with murals. There is a huge chandelier hanging from dead center--those are lights from the chandelier you see; all those white round objects shaped in a circle. 

The tip of the dome is 165 feet from the floor. The chandelier hangs from a 95-foot chain!
So, how did I get this shot? I placed my tripod in dead center, opened its legs as far out as they go, lowered the center column as low as I could, placed my camera on the tripod facing straight up. Before I did that though, I set my camera for auto focus (with a 17 mm lens), and placed the focusing point in dead center. I set my f/stop to f/22. I always like to use more f/stops than I need. The small f/stop gave me a shutter speed of 1/4.

Now, let's go with just the opposite--shooting down. I was at Denver, Colorado's annual Chalk Art Festival. As I photographed several artists on their knees painting their pieces on the street asphalt, it occurred to me to take my camera strap from around my neck, extend my arms as far as I could, and shoot straight down. But, first I had to make some calculated estimates. My settings were: 640 ISO (to get a fast shutter speed); focal length of 17 mm; f/stop of f/11. Using the Aperture Priority setting, the camera gave me a shutter speed of 1/250. I set my exposure compensation at -1 stop. But, please, don't memorize these settings. They are based on the time of day, the weather that day (clear skies), the camera and lens I used, etc. Don't memorize settings or formulas. Memorize concepts! By concepts I mean facts like: If you are going to hand hold a shot, you are going to need fast enough shutter speeds to get a sharp (not fuzzy) photo; the higher the ISO, the faster shutter speed you'll get (when shooting Aperture Priority); etc If you memorize concepts, you will know what to do with your f/stops, shutter speeds, exposure, ISO, White Balance, etc--regardless of the situation.  


During one of my "shootings," I came across this great old antique hot rod. Here is the original photo of the car.

I set my lens on 17 mm, my auto focusing point on about 1/3 from the bottom of the viewfinder, ISO at 500, f;stop at f/8, and set my exposure compensation dial to +1.3--it was dark underneath and I wanted to get as much detail as possible. Those settings, on Aperture Priority, gave me a shutter speed of 1/30. My camera was on a tripod. So, again, taking the time to do this gives us those unique-looking photos; photos we're not used to seeing because......well, because we just stand there! 


As I walked along Pearl Street Mall (an outdoor mall) in Boulder, Colorado, I came across this bar/cafe that caught my attention. It was the light bulbs that grabbed my attention. As I always do, I asked if I could photograph the light bulbs--they weren't your everyday light bulbs. I wasn't interested in the bulbs in the bar--I was interested in the bulbs. I wanted to isolate them from their surroundings. So, I shot up at them. 

The bulbs were high on the tall ceiling, so I set my lens to 170mm to get a really tight shot of them, and f/25 to make sure I got everything sharp.

The more focal length, the more f/stop you need to get things sharp. That is a result of the change in aperture size as we go higher in focal length. For example, a 300mm lens at f/8 will have less depth-of-field than a 17mm at f/8 because its aperture size, even at the same f/stop, is larger. Test that out someday.


Now this is different than the images above. One Halloween season I bought a hand-sized hard plastic skull. I thought it would be fun to do an in-camera multiple exposure. I placed the skull on a low surface and shot down at it, then moved it once and rephotographed it, then did it two more times to create 4 skulls in a circle, as if they were talking to each other. I made all four shots shooting straight down. I converted the final image to a B&W photo.

In case you're wondering how I got them so perfectly aligned, this is what I did. I took some measurements, then placed Scotch tape where each of the four had to be. So, when I placed the skull for each of the 4 shots, I simply placed it where I had placed the small pieces of Scotch tape. 


                                                        "Heady Debate"


I was in the middle of a 1-on-1 lesson with a student in Idaho Springs, Colorado. One of the landmarks in the historic mining town is the still-standing ARGO gold mine and mill. Several feet in front of the main facility are several ore cars displayed in the yard, at eye level. I showed my student how we could get much lower and shoot up at the old ore cars, while placing the building and sign as a backdrop in order to create context. These shots were more interesting, more intriguing than the straight-on shots. 


i will finish with this artistic assemblage of beautiful and naturally colored rocks I found near a dry creek bed along Owl Creek Pass in Colorado. I use the word assemblage intentionally, as I gathered several differently-shaped and differently-colored rocks together to create this image. After I got the composition that looked good to me, I shot straight down at them. 


So what are you waiting for? Don't just stand there. Go out and look at life differently. Think creatively; shoot creatively. 

As I say in my book, my right brain shakes hands with my left brain and says, "I have an idea, and this is what I need from you."

Have fun. Unfurl your soul. Stay safe! 

Eli   
  
 .    


Friday, August 21, 2020

 ORDER OUT OF CHAOS


I thought I'd do something different this month. I have chosen beautiful 210-acre Garvan Woodland Gardens (GWG) in Hot Springs, Arkansas as the backdrop for my tips this month. In any gardens like these, it is easy to become overwhelmed. There is so much to see, so many plants, flowers, landscaping, etc. Where do we start? What do we photograph? Where do we aim our camera?

Have you ever felt that way during your travels or weekend getaways? Now this might sound strange, but when it comes to photography, the eyes see too much. We need to reign our eyes in through a technique I call "scanning." I spend a lot of paragraphs on this in my book Right Brain Photography. Today I will just give you an abbreviated version of this approach.

If we try too hard, it will be too hard. By that, I mean there is an easier way. What I do when I encounter those OMG scenarios is to scan the area within my view. At this point, I don't even worry about the entire park or gardens--that's way too much to swallow. I follow my intuition and let it guide me. I don't doubt it; I just follow it. If I sense there might be something over there I simply walk over there and check things out. So, what am I looking for once I get "over there?" I don't photograph subjects. I look for color, shapes, lines, design, and even mood. Sometimes I get certain feelings from a place or a subject I see. The actual scenario or subject(s) become secondary. I obviously see it, but I look much deeper than what the eyes see.

I have been to GWG four times, so far. The following are extracts from those visits.

The first thing I do when I visit a place like this for the first time is to get a map, ask the staff to show me the highlights, and I also ask them if there are any features, displays, or current blooms that are out this time of year. 

One of the highlights in the gardens is this waterfall area. I don't do usually do HDR in nice open areas like this, but this particular day, at this sight, I was getting an extremely wide dynamic range of lighting, more than my camera could handle. My rule of thumb with HDR-created images (combining 2-3 images to create a single image) is to not make them look "HDRed." I don't like that "illustration" or "architectural rendering" look. That's why I never combine more than three images.  


I saw this bridge from several yards away, but didn't like the surroundings I saw from that distance. I kept walking toward it, carefulling seeing how the surrounding environment changed as I walked. I was looking at how the areas to the left, right, and behind the bridge were looking as I got closer. I liked the design of the bridge, but was looking for the best surroundings that complemented the bridge. All of a sudden, there it was! As I got close to the bridge I knew that was my shot. It was like a life metaphor. I like scenarios that give me what I call that "scene from a novel," used by authors to describe a feeling, a goal, a promise. 


A few years ago, the 'Gardens commissioned an architect to design a million-dollar "tree house" would fit in with the theme of the garden. As you can see from the image below, it works. 

All photos I had seen were of the treehouse itself, hovering above the gardens. However, when I saw it, I noticed that the designers had included an engraved space under the treehouse that replicated theme of "tree" house. The walkway I was standing on was too close to the scene. I had to use a 10 mm wide angle lens to capture it all.

This is what I call extracting. I extract something I'm "working on" and eliminate the rest, that is, I ignore everything else in order to better focus on the results I want.  


One of the highlights of these gardens is Bridge of the Full Moon. The trick is to find the best perspective. I wanted more than just a "smart phone" picture of it. After scanning the scene, I saw this. It didn't hurt that the scene was sprinkled with spring colors. The "smart phone" picture would have been of, well, just the bridge. However, I wanted to incorporate the essence of the environment in which the bridge was built--the creek, trees, plants, hillsides.   


A Japanese garden is a must for any decent gardens. There is one in Portland, Oregon, in Denver, Colorado, and at Garvan Woodland Gardens. For this scenario, my goal was to capture the garden, the koi and its surroundings. Again, the spring colors added the exclamation point. 

All the principles I use to create my compositions were present that day. However, I had to be patient for some of those principles to come together. I wanted fish to fill in that empty lower right-hand corner (containment). It took several minutes of waiting patiently for the most colorful koi to swim in that specific corner. The other composition principles which I incorporated were: the small green tree on the lower left and the small white trees on the left (containment), the curving stone path (leading line), the big white tree (balances out other areas in the scene. The center of interest was the entire scene.  


You can't visit GWG without at least walking into Anthony Chapel. It is one of three glass chapels in the state. There are two others in the U.S. outside of Arkansas. It is a big chapel, so be sure to take a wide angle lens--at least 18 mm. You will also need a tripod, or a camera that will give you great images at high ISOs. If shooting without a tripod, a lens with vibration reduction will come in handy. 


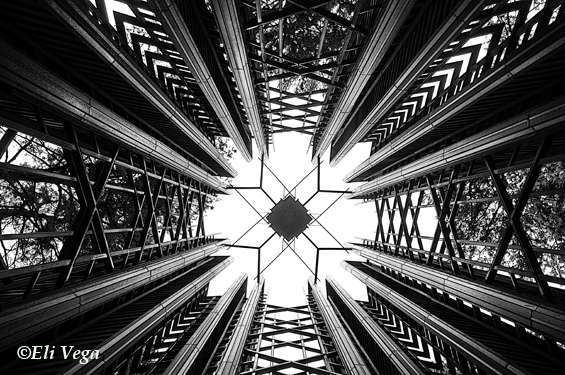
Not far from the chapel is a beautiful five-story bell tower. In order to amplify it's surreal qualities, I put my camera on the ground and shot straight up at it, then converted the image to B&W. I used a 10mm-24mm lens, set at 10mm.


There is even a little cave you can walk into. Shooting from the inside looking out, you definitely will need some degree of HDR. I used three images to get this one. I wanted to keep the inside darker than the outside to make it look the way it looks and feels when you're in there. 


Photo enthusiasts who have taken my classes or workshops know that I can't be on a photo shoot without creating my right brain photography  During one of my visits to GWG, I saw a section that had an endless sea of colorful tulips. Absolutely beautiful. I created several images that day, but this one gave me the best feel of what if felt like when surrounded by and immersed in color and vibrance. This is an in-camera double exposure.


I hope I have given you some ideas, techniques, and approaches to take with you next time you visit a botanical garden, arboretum, or Chinese garden. What I shared with you is a portion of my I.S.E.E. SOMETHING paradigm--use your Intuition, scan, extract, and eliminate everything around you to help you focus. 

Don't get overwhelmed, stay focused, and, most importantly, have fun!

Contact me if you would like a 1-on-1 ZOOM lesson.  
vegaphotoart@gmail.com  


Thursday, July 16, 2020

SUNSETS & SUNRISES


I think it's safe to say we all like photos of sunsets and sunrises. Here are two key points to remember: 1) The sun doesn't always have to be visible in the scene. The colors, tones, and moods produced are also part of those special life moments. 2) Don't just take a picture of the sun setting or rising. Photograph something at sunset or sunrise. That can be a grouping of trees, structures, a river, a landscape, etc

Composition is always the first on my checklist. I make sure I have the best possible composition, before the sun comes up, or sets. I spend an entire chapter on composition in my book, Right Brain Photography. Without a good composition, I end up with a weak image, which forces me to grab the viewers attention through exaggerated sharpness, off-the-wall colors, and getting the same lighting exposure throughout the image. A viewer not trained in composition can be easily awed by those components. 

 
Speaking of exposure. remember, there is no such thing as the "correct" exposure. There is only the right exposure, and that exposure is based on how you want the image to look. If you want every inch of the image to be equally exposed, that is no shadows or bright areas, you might to apply an HDR approach at the time you take the picture, then make adjustments with your software of choice. However, if you want to create mood, intrigue, or even a spiritual feel to the image, take advantage of the exposure compensation dial on your camera and experiment with it. When you do that, you're creating the right exposure, for you.

As for depth of field, I always want as much depth of field as possible, even though it won't be a major factor with images with large shadow areas. I'd rather have more f/stop than I need--nothing worse than getting an image with "soft" (out of focus) areas. 

Focusing. As a rule of thumb, I usually place my focus point roughly one-third from the bottom of the viewfinder. Depth of field covers roughly one-third in front of and two-thirds behind the focus point, thus my rule of thumb.

If you still need clarification on the points mentioned above, please contact me. In today's "Corona Fog" world, I offer 1-on-1 Zoom lessons. 

Okay then, let's move on to see how all this looks in a real photo. Let's start with this one.
I was at this spot on the Kings River in northern Arkansas thirty minutes before sunrise. I don't use those sunrise/sunset apps. Why? Engineer-driven sunrises are not the same as a photographer's sunrise. 

There is always some fine-tuning after the fact. Cameras, lenses, and light exposure meters are not perfect. For this image, I darkened the bright yellows of the sunrise and let the shadows untouched. When we try too hard to get that "perfect" picture, it ruins the mood, leaving us with a perfectly exposed photo. Obviously, if that is your goal, taking an HDR approach is the way to go. I like mood, feelings. sensations. In addition to satisfying myself, I  want my viewers to experience what I experienced when I was there. I don't want them to simply be impressed with my computer technical skills.   

                               ISO 100; +1/3 overexposure; f/29 gave me a slow shutter speed,
                               which gave a sense of motion in the water     


I had to work fast for this sunrise over the Ozarks. First, I saw the interesting landscape, with the fog hovering over the canyon below--that was my subject. The sun was secondary. 
To darken the image I underexposed the scene by a -1.3. I set my White Balance to florescent to add mood. The placement of the sun and the tree in the foreground was part of my composition, which I explain further in my book.


                     f/25 to get that sunburst; ISO 400 to "freeze" the sun with a shutter speed of 1/1250


This was a sunset, also in Arkansas, atop Petit Jean Mountain. Even though I applied HDR,using only three images, I made sure the scene maintained shadows in order to retain the feeling of awe most of us experience at sunset. My primary reason for applying HDR was to hold back (darken) the exposure in the sky. That V-shape in the upper right hand corner of the scene was actually there. I had never seen that before. 

                               With a wide angle lens (focal length 20mm), all I needed was f/16


There are some cabins west of Eureka Springs, Arkansas. The name of the outfit is Can-U-Canoe. West of these cabins is an awesome view that gives the illusion of an island. Actually, it's just the White River meandering around a large bend, but from that perspective it looks like an island. I got permission from the owner to set up on the deck of one of her cabins. What a view I got that evening right after sunset. 

I could have "stitched" two or three images together, but a 10mm focal length gave me enough of the entire scene. 

                       ISO 100; f/10 (not much needed with a 10mm focal length); -2/3 underexposure 


This beautiful historic hotel in Eureka Springs, Arkansas was the setting for this sunrise. Remember that large f/stops (f/20 or larger) give us those cool sunbursts. 

                      ISO 100; f/20; +1 overexposure to keep detail in the hotel and open up shadows)


Let's now go to Texas. I found this cool abandoned ranch house north of Dallas. No, it isn't the same house used for the 1980s TV show "Dallas." It was the perfect subject for a sunset. At the beginning of this blog I advised to photograph something at sunset, rather than use the sunset as the subject. This is what I mean. I used film for this image--no metadata available.


Just a few miles east of Dallas is Fort Worth. That is where I found this early morning scene. This too was with film. That day, I was walking on a dry river bed toward downtown Fort Worth. My main objective was to get a good sunrise shot of the skyline. However, as I always do during my walks and hikes, I like to turn around occasionally to make sure there isn't anything behind me worth a photograph. I did just that when I saw this scene! I used an FLD filter, which I still use today, to alter the color in the scene. 


One of the least known canyons in Colorado is Eldorado Canyon near Boulder.Though small, it is worth exploring. I did just that one morning, hoping for a good sunrise. I wasn't disappointed! For this image, unlike others, I made sure I got detail in the awesome mountainsides, which serve as bookends to the flowing creek. 


Ahhh, and sometimes, if we're lucky, we get that alpenglow at sunrise (or sunset) in the mountains! Now, those are the mornings you thank yourself for getting up at 4:30. This image was created at 5:19 am! It was darker than the image appears.

If you ever visit Rocky Mountain National Park in Colorado, add Sprague Lake to your bucket list. 


                   ISO 800 to "freeze" ripples on lake; f/11; underexposed -1 2/3 to keep
                   the 
scene from being overexposed 


As an overview: Get there thirty minutes before sunrise to get your composition just right.Take advantage of that exposure compensation dial to bracket your shots. Use high f/stops, f/20 or more, to get those sunbursts. Don't worry about the "correct" exposure--get it right, for you! 


Of the nine images I shared, six were created early in the morning. So, for those of you who are not morning people, shake it off and go out and add some gems to your collection. But, if not, there is always late evening. In either case, go out and experiment, explore, be bold, and, most of all, have fun! 

If you need some personal 1-on-1 help and tips, contact me and we'll set up a Zoom chat.


Tuesday, June 23, 2020


THE 'BULB' SETTING
WHEN & HOW TO USE IT


As far as I know, all cameras are engineered to give us up to a 30" (thirty seconds) exposure. If it is too dark out there, the camera will talk to us and say things like, "Wow! You expect me to take that photo in this darkness? Well, I can, but you better have a tripod and be patient with me because this will require a 10" exposure.....or 20"......or 30." 

That's a great standard feature that most, if not all, DSLRs give us. I have several images in my collection that required 20"-30" exposures. The example below was created with a 25" exposure. That is a long, very long, time in the photography world. If you don't believe me, close your eyes until someone tells you 25" are up. 

I "painted" the underside of Mesa Arch at twilight with a simple large off-road emergency LED flashlight. 


That's great when it is still light enough, even at twilight, for the camera to calculate, on its own,an estimated time, like 25." What happens, however, when it is so dark that the camera's engineering goes beyond it's limit, i.e., it is so dark that it's brain doesn't know how many seconds, or minutes, it takes to give us an adequate photo? Ah, this is where we become the conductor; where we need to tell the camera what we want. We just pat its head and tell it, "Don't worry. I've got this." This is where BULB comes in. 

I don't know why, after all these years, camera manufacturers have kept that terminology, decades after photographers used a large bulb to photograph low-light scenarios, like portraits and such. Wow, that was a long sentence! 

First things first. You might start with your camera manual to find out how to set your camera to BULB. You might try this. Set your camera shooting mode to shutter priority first. Then, turn your command dial until your camera reaches that 30" mark. Then, change your shooting mode to M for Manual. Now, turn the command dial one more notch until you see BULB. Eureka!!!  Again, if that doesn't work, read your manual.

So, you ask, why do we need BULB? We need that setting whenever we want to photograph  subjects late in the evening or at night. Examples include, skylines, bridges at night, etc. We can also use BULB in more creative ways, such as photographing historic buildings, natural rock formations, etc. 

One of my favorite ways is to combine two techniques: BULB, coupled with light painting, like the image above.

Leaving our shutters open for 1-5 minutes, or longer, takes us into that "road less traveled." . To me, it's more creative than technical, meaning that it takes some calculated guesses to get exactly what we want. Left-brain thinkers get bothered by that, however, it is no different than bracketing a shot to make sure we get a really good one, or when we're creating an HDR image. The only difference is that we are bracketing in increments of 10" or more.

Now, are you ready for some examples? 


For this image, I first saw with my imagination. I saw the huge formation in the background and really liked its shape. I then saw the small Juniper in the foreground. I thought it might look cool if I "painted" it. All I did was slowly wave my flashlight at and around the tree for a few seconds. There is always more than one way of doing this. I used a cable release. Once I decided on the best composition, I set the camera on BULB. I clicked the shutter open with my cable release and locked it open. I then walked closer to the tree, making sure I wasn't in view of the viewfinder, and slowly painted it. I then returned to my camera and released the shutter with the cable release. 

In this case, it came out just fine the first time. If it had come out a little too dark, I would have simply repeated the sequence, but maybe painted the tree more slowly, to make sure the light and color registered better on the sensor.      

Someone said it reminded him of the burning bush in the Bible. 


                                                f/25 & approx. 2 2/3 minutes, at twilight 


Part of the trick to all this is to see it before you see it, as I explain in my book, Right Brain Photography. I like to explore, and one of my favorite ways to explore is to follow my intuition. When I see a road I haven't been on before, I like to take it just to see what's out there. I did just that one day near Eureka Springs, Arkansas. It was in the middle of the day. It didn't take long before I saw this really cool old red barn! I immediately knew I had to go back someday at twilight and "paint" it. 

I knocked on the house door near the barn . A woman opened the door and told me she and her husband owned the land. I asked her if she would mind if I photographed the old barn someday. She was very obliging. She raised her eyebrows in bewilderment when I told her I wanted to come back some evening after the sun set. She gave me this "Why?" look. I explained.

I went back about a week later. I called her first to give her a heads up. I didn't want her husband to come out with a shotgun that evening! I told her not to worry if she saw lights by the barn; that it would be me photographing it.

I first determined the best composition--that is #1 on my check list when I'm shooting. 
I then locked the shutter open and started painting. I started on the left, making sure I painted that small utility trailer too. I then continued on the wall, from left to right. I literally walked in front of my camera, knowing that my motion would not register on the sensor. I stopped for a short while before I painted the front of the barn, starting with that large door on the left, then continuing with the rest of the facade. I spent a few extra seconds around the inside of the barn where it was darkest. After doing that, I then spent a few more seconds painting around the top of the facade where it appeared that they used to have a light up there. I then went back to my camera and unlocked the cable release. 

This approach, and the same approach I took with the Juniper tree above, is my standard playbook for similar scenarios.  


                                               f/8 and just short of 3 minutes.


Garden of the Gods, Colorado Springs, Colorado. This image is on the cover of Right Brain Photography. This was approximately 5 minutes at f/20. I'd rather have more f/stop reach than necessary, for reassurance.      


This scene is also in the second-best city park in the world--Garden of the Gods. I used a wide angle lens and I was several yards away from this formation, called Tower of Babel. In order to pick up the stars, I used f/2.8. F/3.2 could have worked as well. Using BULB, and relying on my mobile phone timer, I left the shutter open for 26 seconds. Some cameras have a built-in timer that counts down the seconds--all you have to do is look at the screen and release the shutter when you're ready. 


This is a beautiful historic bridge north of Eureka Springs, Arkansas. As I did with the photo above, I used f/2.8 to gather enough light to record the stars. The "shutter speed," which is what it really is, was 44 seconds. The white and red colors are cars on the bridge.


I show this last example to demonstrate a different photographic objective conducive to the BULB setting--that of creating light streaks from moving vehicles. It has to be done late in the evening after the sun sets, but not so late that it's pitch dark. Those long streaks came from more than one car. There must have been three or four. If it's dark enough and the cars keep moving, they do not register on the sensors. I've had situations when one or two cars stop or slow down for some reason--not good! I don't want to see any cars in the photo.  

What I look for is a long exposure that will capture several seconds of moving vehicles; long enough to create light streaks from headlights and taillights. I prefer to get both in the photo, but if I can't, I prefer to get taillights.  

This requires a lot of patience. I have been known to stay in one spot for twenty minutes or longer just waiting for the right combinations. I always take several shots because I never know exactly what I'm going to get. It is yet another form of bracketing. I just look at the final images, pick the keepers, and delete the rest. 


                                                             f/18 and 34 seconds


I find it fun to go out in the evening. Several of my most creative images were created after sunset. By the way, for years now I have made the habit of wearing a bright reflective vest, the kind construction workers wear--it keeps me safe and minimizes suspicion by anyone who might see my body movements at dusk. I also have several pieces of white reflective tape on my tripod to lessen the chances of anyone mistaking it for a weapon. Times have changed and we have become more leery, suspicious, and on the lookout for danger. 

So, once you've taken safety precautions, go out and have fun with your camera and lenses. You will create that level of photography that will make people ask, "How did you do that?"


Wednesday, May 20, 2020


HOW TO PHOTOGRAPH FIREWORKS

Hopefully we will all get a chance to watch fireworks on the 4th of July, 2020.

If you do find a good safe spot to watch them, here are some tips that will help you go home with some great shots you can hang on your wall, share with friends, or share on social media. All you need is a few basic tools.

1) A basic digital camera, on a good sturdy tripod. It doesn't have to be expensive,
   just as long as it has a 'BULB' setting (read your manual).
2) A telephoto focal length for most, not all, shots. 200 mm to 300 mm should be good 
    enough. It will depend on how far you will be from the fireworks.
3) A piece of material big enough to cover the front of your lens. It can be something as 
    simple as a piece of copy paper folded in half, your camera manual, etc.

Now let me show you how they all work together. 

CAMERA:
ISO--I like to set my ISO at 100
F/Stop: My f/stop will be at f/8-f/11. If my images are coming out too bright at f/8, I quickly switch to f/9, f/10, or f/11--whichever is giving me the best exposures. I just experiment with the first 1-3 blasts, check my display screen, and adjust accordingly.
Shutter: I set my camera to BULB. My piece of paper becomes my shutter speed (I'll explain that shortly)

IMAGE FORMAT: I usually shoot JPEG Fine and Vivid, but any format works--TIFF, RAW.
LENS (no need for IS or VR setting):
Focus:
I like to shoot most of my fireworks blasts way out high in the sky, when they hit their apex and go "boom." That's when all the cool streams of color begin to flower and open up!
Forget Auto Focus--sorry. I set my focus to near infinity since all fireworks will be several yards away from you, way up in the night sky. That's where f/8-f/11 come in-- if you're a little off on your focus point, f/8-f/11 will cover any margin of error. In other words, that f/stop range will cover several yards closer or farther than the actual fireworks location.

Once you feel that all shots are looking good and not out of focus, stay with that f/stop throughout the 20-30 minute show! The only reason I would change the f/stop is if the images are coming out too bright--then I might switch to f/9--f/11.
TRIPOD: You can't do this without a good sturdy tripod--one that goes up at least to eye level. You can't do this on a mono pod or resting your tripod on a boulder or your car's roof.
PIECE OF PAPER:   Yes, I've used a piece of 81/2 x 11 piece of paper folded in half. As long as the material you're using is opaque so as not to allow light to hit the lens. Besides, there won't be much light hitting the lens when you're aiming at the dark sky. I've used my camera manual or a small piece of cardboard. 

THE PROCESS:  Okay, so I've got all the tools I need, now how do I pull this off? First, I don't expect every single image to be perfect. This is why I just shoot, shoot, shoot as much as I can until the show is over. Some bursts will be out of view; some will be just a flicker;
some will be only partially in the viewfinder. That's okay, I know I will get several great shots during the night. My process has never failed me.


Now, here is the fun part--the process I use during 20-30 minutes of fun colorful bursts.

I place my camera on the tripod and adjust all my settings as mentioned above. I aim my camera toward the general area I believe the bursts will be. I'll adjust later once the fireworks start. I use a wide enough coverage to make sure I will cover most of them. This is an estimate; not science. I know I'll get several chances to get it right. 

I always use my 3-foot cable release so I'll be ready and quick when the show starts. I keep my lens cap on until showtime. I also have my "cover" (piece of paper, cardboard, etc) ready for action. 

When the first burst comes up, I take my lens cap off and aim my camera to where I saw the first burst. I keep it there, with the tripod head loosened. When the next one comes up I keep adjusting both my focusing and focal length until it seems like I'm covering the bursts just about right, knowing that some will still be off to the side, etc. 

When I think I've got my aim just about right, I lock my camera in place and I'm ready to start capturing the fun, knowing that I might make adjustments if necessary. But I have to be quick in making those adjustments. 

So, now I have my lens cap off and cover my lens with my cover (the piece of paper). When the next burst goes up, I quickly release the cover and click my cable release. When the burst starts to dissipate, I quickly cover my lens with my cover, BUT I still have the cable release depressed! In other words, my lens is still open--it's just covered up with my cover.
When the next burst goes up, I then take away the cover again. THEN I release the cable release. In essence, what I've done is taken a double exposure--two bursts on the same image!! 

I continue this process until the show is over. Sometimes I'll do two bursts, then I'll do three, then I'll do just one if it's an awesome one. Back and forth, back and forth. 

At the end of the night I will end up with three bursts on the same image, or two, or just one. 

Now that I have explained at length the tools, techniques, and process I use, let me share some of the results from several 4th of July displays I have photographed. 


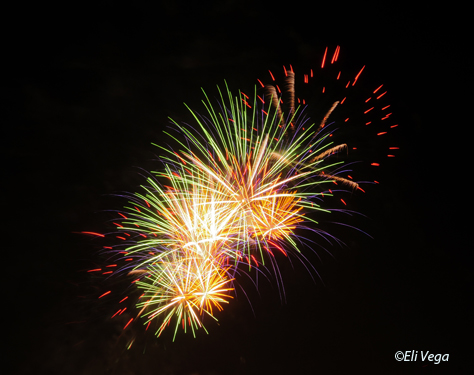
This was two bursts on the same image. The fun of it is that you never know exactly what you're going to get, but you know it's going to be fun. But, if we don't plan, we won't get lucky. 


This one was three or four different bursts. I don't want to zoom in too tight. I want to leave myself some breathing room around the edges just in case something like this happens. If the bursts are a little off, I can always crop the image to center them as needed. 


This was a fun one! This also had to be three or four bursts on one image. 


This one was surreal and Star Trekish.


Sometimes I do use a wide angle lens just for something different, as I did for this shot.
You can see fireworks and nearby buildings and structures. The fireworks smoke comes from me doing close to the fireworks platform. It adds to the feel of the image. 


I loved this patriotic red, white, and blue display. Some pyrotechnic companies get very creative. 


If you are lucky to find a fireworks display near a body of water, take advantage of of it! Sometimes, if I think the venue is appropriate, I will get some fireworks vertically.   


These two beauties showed off this particular night. Note the cropping.


You just never know what surprises you're going to get during the night. Just keep shooting--1, 2, 3, or even 4 bursts. I believe this one was 3 different bursts. Sometimes, when you do more than one single burst, they don't even look like fireworks.


As a finale, don't forget to find fireworks displays over a lake if you can--it adds an extra dimension to the excitement of 4th of July. This one looks like a neon palm tree on psychedelic steroids. 


Surely you feel patriotic by now. I hope you get a chance to see some fireworks this July. Copy and paste as much of my blog and take it with you before you leave for your fireworks night show. 

I sure hope we won't have to "ZOOM" our fireworks this year!  😮