Thursday, October 19, 2017

SEE WITH YOUR IMAGINATION
(Not your eyes)


I talk about this in my new book, RIGHT BRAIN PHOTOGRAPHY. It is one of the hardest concepts for many photographers to grasp. There are several reasons as to why that is, but I won't get into that in this post. I will, however, talk about what that means to me and how I apply it to my photography.

I recently had a 4-hour 1-on-1 photo lesson in The Ozarks near Eureka Springs. My student was one of my most devout students from Colorado. I will use our 4-hour photo shoot as my tip this month. 

Selma and I spent our time around Lake Leatherwood, a city lake near downtown Eureka Springs, Arkansas, and nearby Blue Spring Heritage Center.

We did not have much to play with that day. The autumn colors were not to be, it was a warm bright sunny day, and just not much that jumped out at us. Herein is my tip for this month: 1) We should not limit ourselves to photographing only that which hits us between the eyes; 2) We should see with our imaginations, not our eyes. If we only see with our eyes, we will often be disappointed with what we see.

My three years as an art major taught me to create something that wasn't there. I apply that same concept to my photography, but in a different way, since I'm working with a different medium. I ask myself, not how can I photograph what my eyes see in the best way possible, but also, what can I make that look like, other than what I see with my eyes. When I "see" that in my imagination, my right brain shakes hands with my left brain and says, "I've got an idea, and this is what I need from you."

I kept telling Selma, "See with your imagination," as I pointed out certain photo opps to her. As a result, we were able to see what we didn't see. 


I'll start with a couple of images I created while walking around Lake Leatherwood. As we stood on top of the old CCC stone dam, I pointed out some reflections in the water to Selma. I told her I was going to focus on the reflections, with just a sliver of land, but I was going to show it "upside down," with the blue sky reflections as the top of the image. Here is the result of that imagination. 

If you look closely, there are two abstract water horses, and even a strange brown-looking face in the lower middle part of the image. From a left brain perspective, I underexposed the scene by a -1 2/3 to bring out the colors, which also gave me a faster shutter speed (1/640), to freeze the rippling in the water. A unique abstract just waiting for me to "see" it. 


I underexposed this scene also by -1 2/3, again, to bring out the colors in the leaves.
The water was reflecting the dark autumn-brown leaves from above, therefore making the scene dark, except for the bright green and yellow leaves. By underexposing, it keeps the darks dark, while accentuating the variance between darks and lights,

Can you see the strange face above the yellow leaf?   


Now we move on to the Blue Spring Heritage Center. We came upon this scene and I told Selma that I thought this would make a good double exposure. She asked, "What is it about any scene that makes you think it would be a good double exposure?" Good question. My answer was this: It has all the elements of a good painting--the trees on the left facing in, the gazebo, the trees on the right facing in, the reflections. You almost see a complete circle, if you follow the direction of the trees, and the reflection.

I spend an entire chapter in my book on composition. This scene, without much effort on my part, had several elements of good composition.


Let me pause here to remind us of one fact we can easily forget. Without getting too technical about it, our eyes have the incredible ability to adjust quickly between detecting detail in very dark areas and very bright areas in any scene. In fact, they do such a good job that high-contrast scenes can often look "flat," not appearing to have much contrast at all. It has to do with the eyes' rods and cones. We can look at the darkest part of a scene and our eyes quickly adjust to that; we can then look at the lightest part of that same scene and our eyes quickly adjust to that too. Our camera sensors, and film, do not have that talent--and I take advantage of that.

The above fact can fool us, which can lead us to move on, as we look for something more interesting. However, I have trained my mind (my imagination) to see what my eyes might have missed. If I see part of a scene that is receiving light and another part that isn't, I stop and let my imagination take over. What can I make this look like?

When I saw these flowers being hit by sunlight, against dark foliage in the background, I knew I could create something my eyes didn't see. The scene actually looked rather flat to my eyes, not much contrast. What I do with a scene like this is either use spot metering (meter on the brightest part of the flower, in this case), or do some extreme underexposure. I went with the latter on this one, which, in essence, can achieve the same results as spot metering, but it's quicker. I underexposed this scene by a - 2 2\3 stops to get this effect. Yes 2 and 2/3 stops--almost 300% less light than the built-in light meter thought I needed for a "correct" exposure. 

Selma kept saying throughout the day that she felt very uncomfortable going down that far on the underexposure. I kept reminding her why I ignore my histogram, and that there is no such thing as a "correct" exposure; there is only the right exposure, and we define that.

(250mm; f/9)


More reflections. We came upon a section of water at Blue Spring Heritage Center. As I had done all day, I pointed to a certain part of the water and told Selma I was going to use the floating moss and other natural elements in the water as the "top" of those trees. This is what we saw. 


I told Selma that I was going to show the image "upside down." The result was impressionism through photography. I wasn't looking at what was there; I was looking at what I could create from what I saw with my eyes. 


At the end of the lesson, Selma shared her "take-aways" from the day. She clearly understood that it isn't always what we see, but also what we don't see, that might make for an interesting image. In fact, she created some great images of her own that day. 

So, as hard it might be for you, deprogram your mind. Stop "taking pictures" the way we were taught since we were two years old. Instead, create images using your imagination. Start seeing what you don't see.

Contact me if you would like a 1-on-1 or small group lesson. Selma is one of my best testimonials.     


Tuesday, August 22, 2017

IN-CAMERA DOUBLE EXPOSURES


A lot of photographers still ask me how I create my in-camera double exposures. It's one of the techniques I use to create Impressionism through my photography. Unfortunately, not all cameras have a multiple exposure feature. However, if yours does not, you can create two separate images, following my step-by-step guidelines, then blend them with whatever photo editing software you use.

Throughout the years, I have come up with several double exposure techniques and approaches. 
For most of my double exposure creations I shoot on manual focus for more preciseness. Then, I follow these steps.

1a) I change my f/stop to a low number (wide opening), like f/4-f/5.6, then manually take the scene out of focus. 

1b) I take a test shot, making sure it's not totally out of focus, but enough out of focus to create the desired "halo" effect when I combine both images. I also test for the right exposure--it shouldn't be too bright. I prefer slightly underexposed because the sensor (or film) will be exposed to light twice during the process.

2) If I like my out-of-focus test shot, I engage my double exposure feature and set it for 2 exposures.

3) Without touching anything, I take my first shot, knowing that I know I am satisfied with Step 1b above.

4) I then take 3 key steps for my second shot: A) Increase my f/stop to f/8-f/16, depending on the scene, B) Refocus correctly on my subject, C) Underexpose the second shot by usually 2/3 of a stop! Remember, the sensor is being exposed to light twice. If you don't follow step 1b and this step, you will get an overexposed final image! 

5) I take my shot. If I don't like the results, I go back through each step and make necessary adjustments. I usually either change my degree of focus at Step 1a, under expose step 1b, and/or underexpose Step 4C.

When I follow these simple steps, I get varying results, depending on the subject. Each subject, composition, or specific lighting on the subject produces different results.See my varied results below. 

My "Heroes of The Alamo" was my first commercial double exposure in the late 1980s.
I first photographed a portion of a relief sculpture that stood about a block from The Alamo. I then superimposed it over a photo of The Alamo. I didn't adjust the exposure for the second shot because I wanted a "see-through" effect. 


The minute I saw these colorful wildflowers near Crested Butte, Colorado, I knew I had to create two renditions, including a double exposure. I followed my own guidelines, step
by step, to create this "flowers on canvas" feel to the image. Flora of any kind, I have found, are the most conducive subjects for double exposures.


I am including a wide array of examples so you can see the different effects various factors have on double exposures. In the example below, a bicycle in the snow. I converted the original to a B&W since there wasn't much color. The deep shadows were created by snow drifts close to the bicycle's back tire. 

The results of my double exposures are either an artistic water color or oil painting effect, or a dream-like effect--sometimes both in the same image.


This was created during one of my "Make The Common Uncommon" workshops. I saw a clock and I saw coins in a jar and the idea of "Time is money" came to mind. So, I started rearranging the clock, the jar, and the coins. Then I lit the scene with two flashlights, one that gave out a gray/blue light and another that gave out a yellow/gold light. After I made this arrangement, several of us took turns, spending several minutes each on creating our own renditions. 


I imagined a photo from a documentary with the title, "Bury Your Butts." The direction all the cigarette butts were facing, against the dark menacing background, was a perfect scenario for one of my surrealistic images. The ghostly halo around the cigarette butts added a sense of nightmarish endings.


I will conclude with a more pleasing example of my double exposures. I hear you saying, "Yes, please!" 

My last example is a little departure from my more traditional way of creating double exposures. The steps are basically the same, with one exception: Instead of taking the first image out of focus, I literally swirled my camera around a grouping of purple-colored flowers, then walked around until I saw a butterfly whose colors would complement the first blurred image. When I found the right butterfly, I then simply followed Step 4 above--underexposed the butterfly by 2/3 stop. And, voila!!! 


You can find more examples of my double exposures in my new book, RIGHT BRAIN PHOTOGRAPHY (Be an artist first). Contact me for your personal signed copy.

Have fun with double exposures. Do not be afraid to experiment. Allow yourself a little
imperfection--just flow with it. It's mentally and spiritually emancipating.  


www.elivega.net     vegaphotoart@gmail.com


Tuesday, July 18, 2017

BE YOUR COMPETITION'S COMPETITION


In one of the many classes I teach, I talk about being your competition's competition. 

I learned this valuable lesson when I was first learning photography: If you want to stand out, either, A) Photograph something nobody else has, or B) Photograph the same subject(s), but differently. In addition to this, I say, either do what others are not willing to do or don't do.

I'll start with this example. There is a popular natural arch in southern Utah with which thousands, if not millions, of photographers are familiar. It's called Mesa Arch, in Canyonlands. The magic of this arch is that it gives off this brilliant, surreal red/orange glow in early morning.
There are thousands of examples of this on the Internet. Just this one link alone will give you an idea.

When I want to photograph a commonly photographed subject, I do some research. When I researched Mesa Arch, I was looking, not only for what had already been done, but what had not been done. I saw many early morning, red/orange kinds of shots. I also saw one composite of the arch and the Milky Way which I thought was pretty cool. 

In 2014 I decided to do something different. I picked December as the month to go, hoping for snow-covered peaks on the La Sal mountains in the distance. My other decision was to photograph it at twilight, a few minutes after sunset, to pick up dark blues in the sky. My third decision was to do something else I had not seen: "paint" the arch.


I posted it on my Facebook page and someone commented that it looked like he was looking at the scene from inside an eyeball, comparing it to Salvador Dalí.


This next example is from my "Ghost of the Crescent" series. There is a beautiful and notorious Hotel in Eureka Springs, Arkansas--The Crescent Hotel. It has a reputation in some circles of being the most haunted hotel in America. 

It was that reputation that gave me an idea. I had only lived in Eureka Springs for a month before coming up with the idea. I commissioned the help of a woman I had met at a local gift shop to serve as my "ghost" model. We spent a couple of hours creating several images both inside and outside the hotel. For this shot, I first demonstrated for her what I wanted. I then gave her clear instructions: When I say "now," you just start walking slowly up the stairs. Don't look at me; just look up as you're walking. Click. I got my "ghost" during an eight-second exposure.   


I was in the whirlpool in my apartment complex in Colorado talking to an avid hiker. During our chat, I told him I was a photographer. He excitedly said, "Man, if you're a photographer, you've gotta check out Lone Eagle Peak!" He got my attention. I checked it out a couple of weeks later. 


So, how does this fit into my message? Well, first, it is a very unique peak, even for Colorado. Secondly, it is a 15-mile hike, round trip. Whew! Would you take a 15-mile hike, up to 10,000+ feet in elevation, just to "take a picture?" 

I went on-line before I went there and all I found were phone camera pics of Lone Eagle Peak taken by hikers. When I sent this image to one of my clients who produces calendars, she immediately responded with a Yes-- she had never heard of, much less seen photos of, Lone Eagle Peak. 


Garden of The Gods, in Colorado Springs, Colorado, was picked as the #2 best city park in the world a few years ago. The photos on this site will give you an idea as to why it's so popular.

Do what others do not do. I had never seen the Garden of The Gods photographed at night. If you ask any photographer why they have not done so, they will quickly reply with, "Why?" This is why.


This image of Garden of The Gods at night, is the cover of my new book, RIGHT BRAIN PHOTOGRAPHY, now in its third edition. This was a 5-minute exposure, about ten minutes after sunset. Like Mesa Arch, I "painted' the two formations in the foreground. With a 5-minute exposure, sensors and film pick up color in the sky not visible to the naked eye. it was pitch black that evening.

Here is another example from Garden of The Gods.This was a 3-minute exposure.


Do what others are not willing to do. It has been my observation that a lot of photographers do not feel comfortable asking people if they can photograph their property. I love talking to people, and I don't hesitate asking. The worst that can happen is they won't let me. If I ask, I might get some great photos; if I don't, I won't.  

There is this really cool museum along Highway 68 in New Mexico. I stopped, then walked inside to check it out. Can you say, OMG? The place had thousands of items, collectibles, and memorabilia that covered the 1930s, 1940s, and 1950s. I didn't hesitate to ask the owner if I could "take some pictures." I think he was honored that I was interested.

So, my message here is that a lot of photographers feel uncomfortable asking permission to photograph people's property. I'm glad I asked. Some of my favorite images in my collection were created because I asked permission.


I first heard about Rancho de Taos church in Taos, New Mexico when I was learning photography in Texas, in the late 1980s. I was fascinated with what I saw, with private lingering thoughts of, "Someday....." I later saw a photograph of the church taken by Ansel Adams. Years later I also saw a painting of it by Georgia O'Keeffe. 

Well, I finally got my chance several years later to see what I could do with it. And I did. I have several images of the church in my collection, taken from all angles. However, during my third visit to Taos, I wondered what else I could do with it---something I hadn't seen; something even I had not done before. 


So, I decided to try photographing, not the entire San Francisco de Así church, but only part of it, at night, with the stars flickering in the dark Taos sky. I converted the original to a B&W.


When you develop a mindset that you are others' competition, without being cocky about it, you start building self-confidence, and with confidence comes peace of mind, and peace of mind allows you to free yourself from whatever it is that holds you back. So, don't try to "take" pictures better that those you've seen. Create images that do not exist, that is, until you get a chance to create them! Have fun.

Contact me if you have any questions about my tip this month.


Saturday, June 24, 2017


WHY I IGNORE THE HISTOGRAM


From the moment I bought my first digital camera, I started hearing and reading about the Histogram. I capitalize it because some people think it's God.

Let's start with some left brain deductive reasoning.
1) The camera's built-in exposure (light) meter is designed to give us the so-called "correct"
    
exposure. A Wikepedia definition reads: "A light meter is a device used to measure the
    amount of light. In 
photography, a light meter is used to determine the proper exposure
    for a photograph."
2) I don't trust nor rely on the built-in light meter to give me what I want. It is not trustworthy. 
3) It is the built-in light meter that drives the Histogram.
    Therefore,


4) If I don't trust or rely on the built-in light meter, why should I trust or rely on the
    histogram? 
I don't. That's why I have it turned off. 
I took a very simple test to show the correlation between the built-in light meter and the histogram. This first photo was taken with the camera's metering mode set on "Matrix metering."

When I looked at the histogram, it was heavily skewed toward the left (dark) side. In other words, it told me the image had to many dark areas and not enough light areas. It wasn't technically balanced between darks and lights, i.e., it wasn't the best exposure.


I then photographed the same scene, but this time with the camera's metering mode set on "Center Weighted." 


The camera's histogram was much happier with this exposure--it was more toward the center, with more showing on the right (light side) and less on left (dark side).

I didn't show these two examples to ask you which one you like best, but to illustrate that
there is a direct correlation between the histogram and the built-in light meter.


Now that I have set the stage, let me share several images I have created which, if I had listened to the histogram, it would have yelled in disappointment, "Dude, you're way off." 

I will now share several examples of when I ignored the histogram. I can't show "Before" examples because, well, I didn't care about them. I can tell you this--the distribution of brights and darks was significantly skewed in each, much to the dismay of the histogram. In other words, none of these images are "correct," according to the histogram.


Exposure:  -1.3
This is like changing the shutter speed from 1/250 ("correct" exposure) to 1/640 ("right) exposure


 Exposure: -2.3 (Really!)


Exposure: - 2.3


The following examples are just the opposite. The histogram would be yelling out that
I had too many bright areas (right side of the histogram)--way off! Really?


Exposure: + 1.7


Exposure: + 2


Exposure: + 2


The theme of this blog is not just about the technical, or left brain, side of photography. It is also about one of my many mantras: I don't see with my eyes. I see with my imagination. I do not try to replicate, or even improve, what my eyes see, but to make it different. 

So, don't let the histogram control you. Create what you want, not what it thinks you need. Don't be afraid to over or under expose by as much as +3 or -3!! Have fun with it. Be an artist first.

Feel free to contact me if you would like a 1-on-1 lesson on this topic.


Friday, May 26, 2017

SURREALISM THROUGH PHOTOGRAPHY

Not everyone is crazy about Salvador Dalí; about surrealism. But, we can see a piece of art, not understand or connect with it, but still appreciate its value. For example, I don't like some of Salvador Dalí's art, but I definitely appreciate his creativity and the imagination that went into creating those pieces.

Let's start with an operational definition, so we can all be on the same plane. When it comes to surrealism, we may find any or all of the following characteristics in a painting or photo- graphic image:

*The juxtaposition of things, elements, objects we don't normally associate with each other
*Element of surprise, or even shock
*Word association anomalies
*Perplexing
*Ambiguity
*Incongruity
*Mind bending

Check out this painting by Dalí himself. How many of the above characteristics do you see?

As an art major in college, surrealism made an impression on me. That impression eventually caught up with my photography. I can't help but see life around me and notice how much surrealism there is! Some is already there--I just need to see it; some quickly jumps out at me; some of it I have to create from what my imagination sees. I'll start with this example. I include this in my new book, RIGHT BRAIN PHOTOGRAPHY.   


I talk about this in my book. Stay with me. 

I was in New Orleans. I saw this pantomime across the street. He quickly grabbed my attention. I took a few shots, but there was something missing. I turned around and there was an artist painting old southern theme paintings, like post-slavery blacks picking cotton in the south. That too grabbed my attention. I asked the artist politely if I could photograph one of her paintings on shale, to which she kindly obliged. 

My idea was to superimposed the street performer over one of the artist's paintings, through in-camera double exposure. I photographed her painting horizontally, the photographed him vertically. This is where my imagination took me--the end result. If you look at the image below this one, you can see the artist's painting on a piece of shale.  

Can you see the share croppers picking cotton, their living quarters, and cotton?


Fish in the water, a tiger, a waterfall, and windows--not items we normally expect to see in the same scene. Leaving myself totally open to anything really helped to see this image. There was an aquarium, in the Denver Aquarium. built under an enclosure that housed two tigers. At this angle, it looks a composite of two totally different images.It looks odd, weird, different, and....well, surreal. 


I am extremely familiar and fond of the famous painting American Gothic. But this?
I saw this giant sculpture in Chicago. Instead of a barn in the background, there are skyscrapers behind the farming couple!! Say what? The original sculpture was huge, about two stories high, but I cropped it in camera in order to match the original painting. She's looking at him as if saying, "Did we take the wrong turn George?" 

The materials from which the sculpture was made, contrasted against the materials of the skyscrapers, gives the scene a surprising feel. I could see where someone might think that  I photographed the couple, then photographed the building, then manipulated both images to look like this. No, it was just surrealism waiting for me.

If you're not familiar with American Gothic, the painting, go
here. 


I shared this one before in a previous blog when I talked about painting with light. I include it here because it is also surreal--you don't expect to see natural formations lit up. In case you missed my earlier blog, let me walk you through how I created this one.

First, it starts with the notion of "seeing with your imagination," which I talk about in my book. What I envisioned was to photograph Garden of The Gods in Colorado Springs, Colorado at night! Most people would ask, "Why?" This is why. It was 15-20 minutes after sunset. The sky was dark. I had to use flashlights for me and my assistant to see what we were doing. I use simple large off-road emergency flashlights.

I created this in three steps: 1) I always determine my composition first. 2) I set my camera on BULB, at an f/stop of f/16. 3) I told my assistant, "I'm going to walk down this path and paint the pathway. Tell me when you can't see the light anymore." He did. I then walked back and stood near my camera. When it's that dark (believe me, it was dark!), the sensor does not register/record dark object movements. 4) With my camera shutter still open (set on BULB), I then "painted" the formation on the left, carefully outlining the side of it. I then asked my assistant to release the shutter. 

The total exposure time was two minutes and ten seconds. My "painting" image creations range from twenty seconds to five minutes. You need time for the light painting to register on the sensor or film.  


Probably my most Dalí-ish technique is to photograph a subject, knowing in advance that I am going to display or show it "upside down." I have done this several times. Nobody has ever guessed that they're upside down. When I tell them, a common response is something like, "Oh my God!." When I saw the rocks in the lake portion of this scene, I knew it would look surreal upside down. 


Although this last example was created using the same technique as above, it's not as bizarre. Most folks just think I manipulated the image using some sort of filter in photo editing software. Nope. I just knew it was going to work "upside down." In order to make sure I got this effect, I used a fast shutter speed--1/320. 


The best way to appreciate surrealism in the photography genre is to think art, not photography. To do otherwise is to expect what we are used to seeing in our daily lives. 

So, go out there and explore, experiment, and take yourself out of your comfort zone. Don't think linear--have fun!

e-mail me if you would like more information on how I create surrealism through photography. 


Wednesday, April 19, 2017

SHOOTING AGAINST THE SUN


Why would anyone want to do that? All the books we read and almost anyone we talk to will warn us against doing that! Well, let's rethink that notion.

I don't like to simply photograph what my eyes see, even if I am totally satisfied with the results. Do I do that? Yes, of course, we all do that. However, I do not want to limit myself. To do so would be like going into a recording studio to record thirteen songs and they all have the same beat, cadence, and sound. I like to mix it up as i go along, and that includes shooting against the sun. 

One of the biggest concerns for most people is that we might pick up some nasty flare--those weird odd colored shapes in our images. Those can either be fixed through photo editing, or I leave them in for added drama and mystery. Imperfections sometimes make for the perfect look, feel, or interpretation.

Here are a few examples of what I love to do sometimes.


It was just barely after sunrise at the Colorado Railroad Museum in Golden. I walked around looking for something to do with the rising sun, when I saw it peak out of one of the windows of the caboose--yes!

The sun can add interest and intrigue to an otherwise common or mundane scene.
It's the exclamation point to an already good scene. Note what it did to the trees
as well.  


My goal one morning was to get a good early sunrise shot of the Fort Worth, Texas skyline, as I walked along the bed of a dried up creek. I always look behind me periodically, to make sure I'm not missing anything. I'm glad I did that morning. I created "Morning Has Broken" that morning. I used an FLD filter to get this mood. 


Driving east one early morning along the northwest Arkansas Ozarks, I saw the sun coming up. I just had to stop. It was a cool foggy morning when I saw the sun and the fog-covered valley. For larger light sources, like the sun, I use small f/stops in order to get the sun burst. I used f/25 that morning---not because I needed it for my depth-of-field, but to get the sun burst. 


That was my day for sun bursts. That same morning I saw this! The placement of the sun, within the composition is key. If I place it off to the side or near the corners (Rule of Thirds), it gives me more room to play with, in terms of my overall composition.

I switched my White Balance to Florescent to get this nice moody blue feel to the scene.
I did the same to the scene above.  


Usually, I like to hide the strong sun behind something, like a building, or trees as I did for this autumn scene in Colorado.


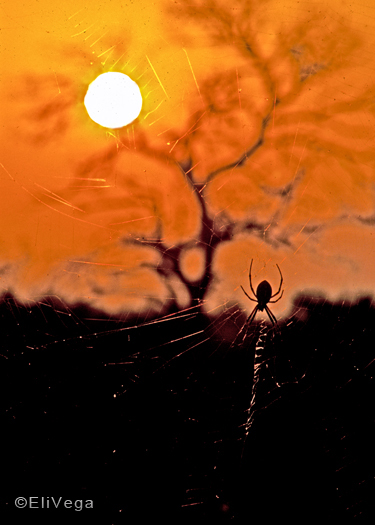
This is probably the most dramatic image I have created while shooting against the sun. A total silhouette of everything, including the spider and its web. A note of caution here: Never look directly at the sun. You can usually get a feel for where it is, more or less, as you look at the rest of the scene. In this case, I kept my eyes on the spider and the tree, knowing that the sun was somewhere near the tree on the upper left--again, the Rule of Thirds.


So, as you can see, we can take advantage of the sun and use it to add to our compositions and our interpretations of life. It's not our enemy, but rather our creative aesthetics ally.

Go out there and experiment, test it out, and loosen up. You don't have to try to be perfect, but be perfect at trying. E-mail me if you have any questions or would like a 1-on-1 field lesson.