Friday, May 26, 2017

SURREALISM THROUGH PHOTOGRAPHY

Not everyone is crazy about Salvador Dalí; about surrealism. But, we can see a piece of art, not understand or connect with it, but still appreciate its value. For example, I don't like some of Salvador Dalí's art, but I definitely appreciate his creativity and the imagination that went into creating those pieces.

Let's start with an operational definition, so we can all be on the same plane. When it comes to surrealism, we may find any or all of the following characteristics in a painting or photo- graphic image:

*The juxtaposition of things, elements, objects we don't normally associate with each other
*Element of surprise, or even shock
*Word association anomalies
*Perplexing
*Ambiguity
*Incongruity
*Mind bending

Check out this painting by Dalí himself. How many of the above characteristics do you see?

As an art major in college, surrealism made an impression on me. That impression eventually caught up with my photography. I can't help but see life around me and notice how much surrealism there is! Some is already there--I just need to see it; some quickly jumps out at me; some of it I have to create from what my imagination sees. I'll start with this example. I include this in my new book, RIGHT BRAIN PHOTOGRAPHY.   


I talk about this in my book. Stay with me. 

I was in New Orleans. I saw this pantomime across the street. He quickly grabbed my attention. I took a few shots, but there was something missing. I turned around and there was an artist painting old southern theme paintings, like post-slavery blacks picking cotton in the south. That too grabbed my attention. I asked the artist politely if I could photograph one of her paintings on shale, to which she kindly obliged. 

My idea was to superimposed the street performer over one of the artist's paintings, through in-camera double exposure. I photographed her painting horizontally, the photographed him vertically. This is where my imagination took me--the end result. If you look at the image below this one, you can see the artist's painting on a piece of shale.  

Can you see the share croppers picking cotton, their living quarters, and cotton?


Fish in the water, a tiger, a waterfall, and windows--not items we normally expect to see in the same scene. Leaving myself totally open to anything really helped to see this image. There was an aquarium, in the Denver Aquarium. built under an enclosure that housed two tigers. At this angle, it looks a composite of two totally different images.It looks odd, weird, different, and....well, surreal. 


I am extremely familiar and fond of the famous painting American Gothic. But this?
I saw this giant sculpture in Chicago. Instead of a barn in the background, there are skyscrapers behind the farming couple!! Say what? The original sculpture was huge, about two stories high, but I cropped it in camera in order to match the original painting. She's looking at him as if saying, "Did we take the wrong turn George?" 

The materials from which the sculpture was made, contrasted against the materials of the skyscrapers, gives the scene a surprising feel. I could see where someone might think that  I photographed the couple, then photographed the building, then manipulated both images to look like this. No, it was just surrealism waiting for me.

If you're not familiar with American Gothic, the painting, go
here. 


I shared this one before in a previous blog when I talked about painting with light. I include it here because it is also surreal--you don't expect to see natural formations lit up. In case you missed my earlier blog, let me walk you through how I created this one.

First, it starts with the notion of "seeing with your imagination," which I talk about in my book. What I envisioned was to photograph Garden of The Gods in Colorado Springs, Colorado at night! Most people would ask, "Why?" This is why. It was 15-20 minutes after sunset. The sky was dark. I had to use flashlights for me and my assistant to see what we were doing. I use simple large off-road emergency flashlights.

I created this in three steps: 1) I always determine my composition first. 2) I set my camera on BULB, at an f/stop of f/16. 3) I told my assistant, "I'm going to walk down this path and paint the pathway. Tell me when you can't see the light anymore." He did. I then walked back and stood near my camera. When it's that dark (believe me, it was dark!), the sensor does not register/record dark object movements. 4) With my camera shutter still open (set on BULB), I then "painted" the formation on the left, carefully outlining the side of it. I then asked my assistant to release the shutter. 

The total exposure time was two minutes and ten seconds. My "painting" image creations range from twenty seconds to five minutes. You need time for the light painting to register on the sensor or film.  


Probably my most Dalí-ish technique is to photograph a subject, knowing in advance that I am going to display or show it "upside down." I have done this several times. Nobody has ever guessed that they're upside down. When I tell them, a common response is something like, "Oh my God!." When I saw the rocks in the lake portion of this scene, I knew it would look surreal upside down. 


Although this last example was created using the same technique as above, it's not as bizarre. Most folks just think I manipulated the image using some sort of filter in photo editing software. Nope. I just knew it was going to work "upside down." In order to make sure I got this effect, I used a fast shutter speed--1/320. 


The best way to appreciate surrealism in the photography genre is to think art, not photography. To do otherwise is to expect what we are used to seeing in our daily lives. 

So, go out there and explore, experiment, and take yourself out of your comfort zone. Don't think linear--have fun!

e-mail me if you would like more information on how I create surrealism through photography. 


Wednesday, April 19, 2017

SHOOTING AGAINST THE SUN


Why would anyone want to do that? All the books we read and almost anyone we talk to will warn us against doing that! Well, let's rethink that notion.

I don't like to simply photograph what my eyes see, even if I am totally satisfied with the results. Do I do that? Yes, of course, we all do that. However, I do not want to limit myself. To do so would be like going into a recording studio to record thirteen songs and they all have the same beat, cadence, and sound. I like to mix it up as i go along, and that includes shooting against the sun. 

One of the biggest concerns for most people is that we might pick up some nasty flare--those weird odd colored shapes in our images. Those can either be fixed through photo editing, or I leave them in for added drama and mystery. Imperfections sometimes make for the perfect look, feel, or interpretation.

Here are a few examples of what I love to do sometimes.


It was just barely after sunrise at the Colorado Railroad Museum in Golden. I walked around looking for something to do with the rising sun, when I saw it peak out of one of the windows of the caboose--yes!

The sun can add interest and intrigue to an otherwise common or mundane scene.
It's the exclamation point to an already good scene. Note what it did to the trees
as well.  


My goal one morning was to get a good early sunrise shot of the Fort Worth, Texas skyline, as I walked along the bed of a dried up creek. I always look behind me periodically, to make sure I'm not missing anything. I'm glad I did that morning. I created "Morning Has Broken" that morning. I used an FLD filter to get this mood. 


Driving east one early morning along the northwest Arkansas Ozarks, I saw the sun coming up. I just had to stop. It was a cool foggy morning when I saw the sun and the fog-covered valley. For larger light sources, like the sun, I use small f/stops in order to get the sun burst. I used f/25 that morning---not because I needed it for my depth-of-field, but to get the sun burst. 


That was my day for sun bursts. That same morning I saw this! The placement of the sun, within the composition is key. If I place it off to the side or near the corners (Rule of Thirds), it gives me more room to play with, in terms of my overall composition.

I switched my White Balance to Florescent to get this nice moody blue feel to the scene.
I did the same to the scene above.  


Usually, I like to hide the strong sun behind something, like a building, or trees as I did for this autumn scene in Colorado.


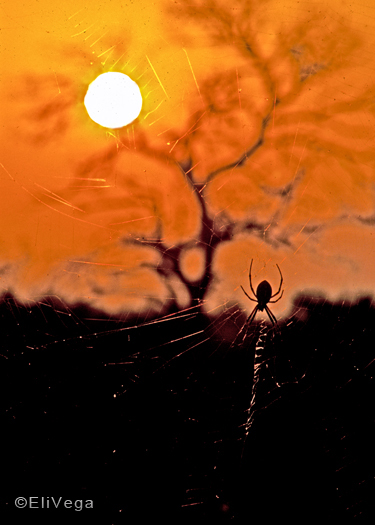
This is probably the most dramatic image I have created while shooting against the sun. A total silhouette of everything, including the spider and its web. A note of caution here: Never look directly at the sun. You can usually get a feel for where it is, more or less, as you look at the rest of the scene. In this case, I kept my eyes on the spider and the tree, knowing that the sun was somewhere near the tree on the upper left--again, the Rule of Thirds.


So, as you can see, we can take advantage of the sun and use it to add to our compositions and our interpretations of life. It's not our enemy, but rather our creative aesthetics ally.

Go out there and experiment, test it out, and loosen up. You don't have to try to be perfect, but be perfect at trying. E-mail me if you have any questions or would like a 1-on-1 field lesson. 

Wednesday, March 22, 2017


FLORA PHOTOGRAPHY


I thoroughly enjoy nature and landscape photography, but I never pass on a good opportunity to photograph flora--flowers, plants, fungi, etc. In most cases I do not try to document what my eyes see, even if I can make it look better than what my eyes saw through photo editing. What I do prefer is to see what I can make it look like, in camera, then fine-tune it later. 

Nature's shapes, colors, and designs elicit mood, feelings, awe, and even art. I try to reflect that through my photography, depending on what "moves" me at the moment.

My right brain kicks things off then shakes hands with my left brain and says, "I've got an idea, and this is what I need from you." What I need depends on what I want to create. And I satisfy my needs through various techniques, which I will mention below. Sometimes, when  the subject itself has inherent artistic value, I respect it, thank it, and go "click." 

Now that I've introduced my tip of the month, I will now share several examples.


Double exposures is my most common technique when photographing flowers. Not all flowers or groupings are conducive to double exposures. It's not science,  but rather a feeling I get, based on composition, colors, shapes, and the lighting at the time. All factors fell into place for me for this first example.  

What I did for this image is the most common double exposure technique I use. My #1 step, always, is composition--what is going to be included within the four corners of my viewfinder, and how? Using manual focus (not manual exposure), I first set a wide, or small number, f/stop and focus so that everything is slightly out of focus. I take a test shot--making sure it's not too out of focus, and testing for exposure. If either is not right, I delete, make proper adjustments, and try again. Once it's right, I then engage my multiple exposure feature and take my first out of focus image. I then refocus, change my f/stop to a higher number, and under-expose my second shot usually by 2/3 of a stop. Click, and voila!! Oh, and remember, there are no right angles in nature, meaning I often tilt my camera to improve my compositions.                                  


One of my favorite props for flowers is a large non-reflective piece of black material which  
I use as a backdrop. It does a great job at giving florals a studio-like feel, even when shot outdoors in the middle of the day. Try it!    


Spot metering. If you have never tried it, you have been missing out! I learned this during film days. Why spend an hour (or more) in photo editing software when you can get creative in the field? For this image, spot metering right on those bright colors changed the metering by -3 stops! Yes, minus three stops. Because of the wide range of colors between the flowers and the background, it worked perfectly. This is one way of converting backgrounds into backdrops.   


Sometimes the scene itself is so awesome that all I need to do is get the best composition of what nature provides me. I shot straight down at the boulder covered with leaves, branches, and lichen. Rain from the day before had collected in a small indention in the boulder, which added to my composition. 


Another prop I use is my round 32" diffuser. I usually use it as a backdrop. When I saw this grouping, the background was too busy for me. The flowers in the background were competing with these three beauties for attention. What to do? I simply placed my diffuser behind the three, touching up against the ones in the background. Because the diffuser is translucent, the background flowers were, well, diffused. They complemented the foreground rather than compete against it. 


Here is yet another application for diffusers. It was a terrible extremely bright sunny day. There were harsh shadows everywhere and the range between lights and darks was a nightmare. Solution? No, not HDR. I simply placed my diffuser between the harsh sun and the lily and lily pads. Problem solved. Solutions don't have to be extreme, just well thought out.  


These last two techniques are not for everyone. These get into the artistically surreal realm. Some folks like it; some don't. In either case, loosen up and just have fun with it!

The first one I call "swirling." Not everyone has an equally easy time with this. It takes a lot of focused hand-eye coordination. What I do, after I get a good composition, is take my camera off the tripod and hold it on the palm of my left hand. It doesn't have to be the left hand--it just works better for me. During a slow exposure (1/4-1/20 of a second), I smoothly pivot the camera clock-wise or counter clock-wise, swirling my left wrist. It usually takes 2-4 times until I get it right.


I will leave you with one more fun technique. It is a technique that an artist might apply on canvas for a surreal effect. Zooming. You can zoom in or zoom out. Experiment and see which one works for you. As a general rule of thumb, I try to use shutter speeds of 1/4 to 1/20 of a second, to give me enough time to zoom during the exposure. And this is but one effect you can get. Have fun. 


I have also placed materials like thin plexiglass in front of flowers to create artistic results.
Now that I have shared several techniques, I urge you to go out and try them all. After several attempts, you will decide which ones work best for you. As the saying goes, "If you always do what you've always done, you will always get what you've always gotten." 
  

Saturday, February 4, 2017

PEOPLE PHOTOGRAPHY


I do not consider myself a portrait photographer. However, I do occasionally photograph people. I am drawn to people with a unique persona---perplexing, intriguing, surreal, mysterious.

People usually know in advance before I aim my camera at them. Sometimes I ask them to look at my camera; sometimes I ask them to continue doing what they were doing. I call what I do "people photography" because it might be a photo of a person, or small group of people. Studio portraits don't excite me much. That's why my people images are       environmental, that is, they are photos of people in a comfortable environment, be it a public setting or in their homes.

For this month, I will share how I set up my shots, and how I approach folks, such as when
I cautiously approached this stranger in his private home. This is John. Let me set the scene.

This is a building I saw while driving in the middle of Arkansas. I think you would agree that it looks abandoned. I did. The surreal building really got my attention. I looked for vehicles, for life, so I could ask permission to start shooting. Not a soul in sight, so I set up my equipment. The most intriguing parts of the building were the strangely placed windows near the roof. 


 After a few minutes of shooting, I took my eye away from the camera and just stared at the building, wondering who used to live there, why they had added those windows, and what that large piece of black plastic was covering up. Lots of questions floating through my head. When I was done and put up my equipment, I walked toward the building to get a better look at the oddities that served as its facade. When I got about ten feet from it I heard faint music. I looked around, looking for the source of the music. As I got closer, it hit me--the music was coming from inside the building! I ignored all common sense and decided to gently knock on the door. "Come in," I heard a man say in the deepest and scariest of voices. I knocked again, not sure of what I had heard. "Come in." I slowly opened the door, fearing that I would hear the sound of a shot gun being cocked. 


I opened the door slowly, with thoughts of my last day on earth ringing in my head. And this is what I saw.


I introduced myself and told the man I was a photographer, and that I had found his house interesting. "I hope you don't mind, but I was just taking pictures of your house outside." He said his name was John, and, no he didn't mind. We talked for a long time. I will share the abbreviated version of our long conversation. John said his wife lived in the house next door. It kept them from fighting, he said.

The building and the grounds were at one time home to a 1960s Hippy commune. Could that explain the strange windows? 


After more casual conversation, I took a chance and told John that I found him very interesting and that, if he didn't mind, I'd like to take a picture of him. "Like this?" he asked, as he pulled the sheets and pillow up to his bare chest. "Sure," I said, "That's okay."
As luck would have it, there was a window behind me, as I set up my tripod low to the floor. The window provided great diffused lighting into the room, which provided nice even lighting on John.


The time I spent getting to know John was critical. I felt more relaxed with him, and he trusted me enough to allow me to photograph him. If I had moved too fast for the sake of taking a picture, it would not have happened. I would not have this image in m collection. 
I even have his signed model release!! 

=========================================

I was driving downtown Denver, Colorado. Something silver walking on two feet caught my attention. I looked to my right and I saw a man in silver walking down the side walk. I wasted no time. I parked and put coins in a parking meter, grabbed my gear, and ran to find him. Almost out of breath, I finally caught up with him, as he stood in front of a small low-end jewelry store. I introduced myself as a photographer. The first thing I said was, "Man, I love your art! I think it's so cool. Tell about it." He didn't hesitate. He talked fast. He was a street performer. His specialty was defying gravity, and the silver was his street persona. His "stage" name is JAMBOT. 

After several minutes of chatting, I asked him if he would mind if I took his picture--I always use that language; words the general public uses. JAMBOT was a street hustler. He quickly responded, "What's in it for me?" "I don't know. What did you have in mind?" I asked. "50 dollahs," he quickly responded with an accent. "No, I can't afford that, I told him. "I tell you what. If you sign a model release (I explained what that was), I'll give you $10.00." He agreed and I started shooting. 

It just so happened that the awning he stood under was painted red. When I pointed my camera at him, I noticed that he was red and silver--his face reflecting the hues of the red awning! I continued shooting. Then, we shook hands and the shoot was over. 

Let me insert an editorial comment here. In my new book, Right Brain Photography, I talk about how the concept of "impermanence" applies to photography. That opportunity of catching up with JAMBOT does not happen often. It does not last forever. I didn't see JAMBOT downtown Denver after that encounter. The message behind "impermanence" is:. 

Take it now. Do it now. We might not have that chance again. The moment will be gone; it is not a permanent moment. The result of applying "impermanence" is that, over the long run, we will accumulate one-of-a-kind images.


=========================================

I was downtown Fort Worth, Texas. An apparent homeless man got my attention. I went up to him and we started making idle chit chat. I just happened to have my camera with me. As I always do, I asked him if he'd mind if I take his picture? He ran his fingers through his white hair and said, "I'm not ready...." I told him not to worry about it. He asked me what 
I wanted him to do. I said, "Think about whatever it is in your life that makes you smile." He looked away with a pensive look on his face and said, "My daughter. I don't get to see her much." Click. I got my shot the instant he finished his sentence.

I call this image "Nowhere Man." It's the weathered look and his distant glance that make this image. He's looking at me, but he's not.


=========================================

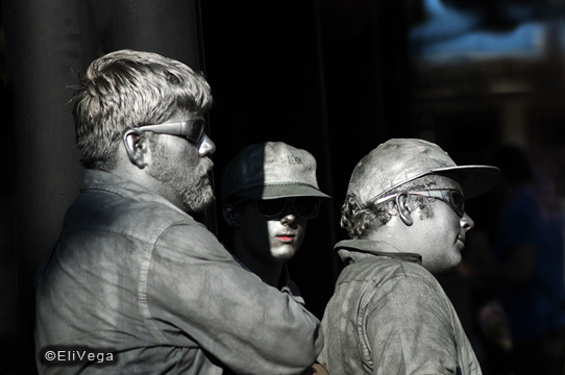
These guys were street performers on Pearl Street Mall in Boulder, Colorado. They actually weren't performing; they just stood there, quietly, without moving. The middle skinny guy must have sensed me. He turned and took a quick glance at me as he moved out of the shadows. When he saw me, he quickly moved back into the shadows. I photographed him the second his face was in the sun. Am I that fast? No. What I do with scenarios like this one is, 1) Aim my camera at the action, the three guys in this case; 2) Take a test shot and make any exposure adjustments(using my exposure compensation dial); 3) Aim my camera again, keeping my finger on the shutter button; 4) Then, when something happens, I am totally ready to grab the shot. I did just that when the middle guy looked at me. It's not about luck. It's planning, anticipation, and quick reflexes.


=========================================

This last example was also created on Pearl Street Mall--a place that for several years has served as a great place to photograph people. I will show you the image first before I explain how I was able to get this Rembrandt-like image of Michael.


As I always do when I walk along Pearl Street Mall, I was looking for that something special; unique; out of the ordinary. When I saw Michael, the scenario met my criteria. I don't remember if he was reading the paper or doing a crossword puzzle, but he seemed intently focused. Even though I was standing right in front of him, he didn't notice me. I walked around, tactfully got his attention, and introduced myself. As I always do, I told him I was a photographer and that I found him extremely interesting. "Would you mind if I take your picture?" "No, not at all. What do you want me to do? he asked. "Oh, just keep doing what you were doing...." 

I walked outside and set up my tripod and photographed Michael through a window. There was an awning that covered both of us, so the lighting was softly diffused. The only details that stood out were his face, beard, hand, and glasses. When I finished, Michael kept doing what he was doing, inside a Starbucks.

=========================================

As you can see, I don't ask people to smile as they look at me. I prefer that candid feel to my people images. I want my images to reflect who they are, not who or what they think
I want. Discretion, tact, patience, and respect are my guiding principles when I approach strangers. 
I have yet had anyone say, "Get the hell out of my face." 

The most difficult part of all this is having the gumption to approach strangers. There is that fear factor; that fear of being rejected--or worse. Here is what helps me. I learned this lesson years ago: If you ask, you might get it. If you don't, you won't.

So, go out and meet people. After all, we're in this world together. Have fun! 

Ask me anything at www.elivega.net   


Friday, January 20, 2017


SUPER SEIZE ME 

I picked this title for my tip of the month as a play on words. No, this is not a commercial for a fast food place.

I've noticed that, especially with the advent of digital photography, we have become obsessed with creating images that are super sharp, super saturated, super HDR-ed, super everything. I have seen too many attempts at showing the bolts on a bridge, colors that look totally unreal and off the color wheel, images that seem one dimensional because every
part of the image has been "flattened" through HDR.

I am not saying we shouldn't do this. It all his its place in photography, business, and marketing. What I am saying is that we should consider adding a mix to our photography so that not every image has the same "look."


What I like to mix into my repertoire are images that elicit feelings, thoughts, mood, and sensations. My goal is not to create work that always results in perfectly executed pictures of subjects. Art is much more than producing photographs or paintings of subjects. The "wows" should not be limited to technical execution.

I always wonder if Georgia O'Keeffe's fans and followers ever asked her at a social gathering, "You are so good. You must use high quality paint brushes." 


Okay, with that introduction, let me share a few images to illustrate my points.


Early morning fog surrounding a small lake near Hot Springs, Arkansas. Sharpening details and saturating colors would have ruined the feel of this soothing and relaxing place.


The Red River separates Oklahoma from Texas at the northeast corner of Texas. Like the image above, it was very calm that morning. There was no need to lighten the exposure to get more detail in the old fishing pier wood supports or the trees--no need to disturb
the cloud of "peace." I did use an FLD filter so the colors more closely reflected what
I was feeling. My point here is the absence of saturation and sharpness.  


I call this "Watercolor Willows." Willows in winter are bare, exposing sharp and colorful branches that form tumble weed-like shapes of burgundy, orange, and yellows. Yes, I could have zoomed into them and honed in on the texture of the branches. However, the sensation I got when I looked out at them was that of watercolor paintings I used to create during my college art days. Using my photographic tools as my paint brushes, I decided to do a double exposure to create a soft "watercolor" look and feel to an otherwise contrasty and detailed subject.   


The contrast between the foreground and the background gives this image a sense of depth, and therefore adds mood/feeling to the scene. I want to walk into the deep soothing woods and relax. If I attempted to create a technically "correct" image, I would have decreased the variance between darks and lights, which would have made it more one dimensional. The end result would be an image that seemed technically "correct," but aesthetically weak.


This last example falls under the category of "Don't try this at home." I was driving down a less-traveled country road in the Ozarks of Arkansas. It was an early May morning with a thick fog hanging over the low tree-covered mountains. I saw this awesome scene and quickly decided to carefully back up to get a better composition. I then drove very slowly, about 5 mph, down the road and shot this through my windshield. I quickly discerned that, at a shutter speed of 1/13, the trees would be blurred. That's what a wanted-- a painterly mood of dark greens as the mysterious road led you to somewhere peaceful.  


So, in summary, of course sharp detail and vibrant color is essential to create great photography. But, those aren't the only characteristics or variables that can create great images. Follow your feelings, sensations, and moods, then translate them into what we call a photograph.

If you are already doing this, please continue having fun with it. If not, challenge yourself-- go against the grain. Go outside your comfort zone. Above all, have fun!!


Eli


Tuesday, December 20, 2016

SEE WITH YOUR IMAGINATION  

I share this indispensable tip in my book, RIGHT BRAIN PHOTOGRAPHY. It is also a topic on which I spend a lot of time in my workshops, classes, and during my 1-on-1 photo lessons. It is one of the most difficult aspects for many photographers to grasp. Why? Because a common reaction is, "I can only see what my eyes see. What else is there to see?" It requires a different type of "seeing;" the type that requires practice, practice, 
 and more practice. It's different than "photographic seeing."

In order to see with my imagination, I need a combination of technical know-how and creative aesthetics. My right brain (creative aesthetics) needs to shake hands with my left brain (technical know-how) and tell it, "I see something. I've got an idea, and this is what     

I need from you." However, before my right brain can tell my left brain what it needs, it needs to know what the left brain can offer. Yes, it takes practice. Two life factors have helped me with this level of photographic application: 1) My art background in college, 
and, 2) I am primarily right brain dominant.

Regardless of where you think you are in terms of right brain and left brain, you can teach yourself. I know because I have students who have struggled with it, but are now "getting it." I have seen the growth in their photography as they send me samples of their work. I have seen improvements in their compositions, exposures, and how they now "see"  things when getting a shot--their renderings.

So, this month I will provide some examples of what I mean by "see with your imagination." But, before I do, l will share a non-photography story. It is about discarding programmed ways of seeing, learning, experiencing. The story is from a book I read, titled Successful Intelligence. Two young boys are hiking. One boy, according to traditional test scores, grades, and teachers' assessments, is very smart. The other boy, not so--not the best of grade scores. As they're hiking, they see a big grizzly charging toward them. The "smart" boy makes a quick calculation and tells his friend that the bear should reach them in 17.3 seconds!  As he is saying this, he sees his friend taking off his hiking boots and putting on his jogging shoes. He yells at him, "Are you crazy? We can't outrun that bear?" His not-so-
smart friend replies, "That's true. But all I have to do is outrun you." A different way of seeing things.

Now, with this long introduction to a subject which I believe every photographer should take to heart, let's start with this first example.

This is a typical way of seeing things; a "Before" image, i.e., a generic, not so exciting scene. This is what my eyes saw.  


By Colorado standards, this was a rather mundane scene. I looked at it for several minutes.
In Right Brain Photography I talk about the method I use to go beyond seeing the obvious.

At first, I didn't see anything worthwhile. Then, my right brain kicked it. Hmm? 


From a distance, I could see some little white flowers. They were in the shallow water, close to the large boulder on the far left. At first, I saw them as just cute little white flowers. My right brain taunted me: Yes, just little white flowers, unless (AND THIS IS WHERE SEEING WITH YOUR IMAGINATION KICKS IN)......I can make them "move." Yes, that's it! I wanted to see what they would look like if I made them "move." My right brain shook hands with my left brain and said, "I've got an idea, and this is what I need....."   

So, what did I need? Four elements had to come together: 1) Tripod; 2) Telephoto lens to "reach out" to the small flowers; 3) A slow shutter speed to help me with the fourth element-- actually move my camera during exposure to create a sense of movement. I was getting ready to apply the etymology of the word p-h-o-t-o-g-r-a-p-h-y--"Painting with light."

I put my 70mm-300mm lens on the camera, set at 300mm. Set it for manual focus, and 
estimated that a 1/5 of a second would give me enough time to move my camera just enough. Shooting on Aperture Priority, I adjusted my f/stops until I saw the camera give me 1/5 shutter speed---it took f/36 to get there! (In my book I talk about the inverse relationship between f/stops and shutter speeds) I put the camera on my tripod, but loosened the head to allow me to move (swivel) my camera to get a fairly smooth movement.

I was ready. When I thought I had the right starting point composition, I slowly moved my camera laterally during a 1/5 of a second exposure. It took three tries to get what I wanted. On one try I moved too fast; on another I moved too slow. But then, v
oila!! 


The image below is pretty close to how it looked to the naked eye as I looked at the scene. My histogram would have loved it--no major light or dark areas to drive the histogram crazy; not much to worry about in terms of dynamic range. But boring. This is why my histogram is turned off. It doesn't meet my right brain purposes. 


What I "saw" was a more vibrant and dynamic scene, with colors "popping" against a dark background. So, here goes the right brain again shaking hands with the left brain.
  
The left brain is endlessly in search of the "correct exposure." After all, isn't that what the histogram is for---to warn us when we don't have it? The right brain, by contrast, is calmly looking for the "right exposure." I arrived at the right exposure by setting my exposure compensation dial to........are you ready for this? -2 2/3 underexposure! This is seeing with your imagination.


These same concepts and principles can be applied to any subject, not just nature. Let me set the scene for this next example. It was Christmas time. I heard about a place where they had different variations of the nativity scene from several countries. Among the many interesting displays, one in particular caught my imagination. It was a display of the 3 wise men and Mary carrying baby Jesus in her arms. Behind the display, on a wall panel, was a mural of Jesus carrying a cross on his lady day of life. The mural had nothing to do with the nativity scene displays. My imagination saw the odd coincidence, even surreal, of the birth of Christ and his last days on earth, at the same time; in the same image. This is what the scene looked like to my eyes, after I got my composition; my perspective.


Not satisfied with the way it looked, I decided to do some light painting. I shined my flashlight as if making quick paint brush strokes around the area of the head of Jesus. With a 3 second exposure, I knew I would have enough time to do that. I also made sure to highlight just the head area, to keep the rest of the mural in darkness. I titled it "Dawn to Dusk."


The following example is one of best I can share, in terms of the amount of "seeing" that went into it. Let's start by looking at what my eyes saw. My strong belief is that most photographers would keep walking past this scenario. It's a beautiful flower, but, my goodness, look at that distracting background; the flowers just blend into the background. Wouldn't you "pass" on this? 


When we see with our eyes, we risk the chance of losing out on a lot. This is but one example. "OK," you say, "What else is there to look at?" Look at what's not there. Look at what else you could do with this, other than what you see before you.

Let me walk you through my "seeing." There's a reason why I refer to it as "seeing with your imagination." The key is not just imagining, but sharpening your imagination. Here's what my imagination saw: Create a double exposure, against a black background. Like this.


Let's pull the curtain back and see what the wizard did. Like in the Wizard of Oz, this is not magic; it just looks like magic.
Step 1) Once I get my composition, I manually focus, with a wide f/stop (small number), take the entire grouping out of focus and underexpose by about 1 stop (the black backdrop tend to overexpose my shot). At this point, it's an estimate and I'm ready for a test shot. I set my camera on a 20-second delay. I go behind the flowers and place my large piece of black material behind them. 
I hear a click.
Step 2) I check my display to make sure it isn't too blurred nor too sharp. If 
I need to make an adjustment, I do and try it again. If I like it, I am ready for my double exposure.
Step 3) I now engage the multiple exposure feature on my camera and set it for 2 exposures. I already know my first shot is going to be good because that was my test shot. 
I depress my cable release, knowing that I have 20 seconds. I again stand behind the flowers and place my black material behind them. I hear a click. I double check my display again to make sure the shot looks like my test shot. It does. I have my first of two exposures.
Step 4) I now focus right on the entire grouping of flowers and change my f/stop to make sure I cover my subject. I underexpose my second shot, usually from -2/3 to -1. For this image, I underexposed by -1 & 2/3 because of the black background. This is art, not science. That's why I take test shots. Now I'm ready for my second shot, which will be in sharp focus.
Step 5) My camera is already set for a 20-second delay. I click with my cable release, then walk behind the flowers again and hold up the black material. I hear a click. I now check my display to see if I got what I wanted. In the example above, when I saw that image displayed on my screen, I stopped shooting. Got it!


Art is subjective. Photography is art. I say this to introduce my last examples. The first one is a straight shot, with which I was satisfied. The second one is a double exposure, using most of the same steps as the example above. I like both for different reasons. They both have those sought after autumn colors. The second one looks like a painting. Impressionistic.


Are you ready to start seeing with your imagination? Have fun with it. Loosen up. Don't think science; think art. Don't limit yourself by letting your eyes determine what you can see. 

A combination of reading and practice always helps. You can also e-mail me. I can help massage your imagination